Configure Journey Builder Access
Learning Objectives
After completing this unit, you’ll be able to:
- Define Journey Builder.
- Manage user roles and permissions.
- Explain how building a multi-channel journey is dependent on a user’s access to those channels.
Introduction
Journey Builder is Marketing Cloud Engagement’s premier campaign planning and execution tool. It’s what empowers you, a marketer, to design and automate campaigns that guide customers through a series of interactions with your brand. Journey Builder is:
- Multi-channel: Communicates seamlessly across email, SMS, push notifications, ads, landing pages, and apps so your customers get the right information in the right place.
- Responsive: Tailors the customer journey based on real-time events like purchases, mobile app downloads, reading an email, or closed service cases.
- Adaptive: Continually adjusts customers’ paths based on their current or predicted behavior.
At Journey Builder’s foundation is the customer journey, which is a series of steps your customer goes through during a particular interaction with your organization. Interactions can include: clicking an ad, reading an email, making a purchase, returning an item in the store, talking to a service agent on the phone, downloading a whitepaper, or redeeming a coupon. If you haven’t already done so, learn more about the connected customer, the importance of personalized customer journeys, and developing a more generalized journey strategy by checking out the Customer Journey Basics module. This video also gives you some quick insight into how Journey Builder functions.
Before You Start
Before you can use this tool, make sure your Marketing Cloud Engagement account is provisioned to use Journey Builder. If you need help, contact your Marketing Cloud Engagement account executive for more information.
In this module, we assume you are a Marketing Cloud Engagement administrator with access to Journey Builder. If you’re not an administrator for Marketing Cloud Engagement, that’s OK. Read along to learn how your administrator would take the steps in a production org. Don’t try to follow these steps in your Trailhead Playground. Marketing Cloud Engagement isn’t available in the Trailhead Playground.
Overview of the Setup Tab
This is where you, awesome admin that you are, set up and configure components that marketers can start using right away to create and manage meaningful multi-channel customer journeys.
Determine Roles and Permissions
To set permissions, let’s take a look at general account settings. There are two kinds of access: roles and permissions.
Roles are based on the type of user and the tasks they’ll be completing, such as importing data, assigning user permissions, or deleting events or contacts. Marketing Cloud Engagement admins can apply these roles to a single user or an entire business unit.
Marketing Cloud Engagement includes several standard user roles:
- Administrator
- Analyst
- Content Creator
- Data Manager
- Distributed Sending
- Marketing Cloud Engagement Administrator
- Marketing Cloud Engagement Channel Manager
- Marketing Cloud Engagement Content Editor/Publisher
- Marketing Cloud Engagement Security Administrator
- Marketing Cloud Engagement Viewer
Permissions control user access based on Marketing Cloud Engagement applications. You assign these settings at the application level. For example, if your creative team is completely separate from your digital marketing team, you can give users on the creative team access to Content Builder, but not to Contact Builder.
Permissions can be set to:
- Allow: User has access to the application or functionality.
- Deny: User does not have access to the application or functionality.
- Not Set: User permission for this application or functionality is not explicitly granted nor denied, but defaults to Deny.
Journey Builder Permission choices include:
- General Access, View: If this permission is allowed and Automation Create, Edit is denied, you can view Journey Builder.
- Automation Create, Edit: If this permission is allowed and General Access, View is allowed, you can create, edit, and publish journeys.
Depending on the variety of work a user performs, you might need to assign both roles and permissions. Customize permissions for roles or individuals to grant complete access to create, edit, and publish journeys; allow limited access to view journeys; or to deny access.
Provide Journey Builder Access to a User
Let’s walk through the steps to assign permissions to your Marketing Cloud Engagement users.
- Hover over Welcome [your username] and click Setup from the dropdown menu.
- Click the Users menu and select Users.
- Select the user.
- Click Manage Roles.
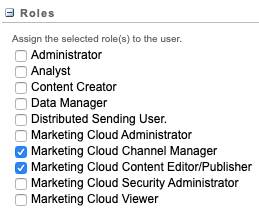
- Under Roles, click Edit Roles.
- Select Marketing Cloud Engagement Channel Manager or Marketing Cloud Engagement Content Editor/Publisher.
- Click Save.
- Click Edit Permissions and select the checkboxes next to the Journey Builder permissions to assign.
- Click Save.

Now that you have assigned roles and permissions for Journey Builder users, your marketers can begin using this powerful tool to create and manage responsive, multi-channel customer journeys.
Resources
- Salesforce Help: Journey Builder Prerequisites
- Salesforce Help: Marketing Cloud Engagement Roles
- Salesforce Help: Assign a Role to a Marketing Cloud Engagement User
- Salesforce Help: Journey Builder Roles
- Salesforce Help: Assign a Role and Permissions to a Marketing Cloud Engagement User from the Users Screen