Create a Joined Report
Learning Objectives
After completing this unit, you’ll be able to:
- Explain how joined reports can expand your view of your business.
- Create a joined report.
Expand Your Perspective
Critical business questions don’t always fit neatly into single categories. If you’re looking for a broad view across different Salesforce objects or a side-by-side comparison of data under different conditions, joined reports are the answer.
Say your sales team identifies all the hot accounts where some extra attention could have a big payoff. But first, they want to know which hot accounts also have open high-priority cases. Or suppose you want to see a side-by-side view by priority of the cases that are closed, new, and in progress.
Joined reports are flexible enough to handle these and many more questions. Before you get started with them, keep these points in mind.
- Joined reports can use a mix of standard and custom report types.
- You can add report types to a joined report if they have relationships with the same objects. For example, Opportunities and Cases both have fields in common with Accounts, so you can create a joined report with them.
Want to Get Hands-on with Joined Reports?
In this module, we show you the steps to create a joined report in Salesforce. We don’t have any hands-on challenges in this module, but if you want to follow along and try out the steps, here’s how to launch your Trailhead Playground. First, make sure you are logged in to Trailhead. Then click your user avatar in the upper-right corner of this page and select Hands-on Orgs from the dropdown. Click Launch next to the org you want to open. Or, if you want to create a new playground, click Create Playground.
Give Joined Reports a Try
- On the Reports tab, click New Report.
- Select the principal report type for the report. The principal report type controls how common fields are named, since some common fields have different names or are handled differently in different report types.
- When the report opens in the report builder, turn it into a joined report by selecting Report
 | Joined Report | Apply.
- Now that you have a joined report, add one or more blocks to it. Click Add Block, choose the report type, and click Add Block. The columns for the new block are added to the right of the first block. If you’re using different report types, each is shown using a different color code in the side panel and column headers.
- Set up columns, groups, filters, and formulas to create the view that best matches what you want to see.
- Add more blocks as needed, then save, name, and run the report.
Some Examples
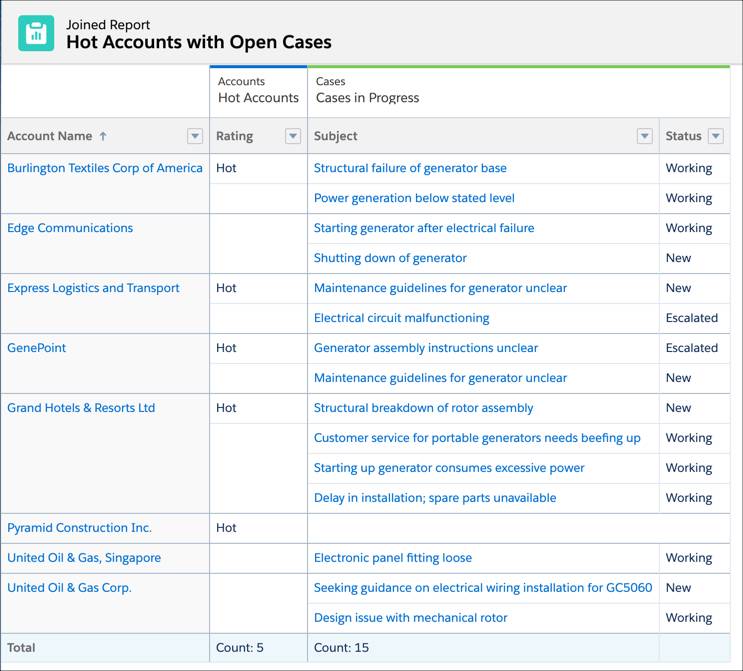
This Hot Accounts with Open Cases report combines the Account report type with the Cases report type. It’s grouped by Account Name. Accounts are filtered to show only the hot accounts, and cases are filtered to show only the open ones. You see at a glance which accounts are hot and also have open cases.
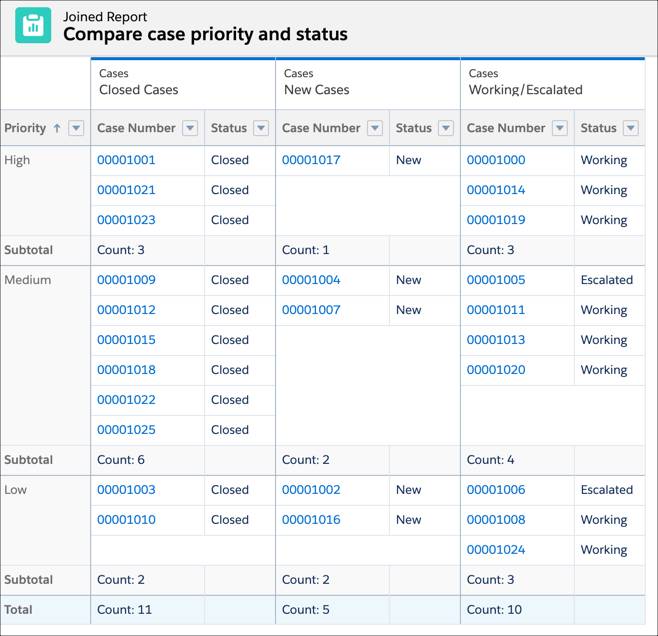
This Compare Case Priority and Status uses three blocks, each based on the Cases report type. It’s grouped by priority, and each block is filtered to show different case status: Closed, New, and Working/Escalated.
Summary
It’s easy to get started with joined reports, and there’s no limit to what you can do. Mix standard and custom report objects in up to five blocks, set up meaningful row groupings, name and apply filters to each block, and even apply summary formulas across all the blocks.
Resources