Build an Interactive Email Form
Learning Objectives
After completing this unit, you’ll be able to:
- Create an Interactive Email Form in Marketing Cloud Engagement.
- Troubleshoot common challenges.
Practice with the Trailhead Simulator
You’ve learned the steps to build Interactive Email Forms, now let’s practice these steps using the Marketing Cloud Engagement Trailhead Simulator. Before starting, there are a few things you should know about Trailhead Simulator.
For the best experience, view the Trailhead Simulator on a computer, not a mobile device. Unlike a Trailhead Playground, Trailhead Simulator provides a simulated user experience that does not store your progress. If you close the simulation and relaunch it, the simulation starts from the beginning. To get back to where you left off, use the simulator navigation controls.
Also, the Trailhead Simulator is designed to highlight the correct click area if you click the wrong area first. Simply click the highlighted area to continue. Here’s an example of this functionality.
The marketing team at Northern Trail Outfitters (NTO), a hiking and camping retailer, wants to add an email form to their welcome email to learn more about their customer’s camping preferences. Digital marketer, Isabelle, went through the checklist and has already created:
- A confirmation content block named NTOConfirmation
- Fallback content named NTOFallbackCB
- An NTO Welcome Email
She’s ready to create her confirmation page and email form. Let’s practice the steps Isabelle follows in Marketing Cloud Engagement by using the Trailhead Simulator.
Create an Interactive Page in CloudPages
- Launch the Trailhead Simulator, then click Begin.
- From the Marketing Cloud Engagement homepage, click Web Studio.
- Then click CloudPages.
- In CloudPages, hover over the Trailhead Simulation Collection. Click Open Collection.
- Click Create, then select Interactive Email Page.
- For the Interactive Email Page name, type
Camping Preferences. Press Enter or Return. - Click Create.
- Hover over the Camping Preferences page you created, then click Open Content.
- Click the Email Form layout section in the editor.
- Under the Confirmation Message section, click the Type of Content dropdown. Select Block from Content Builder as the type of content.
- Click Browse and then choose NTOConfirmation.
- Click Select.
- Click Done Editing.
Add Content
Now let’s add a branded header to your confirmation page.
- Click the Content tab.
- Drag the file NTOheader.jpg to the top content window to create a header block.
- Click Done Editing.
Finalize Content
Finally you need to review your content and publish your page.
- On the upper right side of the screen, click the Mobile button to see how the content looks on a mobile device.
- To test your form, click Schedule / Publish.
- Select Publish Immediately. Next, click Publish.
- Click Continue, then click Exit to end this simulation.
Create an Interactive Email Form Block
Now that we have the CloudPage published, let’s create an email form block in Content Builder.
- Launch the Trailhead Simulator, then click Begin.
- From Content Builder, click Create.
- Click Content Blocks, then select Email Form.
- Select Progressive Profile, then click Continue.
- Under CloudPages Destination, click in the Collection search field. Select Trailhead Simulation from the list.
- Click in the Interactive Email Page search CloudPages field. Select Camping Preferences from the list.
- Under Response Capture, click the Response Capture Method dropdown. Select Create a data extension automatically.
- Click Set Name. In the Data Extension Name field, type
Camping Preference Form. Press Enter or Return. - Click Create.
- Under Visible Fields, click the dropdown next to “What’s your favorite color?” Click Delete, then click Continue.
- Follow these steps to also delete “What are your favorite sports” and “Describe Yourself.”
Map Your Data
Next, connect each form field to a data attribute.
- Click edit for the First Name.
- Under Data Attribute, click the Select or Create Attribute Name field.
- Click Create New Attribute to add a new field to the data extension to store the data.
- In the New Attribute Name field, type
FirstName. Press Enter or Return. - Click Create. Click Done.
- Click edit for the Last Name.
- Under Data Attribute, click the Select or Create Attribute Name field.
- Click Create New Attribute to add a new field to the data extension to store the data.
- In the Create New Attribute Name field, type
LastName. Press Enter or Return. - Click Create. Click Done.
- Click New Input to add a new field.
- Click Select from the list.
- In the Input Label field, type
Camping Preference. Press Enter or Return. - Under Data Attribute, click the Select or Create Attribute Name field.
- Click Create New Attribute to add a new field to the data extension to store the data.
- In the New Attribute Name field, type
CampingPref. Press Enter or Return. - Click Create.
- Under Description, type
Where do you prefer to sleep when you camp?Press Enter or Return. - Click Add Option.
- Under Field Value, type
In a tent. Press Enter or Return. Under the Option Label, typeIn a tent.Press Enter or Return and then click Save. - Follow the steps above to add in an additional option:
In a camper. - Now click Done.
Fallback Content
To ensure all customers have a great customer experience, you need to set up fallback content.
- Click the Design tab.
- Under Type of Fallback click Select an Option.
- Click Block from Content Builder and then click Browse.
- Select NTOFallbackCB, then click Select.
- Click Submit Button. Under Button text, type
Let us know!Press Enter or Return. - Click Save on the upper right corner.
- In the Name field, type
NTO Camping. Press Enter or Return. Click Save. - Click Save, and then Save and Exit.
Create Email
Now let’s add the form to an email campaign.
- Click the dropdown arrow next to the NTO Email Form Block Email. Click Edit.
- Click the Content tab, then drag the NTOCampingExample content block under the tent image.
- Click Save.
Congrats, now that you have all of the key components configured, the email campaign is ready to test!
Test Your Email and Form
As always, it is important to thoroughly test your work before pressing send. When building an Interactive Email Form, it’s especially important to test in various environments—including supported and unsupported email clients. To confirm if your email is successful (from a data perspective), navigate to your form’s response capture data extension. If the form was submitted successfully, you should see a new record with the information you selected in your test email—like this. 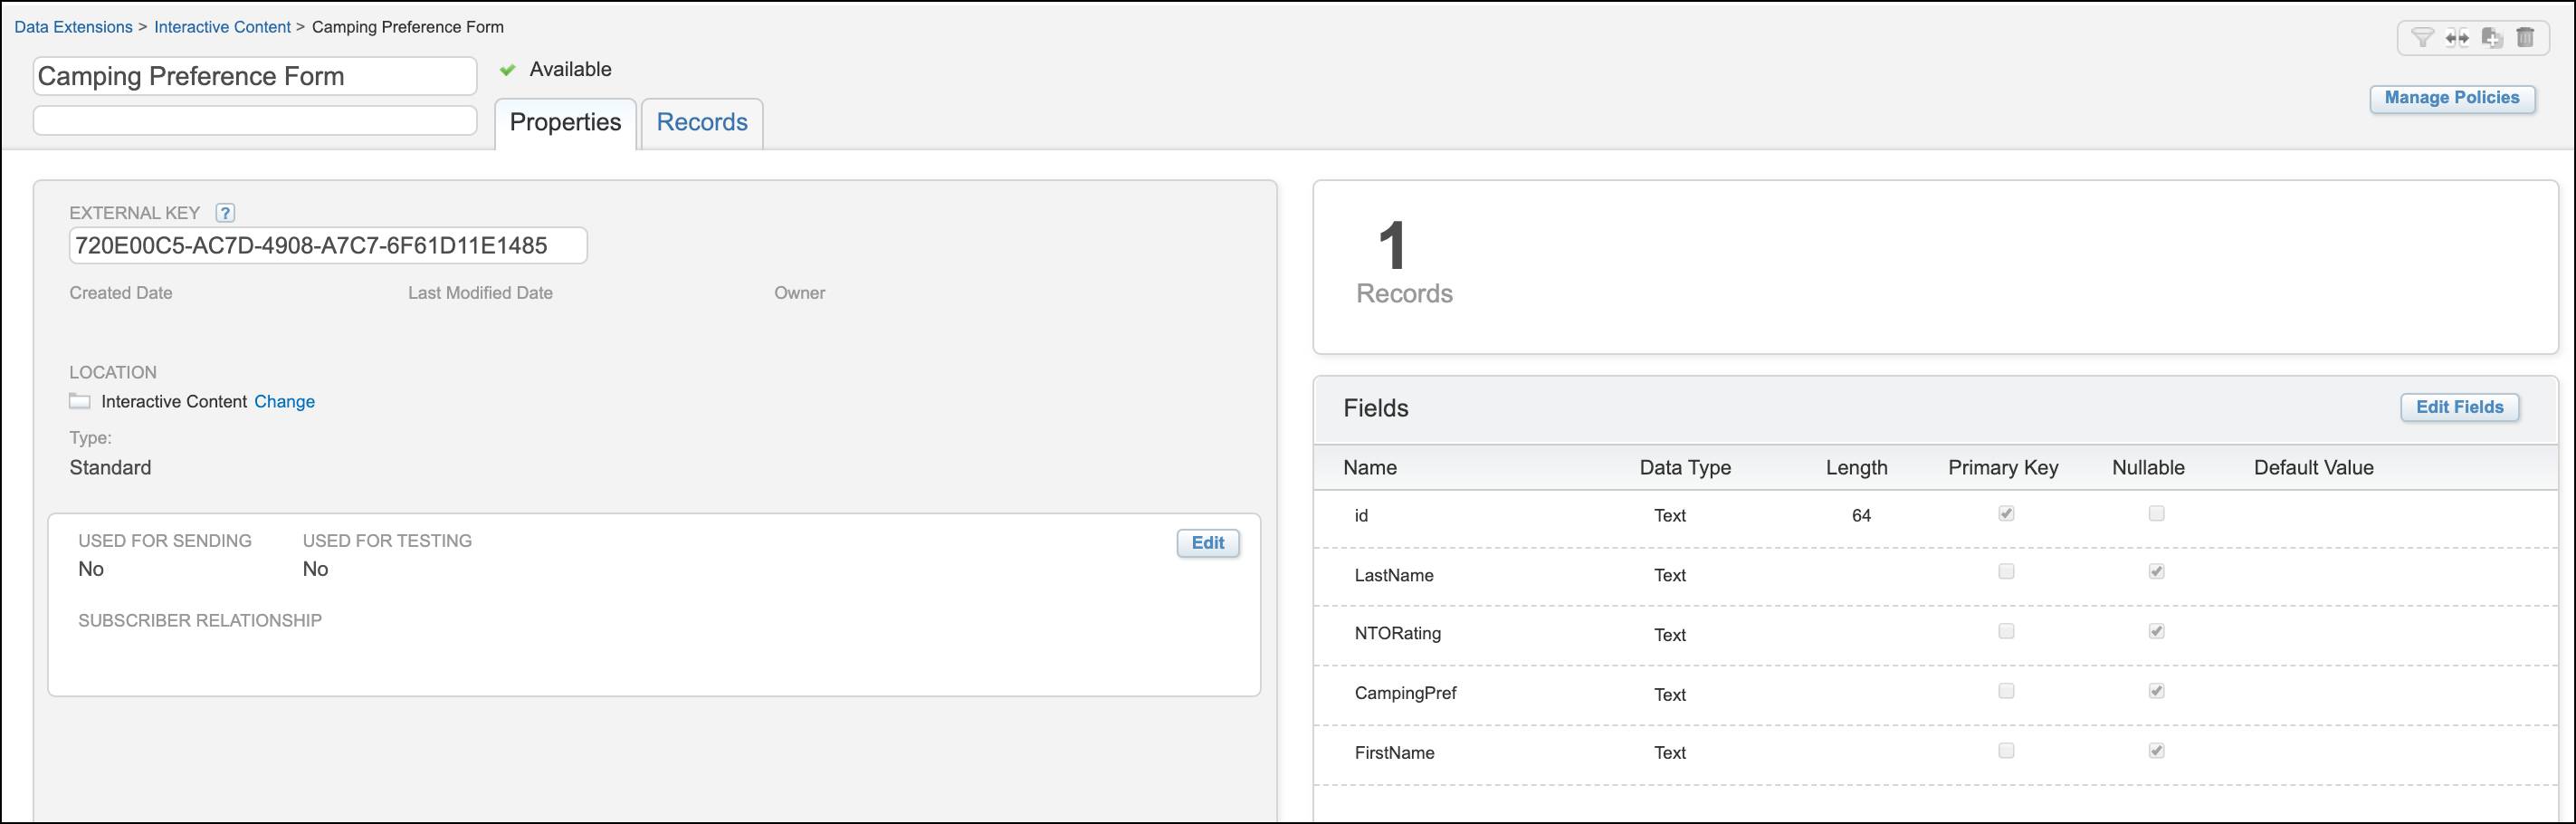
Troubleshooting
What happens if your test wasn’t successful? No worries. Let’s troubleshoot some common challenges.
Form Doesn’t Display in Email
Here are some possible reasons why your form doesn’t display.
- The email client doesn’t support interactivity (like Outlook).
- The form doesn’t appear in a supported email client, and there is likely a CSS conflict between your other email code and the code inserted by the Email Form content block. To diagnose this problem, remove all the other code, ensure that the form is working as expected, then add your code piece by piece to identify the conflict.
- Your issue is Gmail-specific, so your email may exceed Gmail’s size and character limits.
Form Display Issues in Gmail
Seeing issues in Gmail? Gmail provides guidance on size and character limits, so be sure to follow these.
- Messages over 102 KB, can cause the email form to not display.
- Limit the characters in your CSS style tags to about 16k. Anything over that limit, won’t display in Gmail.
Plus, Gmail doesn’t support all CSS attributes that are used to build Interactive Email Forms. For Gmail optimization, consider using these input types:
- Select dropdown or radio button for single option selection inputs
- Checkbox for multiple option selection inputs
Data Not Showing in Data Extension
If your data isn’t writing to your data extension, confirm the following:
- A data extension is selected in your email form content block.
- All form inputs are mapped to a data attribute.
- All required fields in a data extension are mapped to a form input.
- Your Interactive Email Page has a confirmation message selected.
- The data extension hasn’t been deleted.
All submissions that don’t write to a data extension are added to an error log named 00 IC Error Log. This log is located in the Interactive Content folder under the top level folder, Data Extensions, found in either Email Studio or Contact Builder.

Now that you have learned what Interactive Email Forms can do, and how to build and troubleshoot your forms, you are ready to create your own. Toss aside that clipboard and pen, and start gathering customer data with Interactive Email Forms!