Set Up Single Sign-On for Your Internal Users
Learning Objectives
After completing this module, you’ll be able to:
- Create a Federation ID.
- Set up single sign-on from a third-party identity provider.
- Become familiar with the tools to troubleshoot SAML requests.
Single Sign-On
Your My Domain login URL makes it easy for employees to log in to your Salesforce org with a secure, easy-to-remember URL.
Do you want to make it even easier so that they don’t have to log in at all? Then set up single sign-on (SSO).
SSO has lots of advantages.
- You spend less time managing passwords.
- Your employees save time when they don’t have to manually log in to Salesforce. Did you know that users take 5–20 seconds to log in to an online application? Those seconds add up.
- More people use Salesforce. Users can send out links to Salesforce records and reports, and their recipients can open them in a single click.
- You can manage access to sensitive information from one place.
In this unit, we show you how to set up inbound SSO—users log in somewhere else, like an on-premises app, and then access Salesforce without logging in. You can also set up outbound SSO in which users log in to Salesforce and then access other services without logging in again.
Keep MFA in Mind
Remember the MFA requirement that we mentioned in the first unit? That’s right, it applies to SSO users as well. Even if your employees access Salesforce through an on-premises app or an SSO identity provider, they must complete MFA first.
Though we don’t cover how to apply MFA to SSO users here, rest assured that there’s an easy way to do it. To use the MFA service included with Salesforce for your SSO setup, see Use Salesforce MFA for SSO in Salesforce Help. Or, if your SSO provider offers an MFA service, you can require MFA when your users log in to your provider instead of when they access Salesforce.
Configure Inbound SSO with a Third-Party Identity Provider
Let’s start configuring inbound SSO with a third-party identity provider.
The head of your IT department, Sean Sollo, tells you to set up Salesforce users with SSO so that they can log in to your Salesforce org with their Jedeye network credentials. Here, we walk you through the steps to set up SSO for Jedeye Tech’s new employee, Sia Thripio. You’ll set up inbound SSO using the Axiom Heroku web app as the identity provider.
Is this starting to sound difficult? It’s not, really. Let’s break it down into simple steps.
- Create a Federation ID for each user.
- Set up SSO settings in Salesforce.
- Set up Salesforce settings in the SSO provider.
- Make sure it all works.
Step 1: Create a Federation ID
When setting up SSO, you use a unique attribute to identify each user. This attribute is the link that associates the Salesforce user with the third-party identity provider. You can use a username, user ID, or a Federation ID. We’re going to use a Federation ID.
No, a Federation ID isn’t owned by an interstellar shipping organization with nefarious designs. It’s basically a term that the identity industry uses to refer to a unique user ID.
Typically, you assign a Federation ID when setting up a user account. When you set up SSO on your production environment, you can assign the Federation ID for many users at once with tools like the Salesforce Data Loader. For now, let’s set up an account for Jedeye Tech’s new employee, Sia Thripio.
- From Setup, enter
Usersin the Quick Find box, then select Users.
- Click Edit next to Sia’s name.
- Under Single Sign On Information, enter the Federation ID:
sia@jedeye-tech.com. Tip: A Federation ID must be unique for each user in an org. That’s why the username is handy. But if the user belongs to multiple orgs, use the same Federation ID for the user in each org.
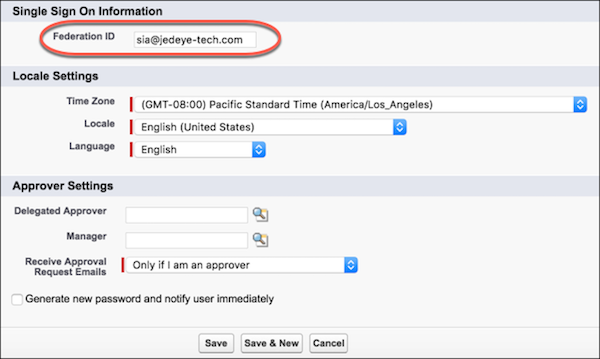
- Click Save.
Step 2: Set Up Your SSO Provider in Salesforce
Your service provider needs to know about your identity provider and vice versa. In this step, you’re on the Salesforce side providing information about the identity provider, in this case, Axiom. In the next step, you give Axiom information about Salesforce.
On the Salesforce side, we configure SAML settings. SAML is the protocol that Salesforce Identity uses to implement SSO.
Tip: You’re going to work in both your Salesforce Dev org and the Axiom app. Keep them open in separate browser windows so that you can copy and paste between the two.
- In a new browser window, go to https://axiomsso.herokuapp.com.
- Click SAML Identity Provider & Tester.
- Click Download the Identity Provider Certificate. You upload this certificate later to your Salesforce org, so remember where you save it.
- In your Salesforce org, from Setup, enter
Singlein the Quick Find box, and then select Single Sign-On Settings.
- Click Edit.
- Select SAML Enabled.
- Click Save.
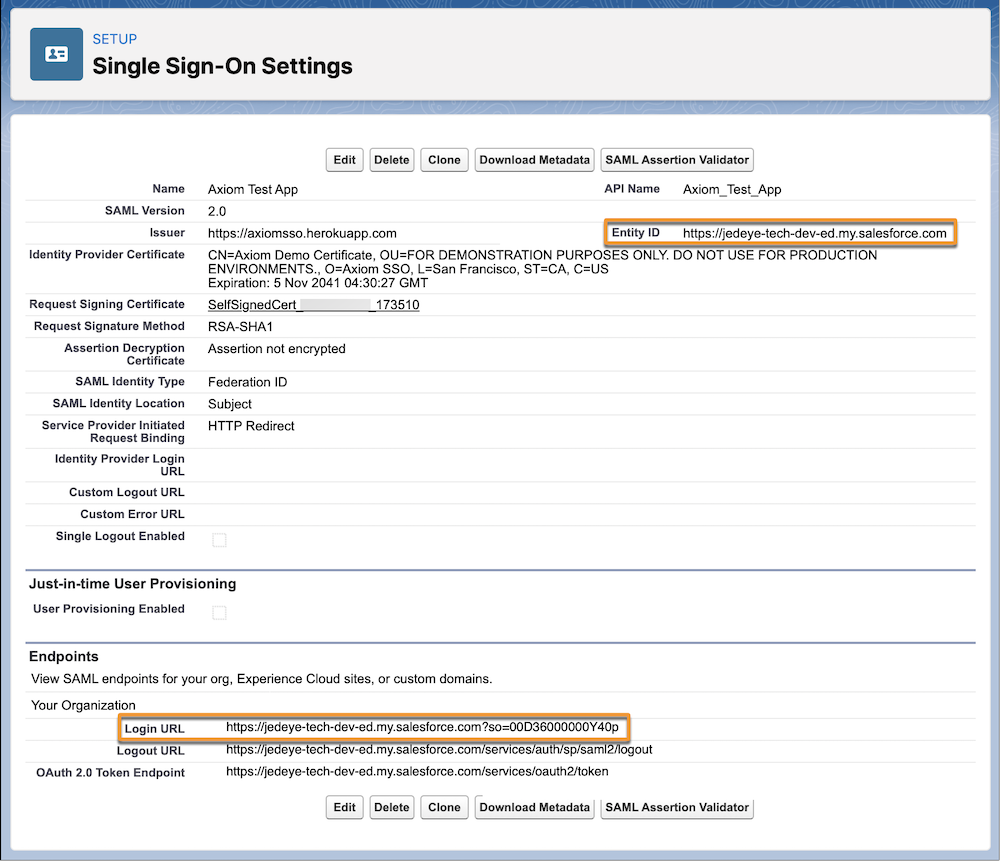
- In SAML Single Sign-On Settings:
- Click New.
- Enter these values.
- Name:
Axiom Test App - Issuer:
https://axiomsso.herokuapp.com - Identity Provider Certificate: Choose the file you downloaded in step 3.
- Request Signature Method: Select RSA-SHA1.
- SAML Identity Type: Select Assertion contains the Federation ID from the User object.
- SAML Identity Location: Select Identity is in the NameIdentifier element of the Subject statement.
- Service Provider Initiated Request Binding: Select HTTP Redirect.
- Entity ID: Enter your My Domain URL, which is displayed on your org's My Domain Setup page. Make sure that entity ID includes "https" and references the Salesforce domain. It should look something like this: https://mydomain-dev-ed.develop.my.salesforce.com.

- Click Save and leave the browser page open.
Step 3: Link Your Identity Provider to Salesforce
Now that you’ve configured Salesforce to know about the identity provider (Axiom), you teach your identity provider about your service provider (Salesforce).
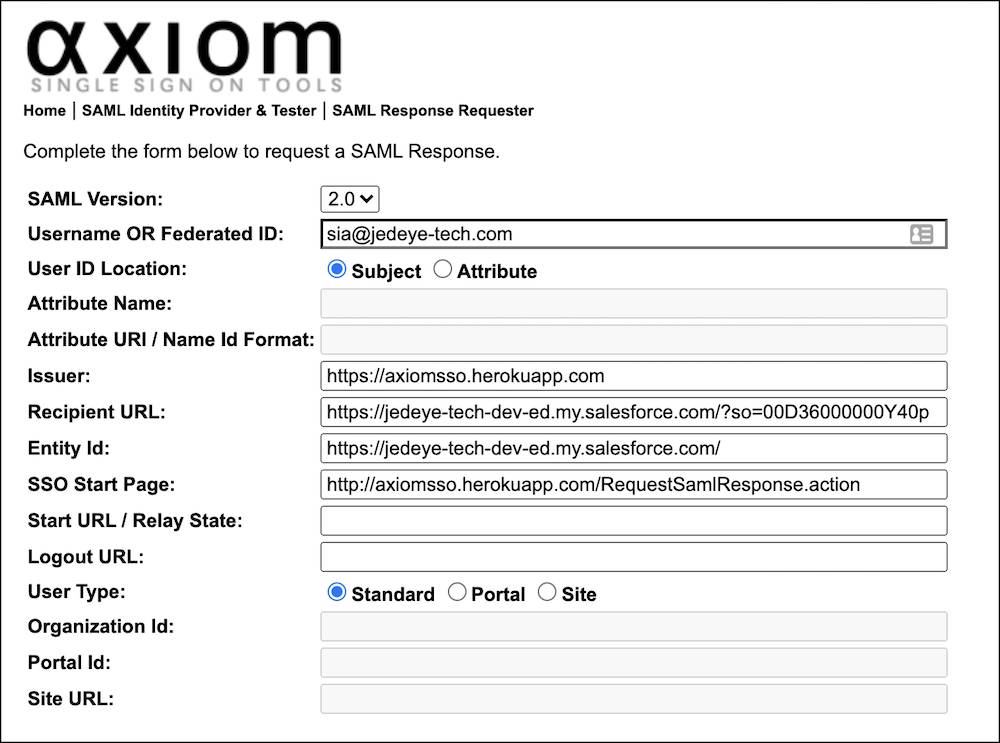
You fill in a few fields in the following Axiom form. Easy peasy. Because you’re supplying Salesforce SSO settings, keep two browser windows open, one for Salesforce and one for Axiom.
- Return to the Axiom web app. If you don’t have the app open in a browser window, go to https://axiomsso.herokuapp.com.
- Click SAML Identity Provider & Tester.
- Click generate a SAML response.
- Enter the following values. Leave the other fields as is.
- SAML Version: 2.0
- Username or Federated ID: The Federation ID from the Sia's Salesforce User page
- Issuer:
https://axiomsso.herokuapp.com - Recipient URL: The URL from the Salesforce SAML Single Sign-On Settings page. Don’t see it? It’s at the bottom of the page (in the Endpoints section) labeled Login URL.
- Entity Id: The Entity ID from the Salesforce SAML Single Sign-On Settings page.
When you’re finished, the Axiom settings page looks something like:
Step 4: Make Sure It All Works
OK, now that everything’s all configured, let’s make sure that it works. What’s the proof? A successful login, of course.
- In the Axiom settings browser window, click Request SAML Response. (It’s way down at the bottom.)
- Axiom generates the SAML assertion in XML. Does it look like language used by a robot communicating with desert outpost moisture evaporators? Look again. You can see that it doesn’t look all that bad. To get to the interesting information, scroll through the XML.

- Click Login.
If everything’s OK, you’re logged in as Sia at your Salesforce home page. The Axiom application logs you in to your Salesforce org as the user with the assigned Federation ID.
Congratulations! You just configured Salesforce SSO for your users who are accessing Salesforce from another app.
Resources
- Salesforce Help: SAML SSO Flows
- Salesforce Help: Configure Salesforce as the Service Provider with SAML Single Sign-on
- Salesforce Video: Configure SAML Single Sign-on with Salesforce as the Identity Provider