Set Up Mobile-First Login and Sign-Up
Learning Objectives
After completing this module, you’ll be able to:
- Create a login page for passwordless login.
- Create a configurable self-reg page to collect information from users on sign-up.
- Test the login and sign-up process by creating a customer.
An Experience Cloud Site in a Flash
Northern Trail Outfitters (NTO) has created a customer service site and manages its customers’ login experience with Salesforce Experience Cloud. Recently, more of NTO’s customers are conducting business on their mobile devices. Customers want instant access to NTO’s customer service site wherever they are.
Customer service manager Joel Pierce wants to check out the new Salesforce mobile-first identity feature to see if it’s as easy to set up as Salesforce claims. He’s decided to take an hour or so to check it out.
As you learned previously, this mobile-first login experience is available to all user licenses. Salesforce default login pages come with any template you use to create a site.
To try out the new mobile-first identity features, Joel starts with building out a test site in a new Trailhead playground. He uses these no-frills setup steps below. Since it’s been a while since he created his customer service site, he visits the Salesforce Identity for Customers Trailhead module for a refresher.
Ready to Get Hands-on with Mobile-First Identity?
Create a new Trailhead Playground now to follow along and try out the steps in this module. Scroll to the bottom of this page, click the down arrow next to Launch, and select Create a Trailhead Playground. It typically takes 3–4 minutes for Salesforce to create your Trailhead Playground. You also use the playground when it's time to complete the hands-on challenge.

Be sure to complete the steps in this unit before you try the hands-on challenge. The challenge builds on the work you do in the steps.
Set Up Access with Profiles and Roles
Before you create your site, it's important to define who has access to what. Profiles and roles give you an easy way to manage what data your customers can access. We also set up an account to contain customers when they sign up.
- Create a profile for users with the External Identity license. A profile lets you control what your customers can access in your org.
- From Setup, in the Quick Find box, enter
Profiles, then select Profiles.
- Next to External Identity User, click Clone.
- Name the profile NTO Customer, and then click Save.
- Create a role for the site admin. Sites require a role hierarchy to help control how users share data.
- From Setup, in the Quick Find box, enter
Role, then select Roles.
- From the dropdown list, select Product-based Sample, then select Set Up Roles.
- Under CEO, click Add Role.
- For the role label, enter
NTO Customer Managerand tab to autofill the Role Name.
- Click Save.
- Assign the Customer Manager role to a Salesforce admin.
- From Setup, in the Quick Find box, enter
Users, then select Users.
- Next to your username, click Edit.
- For Role, select NTO Customer Manager, and then click Save.
- Create an account for our customers.
- From the App Launcher (
 ), find and select Accounts.
- From Accounts, click New.
- Name the account NTO Customers, and click Save.
Enable Digital Experiences
It’s a fresh org, so we first enable Digital Experiences, which allows us to create sites.
- From Setup, in the Quick Find box, enter
Digital Experiences, and then select Digital Experiences | Settings.
- Select Enable Digital Experiences. For this exercise, your domain name is automatically generated. When you create a domain in your production org, enter a unique name, and click Check Availability.
- Click Save, then OK.
- If you’re prompted to give permission to open the page, click Open.
You're directed to the Digital Experiences page, where you can create your site. Keep this page open for the next step.
Create a Site
Spin up a site.
- From the Digital Experiences page, click New.
Note: If you already closed the Digital Experiences page, get back to it by enteringAll Sitesin the Quick Find box, and then selecting All Sites.
- From the Site Creation wizard tiles of templates, select the Customer Service template.
- Click Get Started.
- Enter
NTO Customersas the site name
- For the URL, enter
ntocustomersat the end. For this example, the URL suffix isn’t optional—it’s important to add the suffix, ntocustomers, to the URL to ensure that your site has a unique URL. Also, make sure it’s lowercase to pass the challenge.

- Click Create. Our site has been created in Preview status. The wizard lands us at site command central—Experience Workspaces.
- Verify your site’s sender email address. When you create the site, Salesforce sends an email to the email address associated with your Trailhead playground. Check your inbox and look for an email asking you to verify your Salesforce email address. Follow the steps to complete verification. This step is required for your site to send signup emails to new users, so don’t skip it.
- Click Administration to go to the workspace for managing the site.
- Assign the NTO Customer profile that you created by cloning the profile for users with the External Identity license.
- Click Members, then for Search, select Customer.
- Add NTO Customer to Selected Profiles, and then click Save. When new members sign up for this site, they’re assigned the NTO customer profile. This profile defines access for site members.
- Click Save.

- Activate the site.
- From the Administration workspace, click Settings.
- Click Activate, then click OK.
- Publish the site.
- At the top left, select Administration, and then select Builder from the dropdown list.
- At the top right, click Publish, and in the confirmation dialogue, click Publish again, and then Got It.

- Now return to the Administration workspace to get to work.
- At the top left, click
 , and then select Administration from the dropdown list.
- Select Login & Registration.
We're now at the page where all login-related activity happens.

We can go on and add other Experience Cloud features, but we’ve got the basics covered for now. We’re ready to bring our login pages to the modern, mobile-first-identity era.
Brand the Site
From the Login & Registration page, you can brand all pages related to the login experience. That is, the branding applies to pages where users sign up, log in, verify their identity, reset passwords, and more.
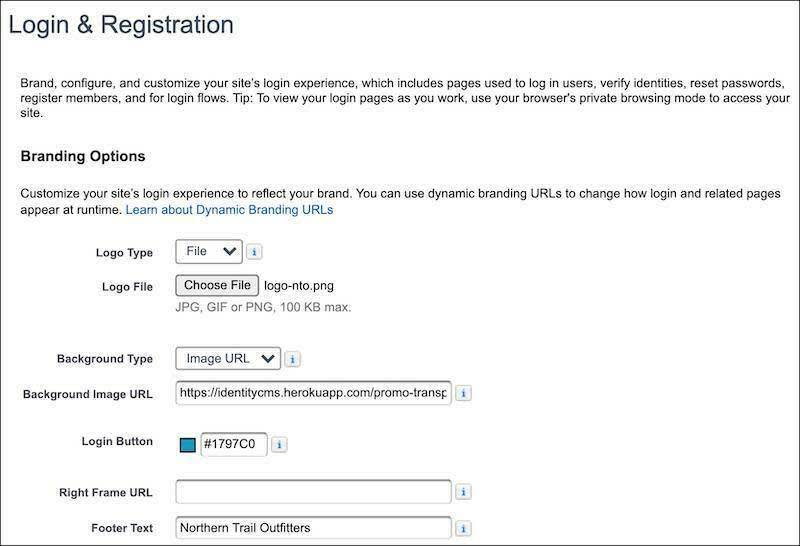
- For a logo, you can supply your own logo by uploading a file or entering a URL. But let’s use ours. To use our NTO logo, download it from our Github repo:
https://github.com/salesforceidentity/Mobile-first/blob/master/logo-nto.png
- Click the Github link above, then click Download.
- From the Login & Registration page, under Logo File, click Choose File. Then locate
logo-nto.pngin the downloads folder on your file system.
- Scroll to the bottom of the page, and click Save. For Logo File, you should now see the logo for Northern Trail Outfitters. Cool logo, right?
- To check out how a background image enlivens your login pages, you can supply a URL to an image. If you don’t have a hosted image handy, leave Background Type set to Color and choose a new color for Background.
- To choose a background image, for Background Type, select Image URL from the dropdown.
- For Background Image URL, enter a URL that points to an image. Our background is what you might expect for an outdoor equipment store—green mountains and blue skies.
- Change the color of the Login Button to match your corporate theme. This color applies to buttons on all login-related pages, including Log In, Sign Up, Verify, and Reset Password.
- Update the footer text with Northern Trail Outfitters or your own.
- Click Save.
Set Up Login Discovery
Let the fun begin. You set up your site and branded it. Now let’s set up mobile-first login. As mentioned in Unit 1, Login Discovery gives users the option to log in with something other than their username—like their phone number. When you set up Login Discovery from the Login & Registration page, users can automatically log in with their verified email address or phone number.

- From your Login & Registration page, find Login Page Setup.
- For Login Page Type, select Login Discovery Page.
- For Login Prompt, enter Email or Phone.
- Click Create a Login Discovery Handler.
- For Execute Login As, click
 and select your name to select yourself. (In production, admins typically create a system user for this field. This way operations performed by the handler can be easily traced back to the login process.)
- Select Allow employees to log in directly to an Experience Cloud site.
- Click Save. After you save this page, Salesforce generates a default login discovery handler. The Login Discovery Handler points to an Apex class that implements the Login Discovery logic. You can learn more about the handler and how to customize it in the next unit.
- Let’s see what your login page looks like with the Login Discovery page type.
- From Administration, click Settings.
- Right-click the URL and select Open Link in Incognito Window (in Chrome) or Open Link in New Private Window (in Firefox or Safari).

The center of your login page shows Email or Phone for the prompt, and Log In for the button. Our background uses our outdoorsy image URL.

Set Up Your Site’s Sign-Up Page
You have a login page for your site members. Now let’s get some members. Users can sign up for the site themselves—after you set up your site’s sign-up page.
- From the Login & Registration page, under Registration Page Configuration near the bottom of the page, select Allow customers and partners to self-register.
- For Registration Page Type, choose Configurable Self-Reg Page.
- Choose which user fields you want customers to supply when they sign up. To keep things simple for this exercise, select First Name and Email.
- Click Create a configurable self-reg handler.
- For Execute Registration As, select yourself. Just like the Login Discovery Handler above, Execute Registration As provides the context in which the Configurable Self-Reg handler runs.
- For the Verification Method, select Email. By choosing Email for the verification method, Salesforce sends a verification code in an email message to your Inbox. If you choose Text Message, Salesforce sends a verification code in a text message to your mobile phone. If you choose None, users must enter a password to log in.
- Keep Include Password deselected. For a simpler sign-up process, we won't collect a password now. But if you select Include Password, the self-registration form contains Password and Confirm Password fields. An advantage to asking for the password at sign-up is to make sure that users always have a way to log in. It’s helpful for those users who can’t find their phone or access their email.
- For Profile, choose NTO Customer.
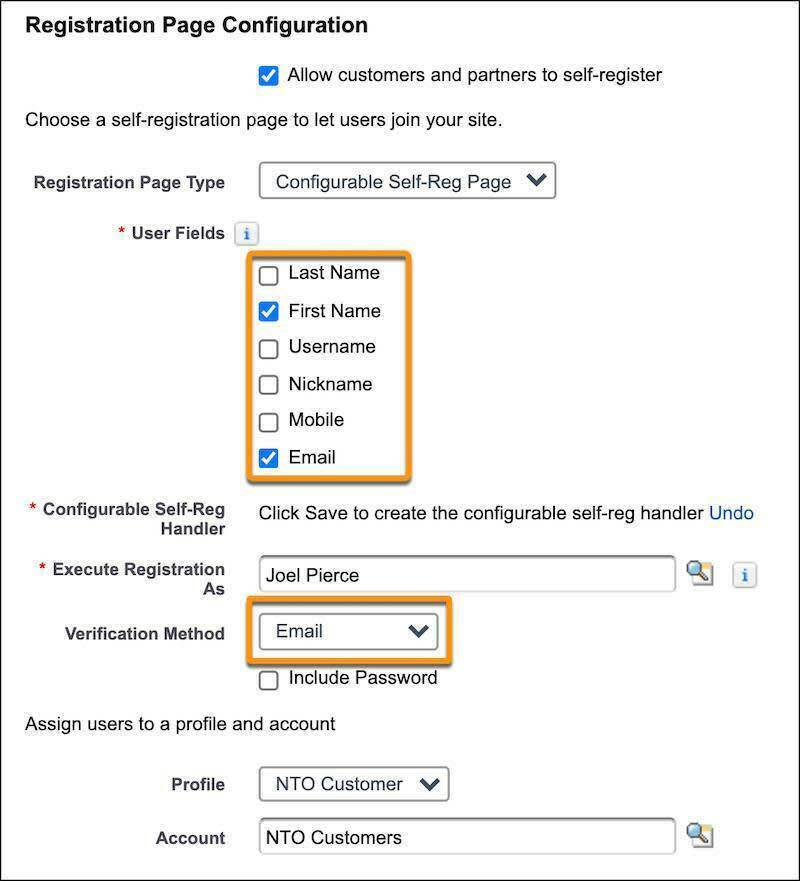
- For Account, choose NTO Customers. Your registration page configuration should look like this. Notice that the verification method is Email.
- Click Save. After you save this page, Salesforce creates a handler that builds your sign-up page.
- Let’s see what your login page looks like now that we’ve set up the Configurable Self-Reg Page type. Refresh the incognito window containing the Log In page.
Your sign-up link looks something like this. Your login page won’t have the outdoorsy motif of our background. But you get the idea.

Test It Out: Sign Up and Then Log In a New Customer
Now new customers can sign up for Joel’s site. To test whether a new user can actually sign up and log in, Joel can create a new customer from the login page.
- Return to the private (incognito) window containing the Log In page. If you already closed the window, from Administration, select Settings, and right-click the path to the site.
- Joel clicks Sign Up and creates a test customer, using the name Samantha. Joel wants to receive verification emails and test the sign-up process, so he needs to use an email address that he can access. But he doesn’t want to use the email address that’s tied to his admin account in the site. So he enters a different email address.

- Salesforce shows the Verify page and sends a verification code to the email address.
- Joel checks the Inbox for an email with the verification code and then enters the code on the Verify page.

And here it is. Joel has arrived at his site’s home page. To see who’s logged in, he clicks the profile icon on the right and selects My Profile.

He sees that he’s logged in as a new customer named Samantha.
Notice that Samantha’s last name looks something like ExternalUser1550768707871. Why? Salesforce requires a last name to create a user. Because Samantha didn’t supply one when she signed up, Salesforce assigned her a temporary one. On subsequent logins, NTO can ask for it, along with other profile information. That way, NTO builds Samantha’s profile as she continues to become a loyal NTO customer. Identity experts might refer to this building of a member's profile as progressive profiling powered by login flow.

Log In and View Your New Site Customer
Given his skeptical nature, Joel wonders if Samantha can log in to the site after she signs up. How does she log in if she didn’t enter a password when she created her account? Joel checks it out. He uses a new private (incognito) browser) to test it.
-
Log in to the NTO site as Samantha.
- Joel opens a new private (incognito) browser window.
- At the NTO login page, Joel logs in Samantha by entering the email address he used when he signed her up.
- Joel checks his email for a new verification code, and enters it in the Verify page.
- Sure enough, Joel (as Samantha) has returned to the Northern Trail Outfitters home page.
-
Check that Samantha is listed as a contact in the NTO Customers account. Joel goes back to his Salesforce org. He wants to see if Samantha is a customer in the NTO Customers account. Remember that we created the NTO Customers account earlier on? This account lists all the customers who signed up.
- From the App Launcher (
 ), find and select Accounts.
- From the list of accounts, choose NTO Customers.
- Success! Samantha is listed as a contact in the NTO Customers account.
Sign Up More Customers
Joel wants to create more customers in his org. He can because his Playground org gives him a few External Identity and Communities licenses. But he can’t create customers with the same email address. Every customer must be unique, so he has to come up with other email addresses to add more customers.
Joel can easily check whether customers have unique email addresses from the Users page in Setup. To see a list of users’ email addresses, Joel first creates a user list view, according to instructions in a later unit. If it happens that two users have the same email address, he can deactivate one by deselecting the user’s Active check box.

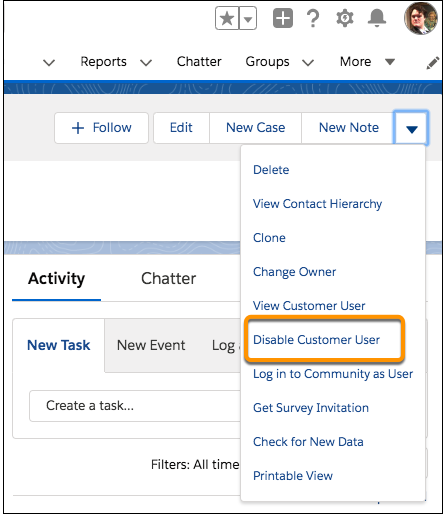
Or, instead of deactivating a user, Joel can disable the customer from Contacts.
What’s Next?
You’ve created default login and sign-up pages. Next up, let’s see how we can customize the login process.
Resources
- Trailhead: Identity for Customers
- Salesforce Help: Customize Login, Self-Registration, and Password Management for Your Experience Cloud Site
- Salesforce Help: Customize Your Login Page
- Video: Salesforce Identity Services: A Mobile-First World Requires Mobile-First Login