Explore Nonprofit Cloud Case Management Tools and Records
Learning Objectives
After completing this unit, you’ll be able to:
- Navigate Nonprofit Cloud Case Management.
- Explain the components of the client record page.
Tour the Case Management Home Page
To get to the Case Management app, click into the App Launcher ( ) then find and select Case Management.
You start on the Case Management homepage, a single place to organize your entire day. Let’s take a tour of the default view.

-
Navigation (1) includes all of the objects and records a case manager needs, like quick access to client contacts, notes, program engagements, and intakes.
- The New Contact link (2) helps you quickly add a client or contact information for someone important to their case.
-
Go To My Notes (3) helps you create a client note or search for notes you saved recently. (We talk more about notes in the Client Work with Nonprofit Cloud Case Management badge linked in Resources.)
-
View My Program Engagements (4) shows you a list of all of your clients’ enrollments.
-
Today’s Events (5) shows you what’s on the agenda for the day, including your client meetings.
-
Recent Sessions (6) shows you any recently completed or upcoming service session records to quickly track attendance. Check out the PMM Trailhead module, linked in Resources, for more on service schedules and service sessions.
-
Incidents (7) shows you the latest incidents for your clients, so you’re always aware of challenges and events in your clients’ lives.
-
The Contacts Who May Require Followup dashboard (8) shows you the count of contacts absent for their last service delivery, contacts with three consecutive absences, and contacts without recent interactions, plus links to helpful reports.
- The Open Tasks area (9) shows you what’s due today, due tomorrow, and overdue. Think of it as a super-powered checklist tied to all of your client and program data.
-
Client Search (10) appears in the utility bar of the Case Management app to help you go from client to client quickly. Client Search scans every text field on a contact record specified as a client, so you can find a client by their full name, nickname, ID, or any other information you have recorded.
-
Global Search (11) allows you to search for any record in your Salesforce org, not just clients.
These components make up the default layout for the app. Yours could look a little different, and you can work with your Salesforce admin to customize the page to add more components to help your team work efficiently within your process.
View Client Information on One Record Page
Case Management also includes a special page layout for contact records that quickly gives you all the information you need about a client.
A contact record gives you one place to view your entire relationship with a client—key for case managers who take a holistic approach to their clients’ needs. The page also gives your whole team better visibility into a client’s situation, so that if one case manager is unavailable, other case managers can pick up where they left off and provide continuing support.
Let’s check out a contact record, starting with the first section—called the client card—which gives you an at-a-glance view of critical information.

Along with the client’s picture (1) are their name and pronouns (2) and their role with the organization (3), which defaults to Client, but you can also use it for donors, volunteers, or any other role you want to see right away. If a client needs special attention, a watchlist icon ( ) (4) can appear next to their name.
The card also gives you space for basic information (5) like full and legal name, birthdate, and age, and their contact information (6).
There’s also space for client alerts (7), such as food allergies or urgent information that staff needs to know right away.
And, finally, you can manage client ID from a contact record (8). If your organization uses an existing ID system, you can import those IDs into Case Management. If not, you can use Case Management’s built-in tool to generate unique client IDs.
But that’s not all—a contact record has even more information below the client card.

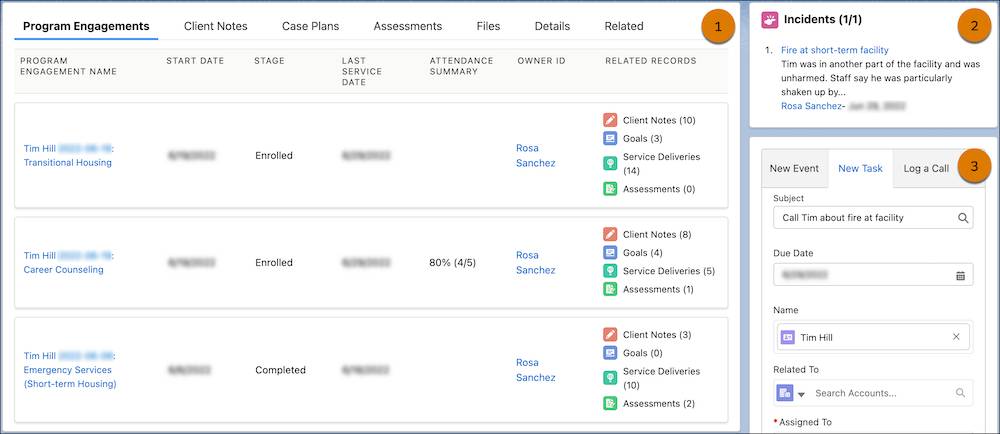
The primary pane on the page (1) includes tabs for related objects like program engagements, client notes, case plans, assessments, files, and more. (We cover case plans and assessments in another module in this trail.)
The secondary pane gives you a place to view recent incidents (2), and includes the Activity Panel to create events and tasks or to log calls (3).
Now that you understand what Case Management does, let’s dive into an example. In the next badge in this trail, we visit our (fictional) nonprofit, No More Homelessness (NMH), as they help a client through the intake process.
Resources
- Salesforce Site: Nonprofit Success Pack & Other Managed Packages
- Salesforce Help: Nonprofit Cloud Case Management Documentation
- Trailhead: Client Work with Nonprofit Cloud Case Management