Explore Data Models for Financial Services Business Lines
Learning Objectives
After completing this unit, you’ll be able to:
- Identify the core objects within the Financial Account data model.
- Describe the business line-specific data models used in Financial Services Cloud.
The Financial Account Data Model
Now that you know the basics of Financial Services Cloud data models, go deeper into each data model and how they work with each other in this unit.
The first data model to understand is the Financial Account Data Model, which is core to so many other parts of Financial Services Cloud. Here’s a look at the data model’s entity relationship diagram (ERD).
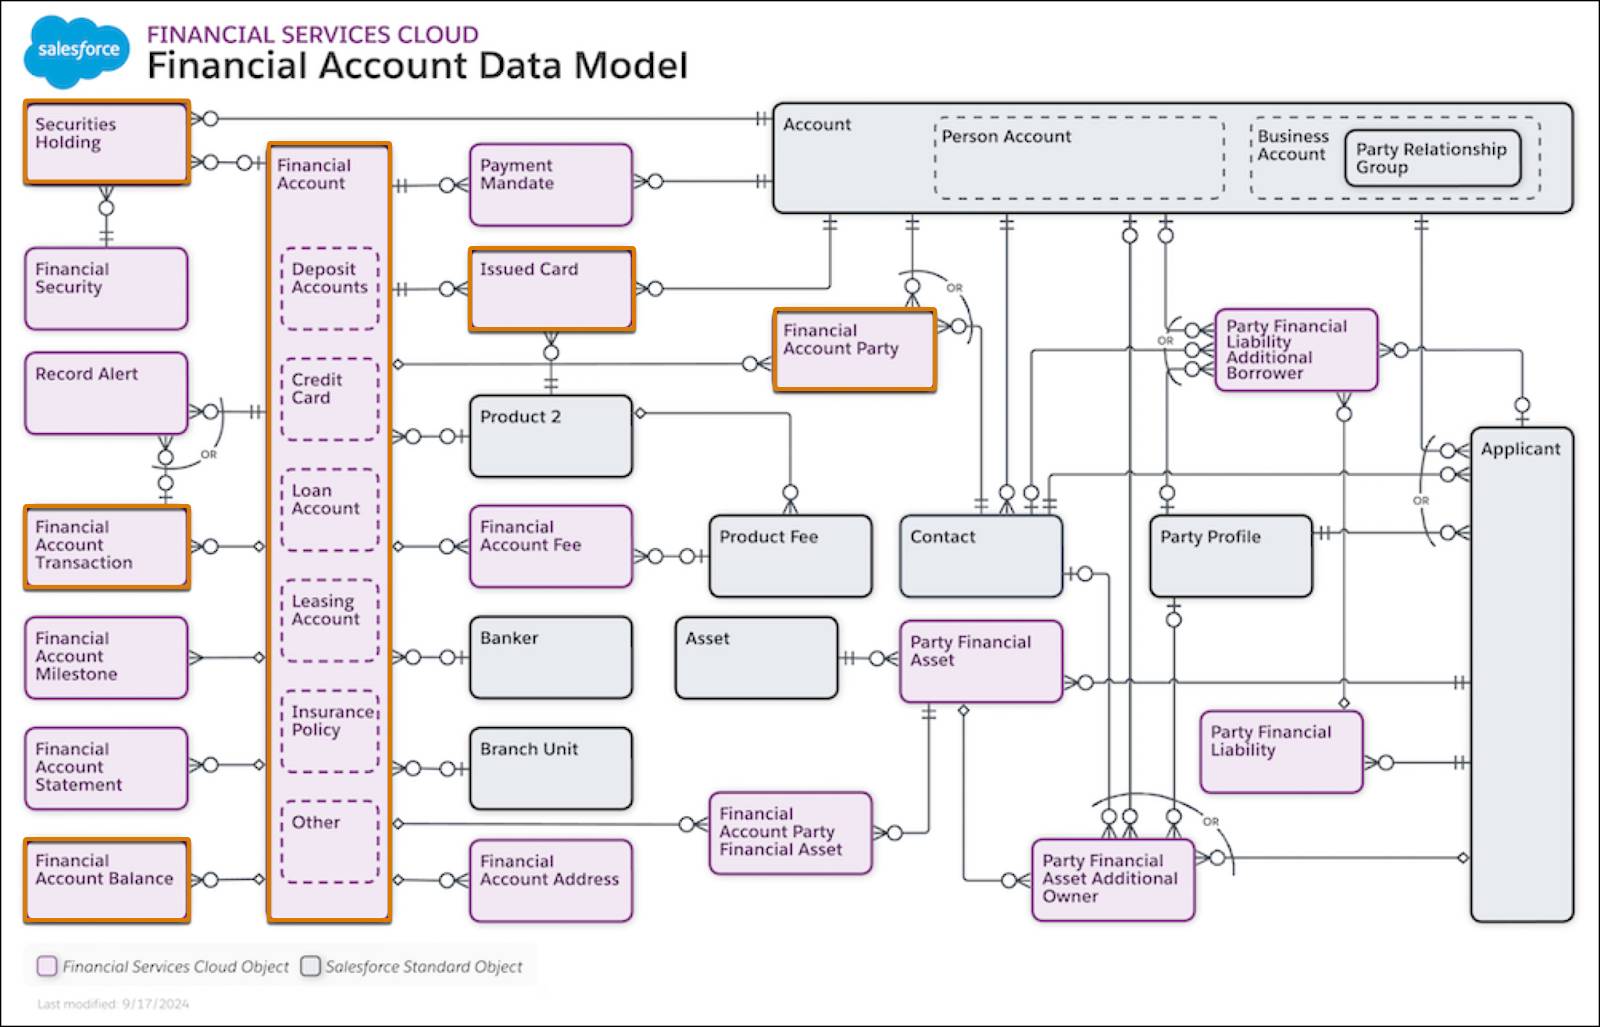
This ERD, and the others included in this module, map the connections between entities within a system. Each box represents an object to illustrate how data is structured and how objects interact. Learn more about how to read an ERD in the Salesforce Data Model Notation topic on Salesforce Developers.
You don’t explore each object in each data model in this module. Instead, you learn about the most important objects in each model to get you started.

For the Financial Account Data Model, the key object is—and this is no surprise—Financial Account. Financial accounts store information about a client's financial instruments, such as investment accounts, bank accounts, and credit cards. You connect a business or individual client to a financial account using the Financial Account Party junction object. Financial account parties also define a client’s relationship to the financial account, whether they are a beneficiary, owner, or trustee on the financial account.
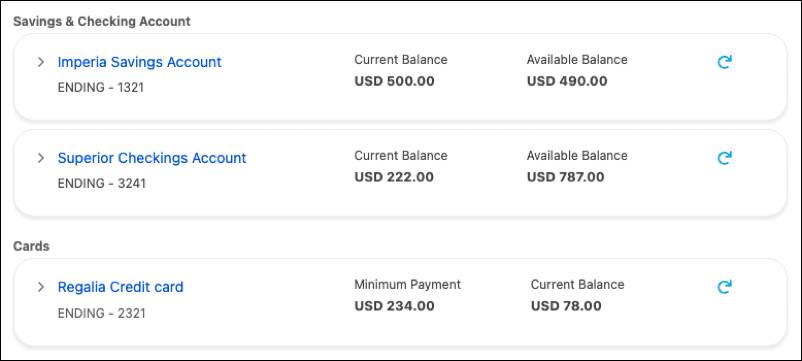
For example, a financial account represents a client’s savings account. Connect that record to their person account using a financial account party. In this example image, there are several financial accounts displayed on a person account record page.
Financial Account also relates to other key objects, such as:
- Financial Account Transaction, which stores details about transactions associated with a financial account.
- Securities Holding, which tracks a holding in an investment account, such as shares of stock.
- Financial Account Balance, which stores details about financial account balances, such as last statement balance, principal balance, and credit balance.
- Issued Card, which tracks cards issued to a customer, such as a debit card, credit card, and others.
Because the Financial Account object tracks so many basic facts about a client’s financial situation, it’s central to Financial Services Cloud as a whole. For example, it’s critical to the features and tools in Branch Management. It’s also the driving object behind financial summary rollups, financial plans and goals, retail banking console, AI-generated wealth summaries, and more.
Data Models for Specific Business Lines
While the Financial Account Data Model is core to many Financial Services Cloud features, other data models extend capabilities for specific business lines. Investment banks, retail banks, wealth managers, insurers, and lenders all share the same foundation but need different perspectives. That’s why Financial Services Cloud offers these tailored data models, some are included and others are available as add-ons. Together, they help you quickly align Salesforce to your business.
Here’s an overview of these data models and a few of their key objects.
The Financial Deal Data Model
The Financial Deal Data Model helps teams manage complex financial situations—such as mergers and acquisitions and initial public offerings—from start to finish. The data model also helps institutions maintain compliance by sharing sensitive details with only the team members who need to know. Here’s a look at the objects in this data model.
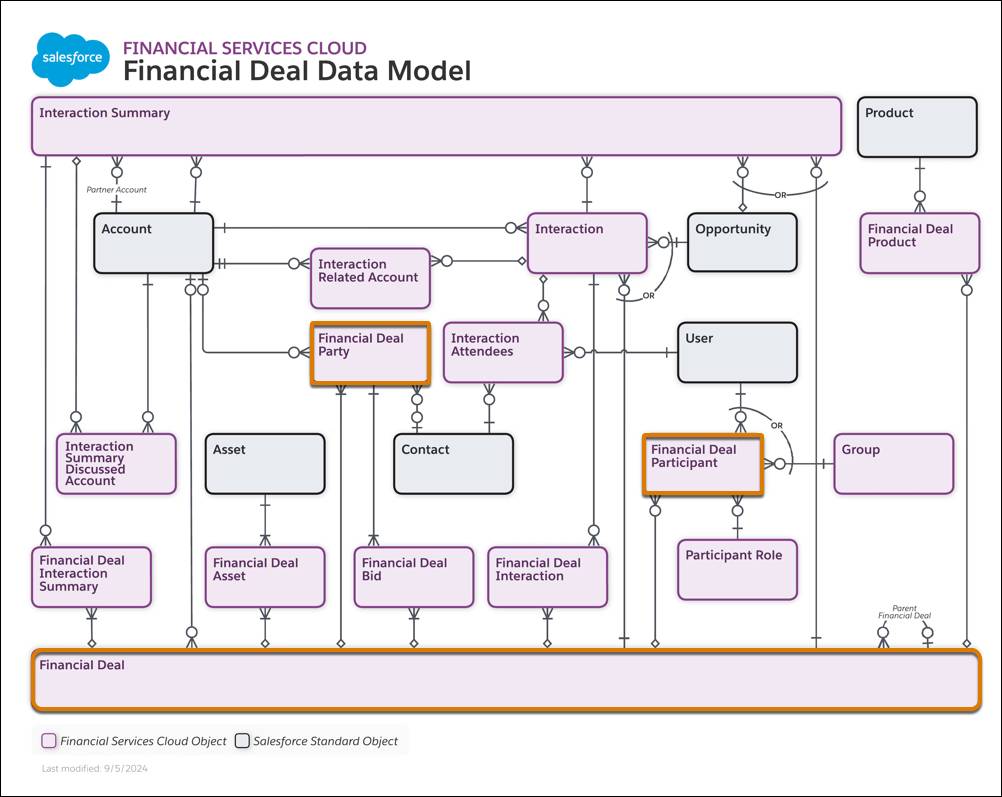
The key object in this data model is Financial Deal, which your team uses to track and manage the lifecycle of a deal. Financial deals are the anchor for all of the information required to see a complicated financial deal through.
Financial deals often involve multiple organizations and individuals. You can track those involved parties and define their roles in the deal using the Financial Deal Party object.
Use the Financial Deal Participant object to associate users at your institution with the deal. This includes members of the deal team or other staff who need access. Turn on Compliant Data Sharing for the Financial Deal Participant object to set which participants can see details about the deal. See Compliant Data Sharing in Salesforce Help for details.
The Branch Management Data Model
For retail banks and other financial institutions with branch locations, the Branch Management Data Model tracks the work of branches, employees, and customer segments within Financial Services Cloud.
Define your branch structure, assign employees and partners to branches, and then track activities and performance by branch. Check out the ERD for this data model.
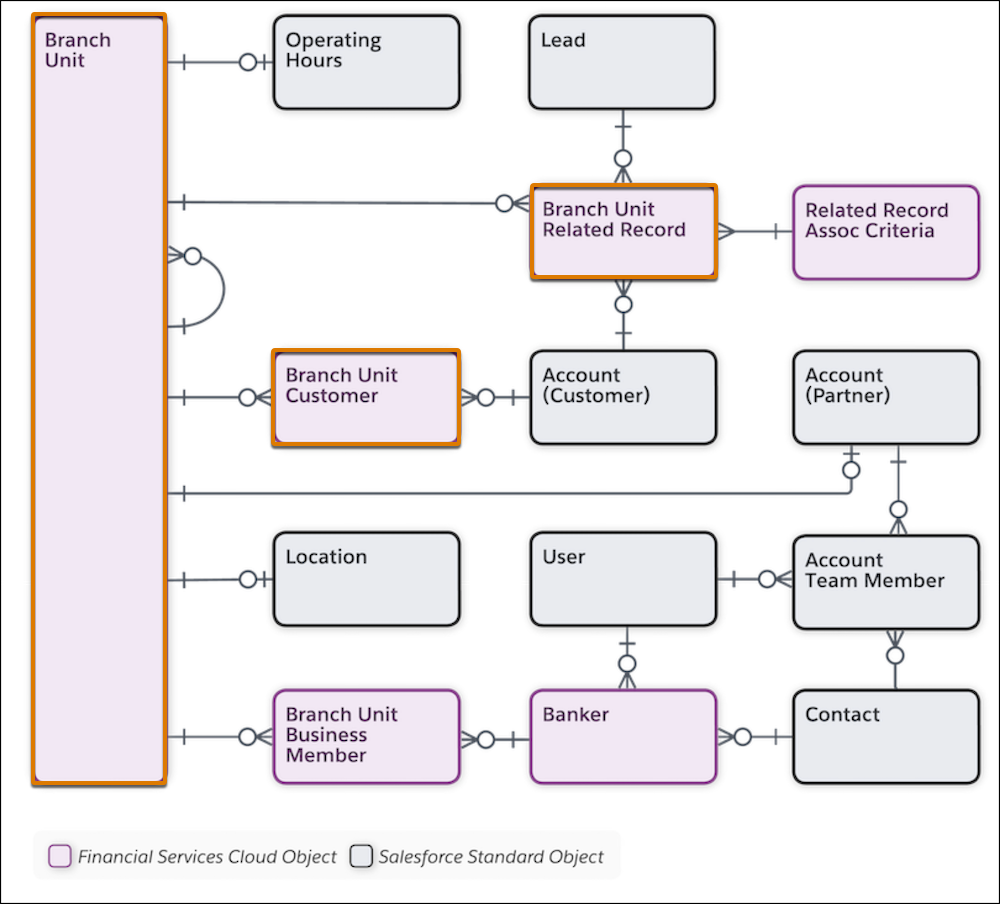
Branch Unit is the key object. It represents a specific branch office, location, or organizational unit, and includes data such as a branch’s name, its parent branch, and its branch manager.
The Branch Unit Customer object connects client accounts to a branch, and the Branch Unit Related Record object connects other records, such as leads, to specific branches. With these connections, you can track performance and run marketing campaigns at the branch level. What’s more, the Record Association Builder tool helps you define criteria to automatically link new or changed records, such as accounts, leads, and opportunities, to the branches that work with them.
Your users can use the Branch Selector component to select their branch and automatically connect their work to a branch using the Branch Management Data Model.
The Business Client Engagement Data Model
The Business Client Engagement data model helps you understand, manage, and engage with your B2B clients, particularly those with complex ownership structures. With the objects included in this data model, you can track the important people at a business and the overall business structure.
Key to this data model are two objects: Applicant and Party Profile.

Applicant represents a business applying for a financial product. It stores details about the applicant, such as its business entity name, type, and primary contact. Applicant also stores information such as industry, industry classification code, legal entity identifier, and stock exchange name.
Party Profile stores compliance-related applicant details, such as identity verification results, credit scores, and background check results. You learn more about this object, key to several other data models, in the next unit.
These objects work with supporting and child objects to capture all the necessary regulatory information about a business and give you a full picture of an organization.
The Insurance and Insurance Brokerage Data Models
Financial Services Cloud includes the Insurance Data Model to track policies, claims, and the rest of the insurance lifecycle. You can optionally add the Financial Services Cloud for Insurance Brokerages data model to manage insurance agents, brokers, and other aspects of the insurance brokerage business.
In Insurance, the key objects are Insurance Policy and Claim. Insurance Policy represents various types of insurance policies such as auto, home, life, or annuity. Claim, meanwhile, tracks any claim against those insurance policies. Separate objects track policy participants, insured assets, policy coverages, and claim payments, plus commission details for reps.
The Insurance Brokerage data model also uses the Insurance Policy object, but adds objects to track broker of record, producer relationships, and other information specific to managing insurance producers.
Complete the Insurance Data Model and Insurance Brokerage for Financial Services Cloud modules for more details. Explore both of these data models’ ERDs on the Financial Services Cloud page in the Data Model Gallery on Salesforce Developers.
The Digital Lending Data Model
Digital Lending, available as an add-on to Financial Services Cloud, includes a data model to track lending applications, applicants, and the data you need to make lending decisions. Take a peek at Digital Lending’s ERD.
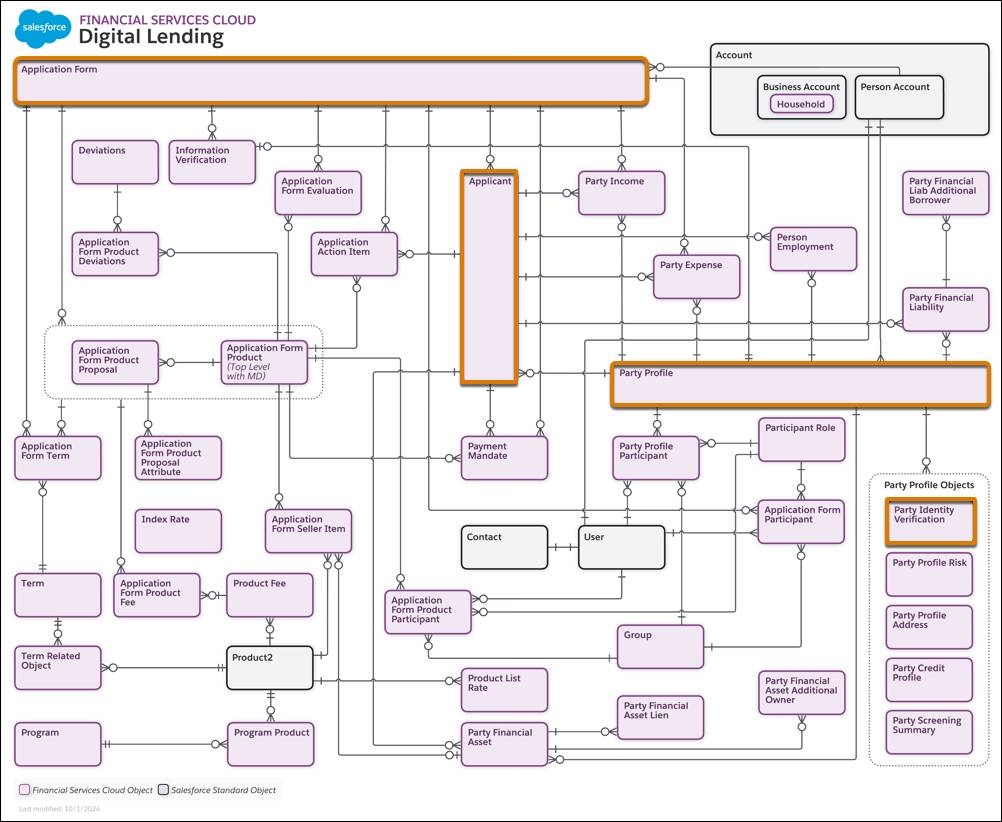
The key object is Application Form, which in Digital Lending, represents a submitted application for a lending product. To use an application form for digital lending, set its UsageType field to Loan Origination. You can also use the Application Form object for other purposes, such as onboarding.
Applicant, a child object of Application Form, represents the individual or group applying for a loan product, whether they’re new or existing clients. Related objects such as Party Profile, Party Information Verification, and others track other key information about an application.
What’s Next?
In this unit, you learned about the Financial Account Data Model, which is central to Financial Services Cloud. You also explored various business-line-specific data models, some of which are included in Financial Services Cloud and others that are add-ons.
Now that you understand these data models, it’s time to explore other data models that support work across your organization’s business lines. In the next unit, you learn about objects that help your team onboard clients and collect customer information.
Resources
- Salesforce Developers: Data Model Gallery: Financial Services Cloud
- Salesforce Help: How Are Financial Accounts Modeled?
- Salesforce Help: Data Models for Financial Services Cloud
- Salesforce Developers: Financial Services Cloud Developer Guide
- Trailhead: Insurance Data Model (see unit: Get to Know the Insurance Data Model)
- Trailhead: Insurance Brokerage for Financial Services Cloud