Customize a Scheduling Policy
Learning Objectives
After completing this unit, you’ll be able to:
- Describe the standard scheduling policies.
- Create a scheduling policy.
- Add a work rule.
- Change the weight of a service objective.
One Policy Isn’t Enough
Scheduling policies rely on specific scenarios. The scheduler uses these scenarios to create the best schedule. But scenarios vary depending on how the day unfolds. Let’s take the scenario of an ideal day. You scheduled your appointments automatically, and not many of them moved during the day. Your standard scheduling policy gets you through just fine.
Sometimes your day doesn’t match this scenario. Suppose there’s an emergency, like a local power outage, and you must reschedule all the appointments in a given territory. Or a lot of high-priority appointments come in at once and you must move lower priority appointments. Or a product must be recalled immediately and you’ve installed it everywhere. Or...you get the idea.
Luckily, the dispatcher console comes with several scheduling policies, each designed for a different scenario. As the day changes, the dispatcher selects the scheduling policy that matches their current scenario.
Scheduling policy |
Designed to... |
Use it... |
|---|---|---|
Customer First |
Balance great customer service with travel minimization. Appointments are graded first by the customer’s selection of a preferred mobile worker or resource, then by the ability to schedule an appointment as soon as possible. The next priority is travel minimization. You can adjust this everyday policy if, for example, you prioritize travel minimization over as soon as possible arrival. |
During an average day. |
High Intensity |
Have mobile workers complete as many appointments as possible. This policy grades appointments first by minimizing travel, then by scheduling appointments as soon as possible. |
During periods of high service volumes, like a storm scenario, where employee productivity is your top priority. |
Soft Boundaries |
Balance great customer service with travel minimization, like the Customer First policy. But this policy also allows mobile workers to share their time between territories for better service coverage. |
When you want mobile workers to cover nearby territories, such as in urban areas with small geographic territories. |
Emergency |
Be used with the Emergency Chatter action to dispatch emergency service appointments. |
For emergency situations, like someone being stuck in an elevator during a power outage. |
Maria decides to start out using the standard Customer First policy. Her dispatchers can choose different scheduling policies during the day if their situation changes.
Fine-Tuning Scheduling Policies
Initially, Ursa Major uses the standard Customer First scheduling policy. It’s a good start, but it’s just the first step on the team’s field service journey. Where you are on the journey depends on your organization’s size and maturity. Here are the steps to follow on the field service journey.
-
Visualize. Implement and capture data about your field service organization.
-
Automate. Use this information to reduce manual processes and errors.
-
Optimize. Refine and improve your automatic tasks.
-
Innovate. Lead and disrupt the field service industry.
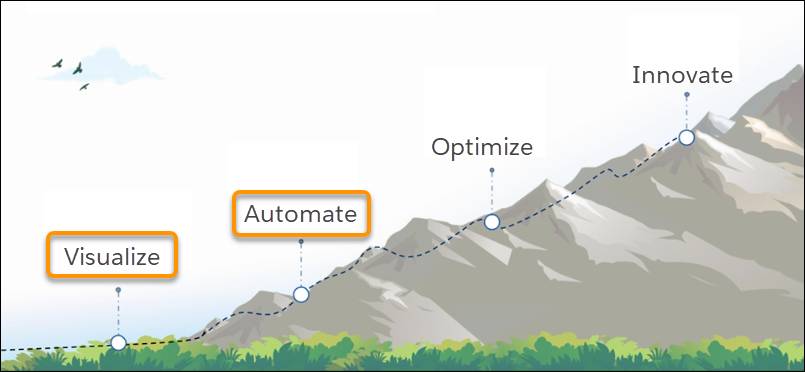
Ursa Major is just starting out. Maria is at the visualize and automate stages. She’s most concerned with using basic scheduling tools to gather data. She wants to see how long appointments take, how accurate travel times are, how often appointments run long or short, and more. When she has enough data, she can start to improve her field service team’s results with optimization and innovation.
Create a Scheduling Policy
Maria creates a policy based on the standard Customer First policy. She plans to customize it as she gathers information about how scheduling works at Ursa Major.
So she clones the Customer First policy.
- From the App Launcher
 , click the Field Service Admin tile.
- Click the Field Service Settings tab and click Go to Guided Setup.
- If Guided Setup checks permissions sets, click Go to Guided Setup again.
- Click Customize Scheduling Policies.
- Hover over the policy to clone. Maria hovers over Customer First.
- Click
 and click OK.
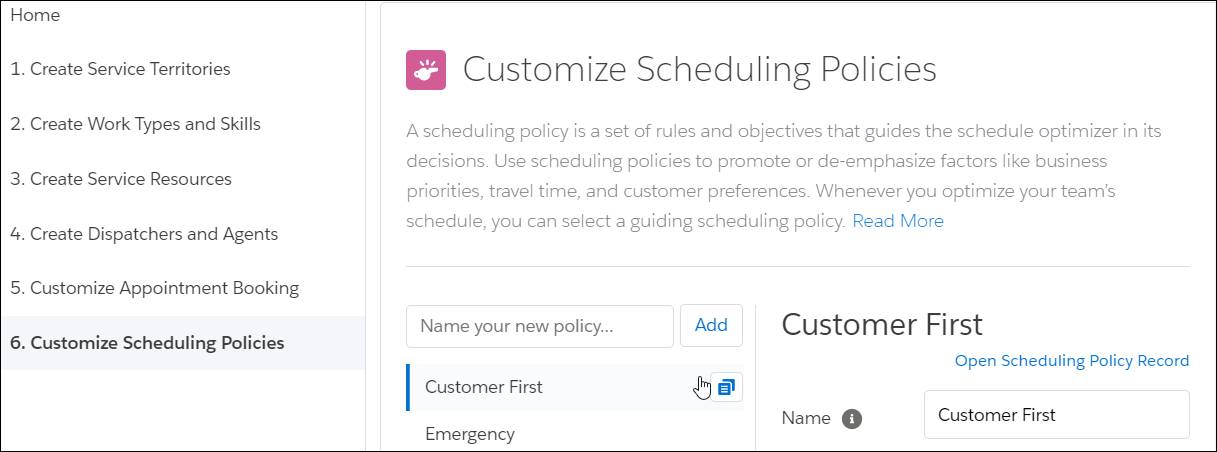
- Click the new policy. Maria clicks Copy Of Customer First.
- Enter the new policy’s name. Maria enters
Ursa Major Customer First.
Maria has a brand-new scheduling policy. It uses the same values as the standard Customer First policy, but changes she makes to the new policy don’t affect the standard policy. That way, she can tweak her new policy but keep the standard Customer First policy to refer to.
Add a Work Rule
Remember when Maria created the Ursa Major Resource Availability work rule? She’s going to add it to her new policy to make sure that her field service team gets their lunch breaks. She predicts that this change will make her whole team happier.
- In the new Ursa Major Customer First policy, scroll to Work Rules.
- Use the arrows to add the work rule to the list of Selected Rules. Maria adds Ursa Major Resource Availability.
- Move conflicting rules out of the list of selected rules. Maria moves Resource Availability to Available Rules.
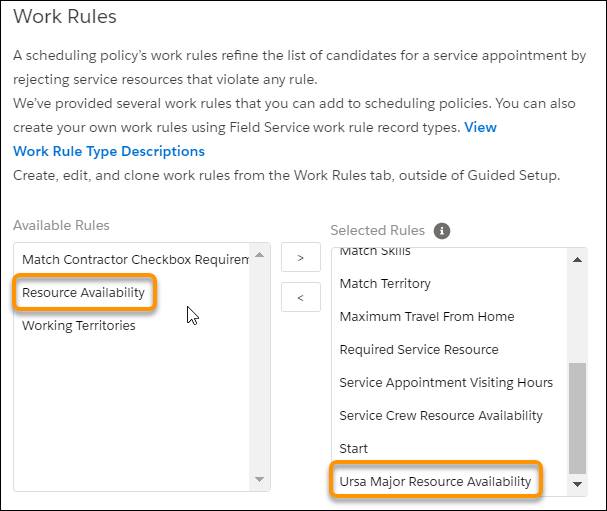
Now service appointments can’t be scheduled during lunch break without creating a rules violation. Maria’s team is so glad to have their lunch hours clear that they bring her tacos on Tuesdays for a month!
Change the Weight of Service Objectives
Maria starts changing the weights of her service objectives to see how these changes affect the Ursa Major schedule. She wants to find the best possible combination that supports business priorities and optimizes productivity.
When she has enough data, she creates a sandbox of Ursa Major’s org. Safe in the sandbox, she changes the weight of each service objective to see how it affects the schedule. Before she starts, she checks out her current schedule. It shows 84% utilization, with 73 hours of scheduled time and a 16-minute average travel time per appointment.

First, Maria experiments with increasing the weight of the ASAP service objective.
- In Guided Setup, click the scheduling policy. Maria clicks Ursa Major Customer First.
- Scroll to Service Objectives.
- Drag the slider to the desired weight. Maria sets ASAP to 5 and Minimize Travel to 1.
- In the service appointments list, select Optimize.
Maria has already set up her org to use optimization by creating an optimization user and assigning the correct permissions. It takes a few minutes to run. Maria uses the time to get a glass of sparkling water for her taco lunch. After a long sip, she views her new schedule.

The scheduled time goes down by one hour and the average travel time increases by one minute per appointment. When this reduction is multiplied over time, this change decreases productivity significantly. She doesn’t want that outcome.
Next, she decreases the weight of ASAP to 1 and increases Minimize Travel to 5. She optimizes again. Here’s the new Gantt.

Travel time goes down by 1 minute per appointment over the standard weighting and is 2 minutes less than the ASAP version she just tried. Plus, her scheduled time is better than for ASAP and the same as the standard scheduling policy. She’ll see how this change works out over time. But it looks like increasing the weight of Minimize Travel helps Ursa Major complete more jobs. Maria is excited to see how small changes to the weight of service objectives can lead to big changes in productivity.
In this unit, Maria learned how scheduling policies apply to certain scenarios, viewed the list of standard policies, and created her own scheduling policy. Then she customized it by adding a work rule and changing the weight of the service objectives.
Resources
- Video: Scheduling Policies in Field Service
- Salesforce Help: Create and Manage Scheduling Policies
- Salesforce Help: When to Use a Sandbox
- Salesforce Help: Activate Schedule Optimization