Import and Integrate Your Data
Learning Objectives
After completing this unit, you’ll be able to:
- Understand the tools and knowledge required to implement a successful integration.
- Identify the steps necessary to build an integration strategy.

What is Integration?
Integration is the process of linking together different computer systems or applications. As an education admin, you can likely rattle off a pretty impressive list of the computer systems in place at your institution. From the Learning Management System (LMS) and Student Information System (SIS), to event management tools and billing systems, it’s a common challenge to have constituent data siloed in many different places across campus. Regardless of the number of systems involved, the process of importing and integrating your data into Salesforce doesn’t have to be as daunting as it may appear. Not to mention the payoff of integrated data is hefty and long-lasting.
Integration includes two components.
-
Physical integration: the actual linking of the systems and apps (this is usually handled by the IT department because it’s more technical in nature).
-
Business integration: identifying what data must be synced, how frequently, and how the integration aligns with existing business processes.
In this unit we offer some best practices for integration tools and an integration strategy that addresses both physical and business integration. We start with an introductory list of data import scenarios that may be relevant to your institution.
Common Import Scenarios
Before we get into integration tools and strategy, let’s set the stage with an idea of how integration will look when put into action at your institution. To help you map out some of those possibilities, this chart organizes common data import scenarios by higher ed departments.
Common Import Scenarios |
|
|---|---|
Recruitment and Admissions |
|
|
Student Experience
|
|
|
Advancement
|
|
Integration Tools
When planning an integration effort, consider three different types of tools: an existing connector, an integration you build from scratch, and a middleware tool. Each one has its place, its benefits, and its list of things to consider before diving in. A summary like the chart below can be a valuable resource in the step of selecting an integration tool. Assembling tool definitions, explanations of functionality and required resources, as well as benefits, considerations, and examples of each tool in use all in one place helps you weigh the options.
Use Existing Connectors |
Build Your Own Integration |
Use Middleware Tool |
|
|---|---|---|---|
|
Examples
|
Gmail Outlook Classy Marketing Cloud Engagement Account Engagement |
Building a connection to a legacy on-premise application |
MuleSoft |
|
What it is
|
A connector that already exists and is specifically designed for Salesforce |
Salesforce APIs or the Salesforce Connect Tool allow you to retrieve data from external apps and display it in Salesforce by actually copying the data into a database |
A separate tool designed to connect systems |
|
How it Works
|
An admin downloads a connector on the AppExchange and configures it in Salesforce |
A developer writes code to establish a connection and data exchange |
The middleware tool is configured to connect required systems |
|
Resources Needed
|
Salesforce Admin |
Salesforce Developer |
Salesforce Architect and an admin for the middleware tool |
|
Benefits
|
The easiest, most straightforward option |
Allows for the most customization |
Provides a central location to monitor and track all of your integrations |
|
Things to Consider
|
Figure out who developed the tool and who is responsible for ongoing support and maintenance |
Developer knowledge required—best used for a small number of custom integrations (typically no more than two or three) |
Make sure you choose a tool that you are comfortable using long-term as it can be difficult to switch later on |
Integration Strategy
After familiarizing yourself with the integration tools at your disposal, it’s time to commit to an integration strategy. Importing and integrating your data is well worth the time it takes, but it's not a project that benefits from a fast and loose approach.
For your consideration, here’s a five step approach to integration that takes you from planning all the way to build.
Step 1: Understand your data and what you will need to connect
In this critical planning step, map out data and processes. Designate a system of record and estimate the volume of data that will be brought in or updated each month. This will help you estimate and understand costs.
Step 2: Determine how often data is updated and imported
You’ve got two options here: Real-Time and Batch.
With Real-Time imports, data is always up-to-date but this import style could cause errors, slow down your org, or use more data storage than you’re prepared for per month.
Batch imports can be timed accordingly with data storage limits and can be scheduled for a specific time of day (a less busy time that doesn’t interfere with other org processes and work), but data is not up-to-date immediately.
Step 3: Identify system “owners”
Ask yourself “Who is the point of contact for each system?”. Will it be a Salesforce admin, the IT department, or possibly an ISV partner? There isn’t a single answer that will apply to all institutions and it may be a combination of people, departments, and a third party. Defining system owners allows all owners to connect on errors and troubleshoot together.
Step 4: Organize and prioritize
When you begin this step, start by identifying key costs of integration. Consider things like your current data storage options and limitations. Is expansion necessary? What are the costs incurred there? Also factor in the costs of connectors or middleware if applicable to your institution.
Next, determine the order of integration. What needs to be integrated first? What can wait until later? The answers to these questions may be dependent on the cost analysis you just completed or on what processes are deemed most essential at your particular institution. It may make sense to group certain integrations so you can account for which ones are related. This may result in changing the prioritization order of one integration because of its impact on another.
Step 5: Design and build integration
The final step! When you enter your design and build phase, make sure you document all deliverables and specs. This includes technical requirements, expected process results and improvements, and clear documentation on what the integration is supposed to accomplish so you can monitor progress.
Once the integration is built and implemented, gather feedback from strategic leaders, business unit leaders, other admins, and end users.
EDA Data Architecture Objects and Fields
We want to take a moment to point out a tool that can be quite useful for integration documentation and maintenance. The EDA Data Architecture Objects and Fields list makes it easy for you to understand the various elements of the architecture. We’ve linked to the list in the Resources section at the end of this unit.
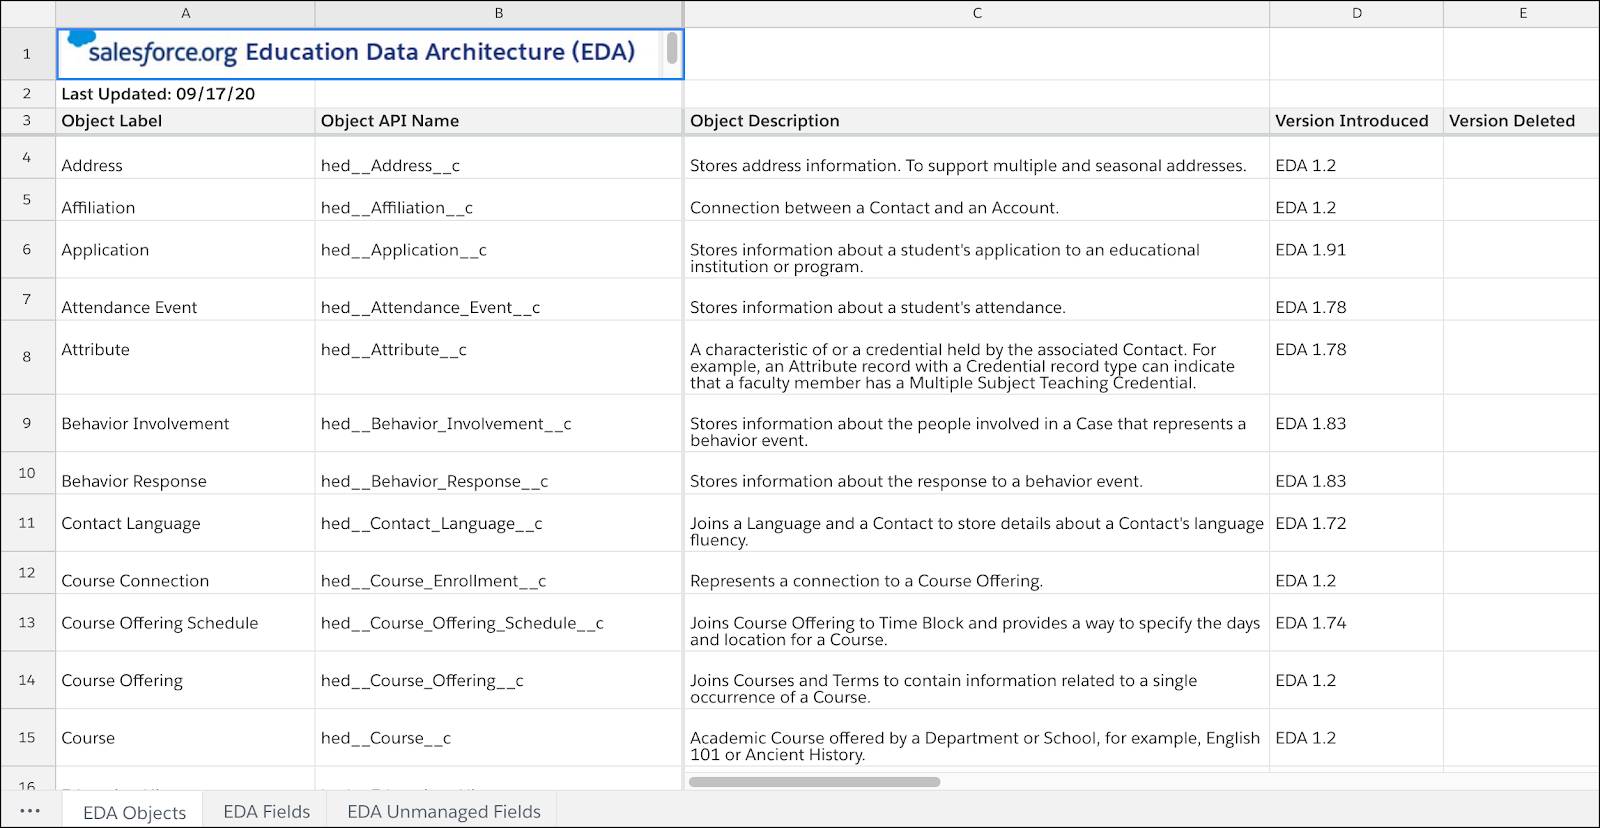
How can you put the EDA Data Architecture Objects and Fields list to work at your institution? We suggest admins use the list as a starting point, adding in any custom objects that they build in their orgs. Documenting data in this way is especially helpful in integration, when admins need to understand what data needs to be where. Documentation is also valuable because it helps future admins understand what already exists and what may need to be updated.
This review of integration tools and strategy is great preparation for starting the conversation about data import and integration at your institution. When you’re ready to learn more, check out the resources linked below.
You’ve completed your journey through the ins and outs of EDA configuration and data import! We hope this module has answered your most burning questions about the basics of configuration and customization of EDA. We also hope it sparked a new list of questions about the ways you can approach these topics to truly make EDA tailor-made to your institution. We suggest exploring the Resources sections of each unit and blazing new trails on Trailhead to continue honing your skills as an awesome education admin.
Resources
- Salesforce Help: Education Data Architecture Objects and Fields
- Salesforce Help: Recommended Data Import Sequence for EDA
- Salesforce Help: Disable Matching Rules