Create a Data Processing Engine Definition
Learning Objectives
After completing this unit, you’ll be able to:
- Use nodes to create the definition.
- Join data from two nodes to create a new output.
Before You Start
Before you take the steps in this module, make sure you complete the Data Processing Engine in Loyalty Management module. The work you do here builds on the concepts and work you do there.
In the Data Processing Engine in Loyalty Management module, Linda designed a data processing engine (DPE) definition to calculate partner liability at the end of each week. She identified the data sources and the other nodes required and how they are connected. In this module, we look at how Linda creates the definition in the builder.
Set Up the Prerequisites
With the design already created, Linda can easily put together the DPE definition. She refers to the design for a quick recap.
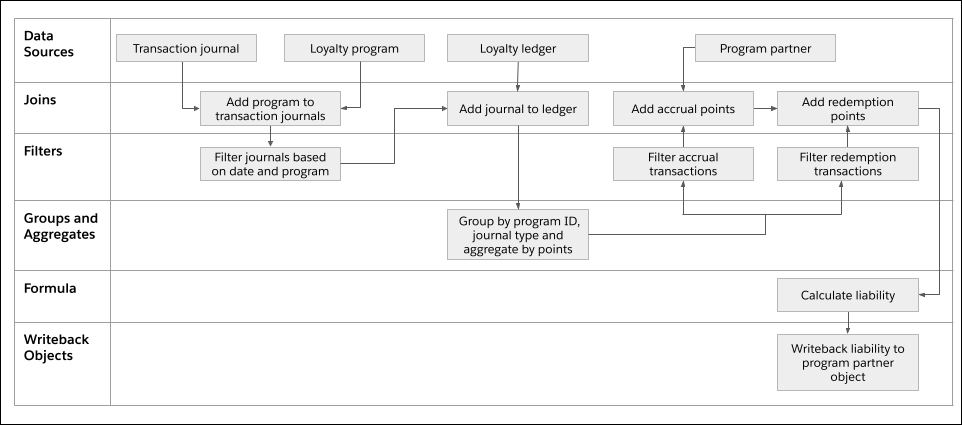
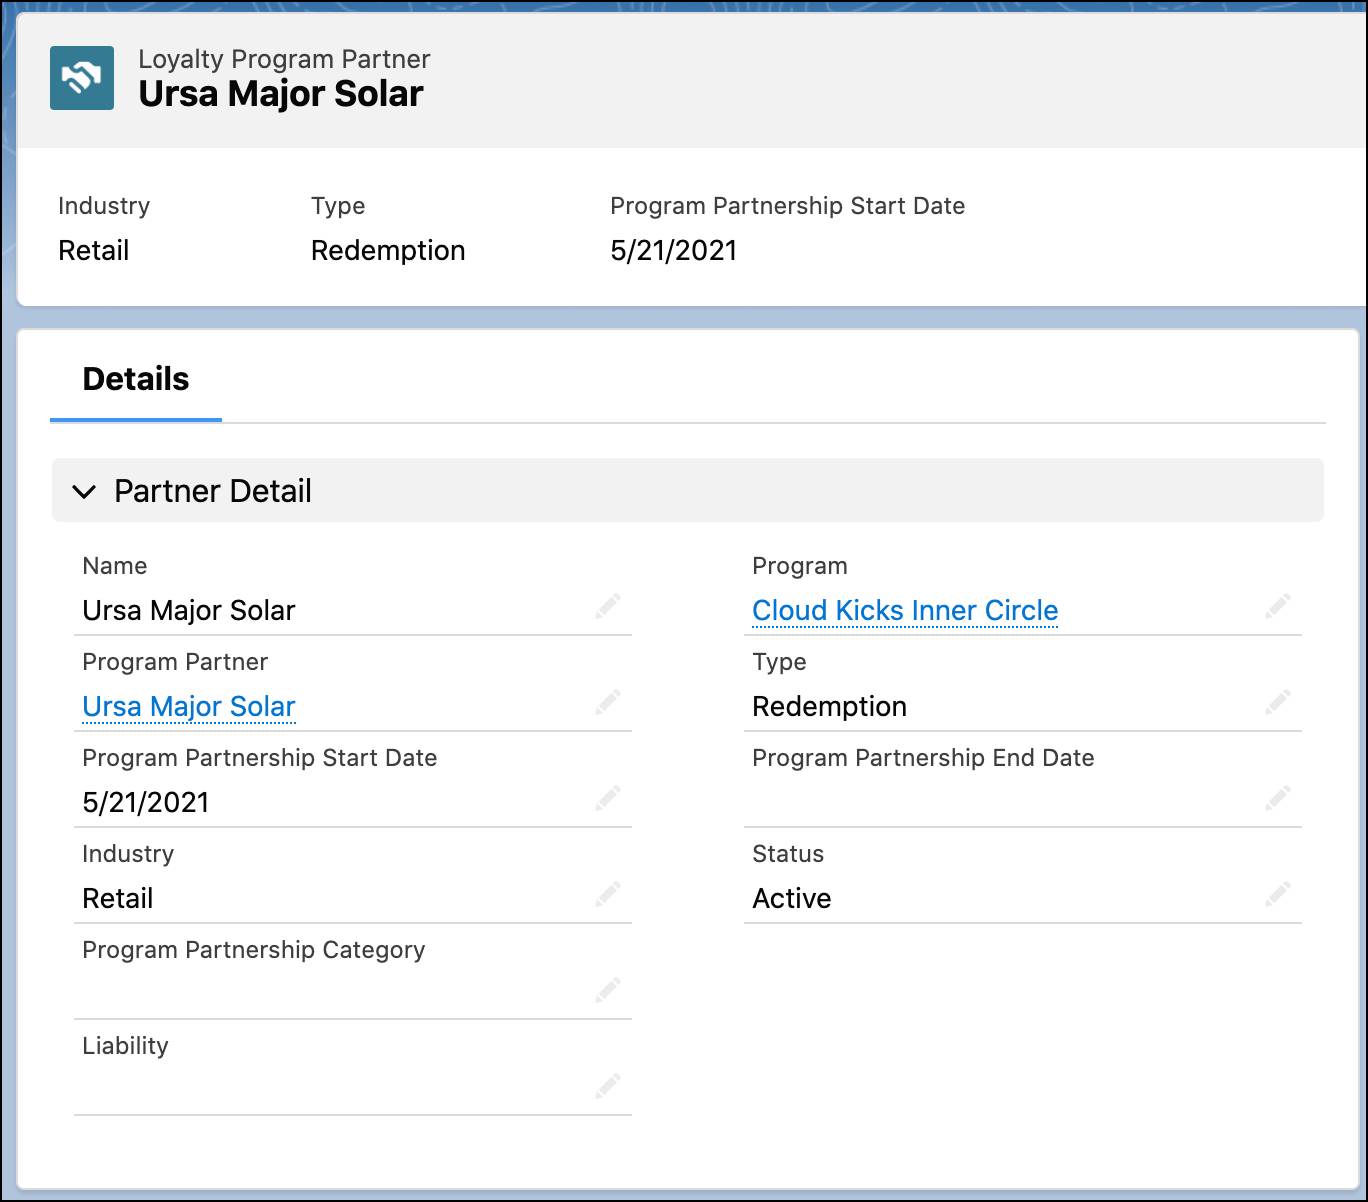
According to this design, the liability amount will be written back to a custom field, so Linda creates the Liability custom field first in order to reference it in the definition.
| Object | Field | Data Type |
|---|---|---|
| Loyalty Program Partner | Liability | Number (Length 16, Decimal Places 2) |

To learn how to create custom fields for objects using Object Manager, see Custom Fields: Quick Look.
Linda checks if the Liability custom field is added to the Loyalty Program Partner record.
Create the Definition to Calculate Liability
Linda has two options to create a definition. She can either create it using the nodes in the builder or by using a JSON file and then uploading it to the builder. If changes need to be made to the definition, Linda can export the file, make the required changes, and then upload it back to the builder.
Linda decides to create it using the builder. She knows the data sources she needs, the required nodes, and the writeback object. Linda now begins creating the definition.
- Click
 , and select Setup.
 - In the Quick Find box, enter:
Data Processing Engine. - Under Workflow Services, click Data Processing Engine.
- Click New.
- Enter Name:
Partner Liability. - Select Process Type as Loyalty.
This will help you group all loyalty-related definitions. - Click Create.
Linda refers back to the diagram and adds the Transaction Journal and Loyalty Program as the first data sources.
- Click New Data Source.
- Enter Name:
Transaction Journal. - Click Save.
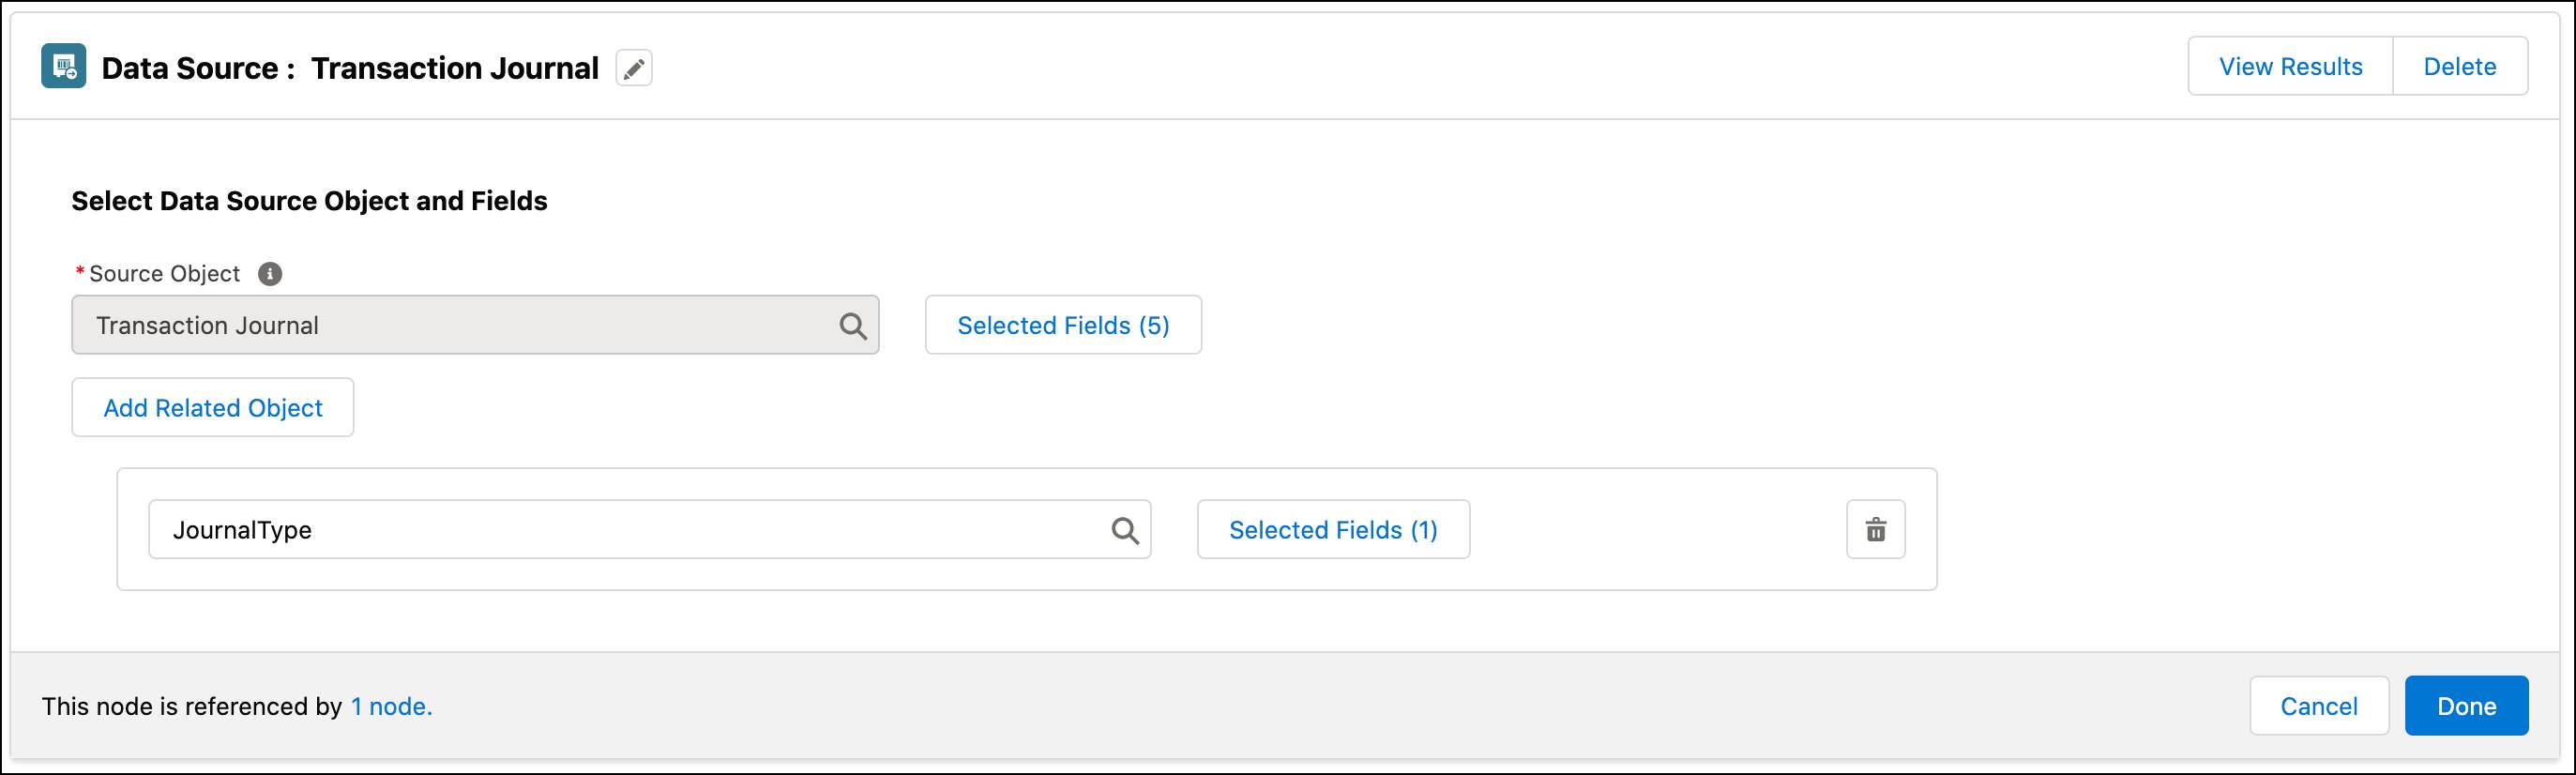
- Select Source Object as Transaction Journal.
- Click Select Fields.
- Select the following fields.
- Activity Date
- Loyalty Program
- Partner
- Transaction Amount
- Transaction Journal ID
- Click Done.
- Click Add Related Object.
- Select JournalType.
- Click Selected Fields.
- Select Name.
- Edit alias:
JournalTypeName. - Click Done, and Done.
Linda now adds the Loyalty Program as the data source to fetch details about the program.
- Click New Node and specify the following details.
- Select Node Type: Data Source
- Name:
Loyalty Program
- Click Save.
- Select Source Object as Loyalty Program.
- Click Select Fields.
- Select the following fields.
- Loyalty Program ID
- Program Name
- Click Done, and Done.
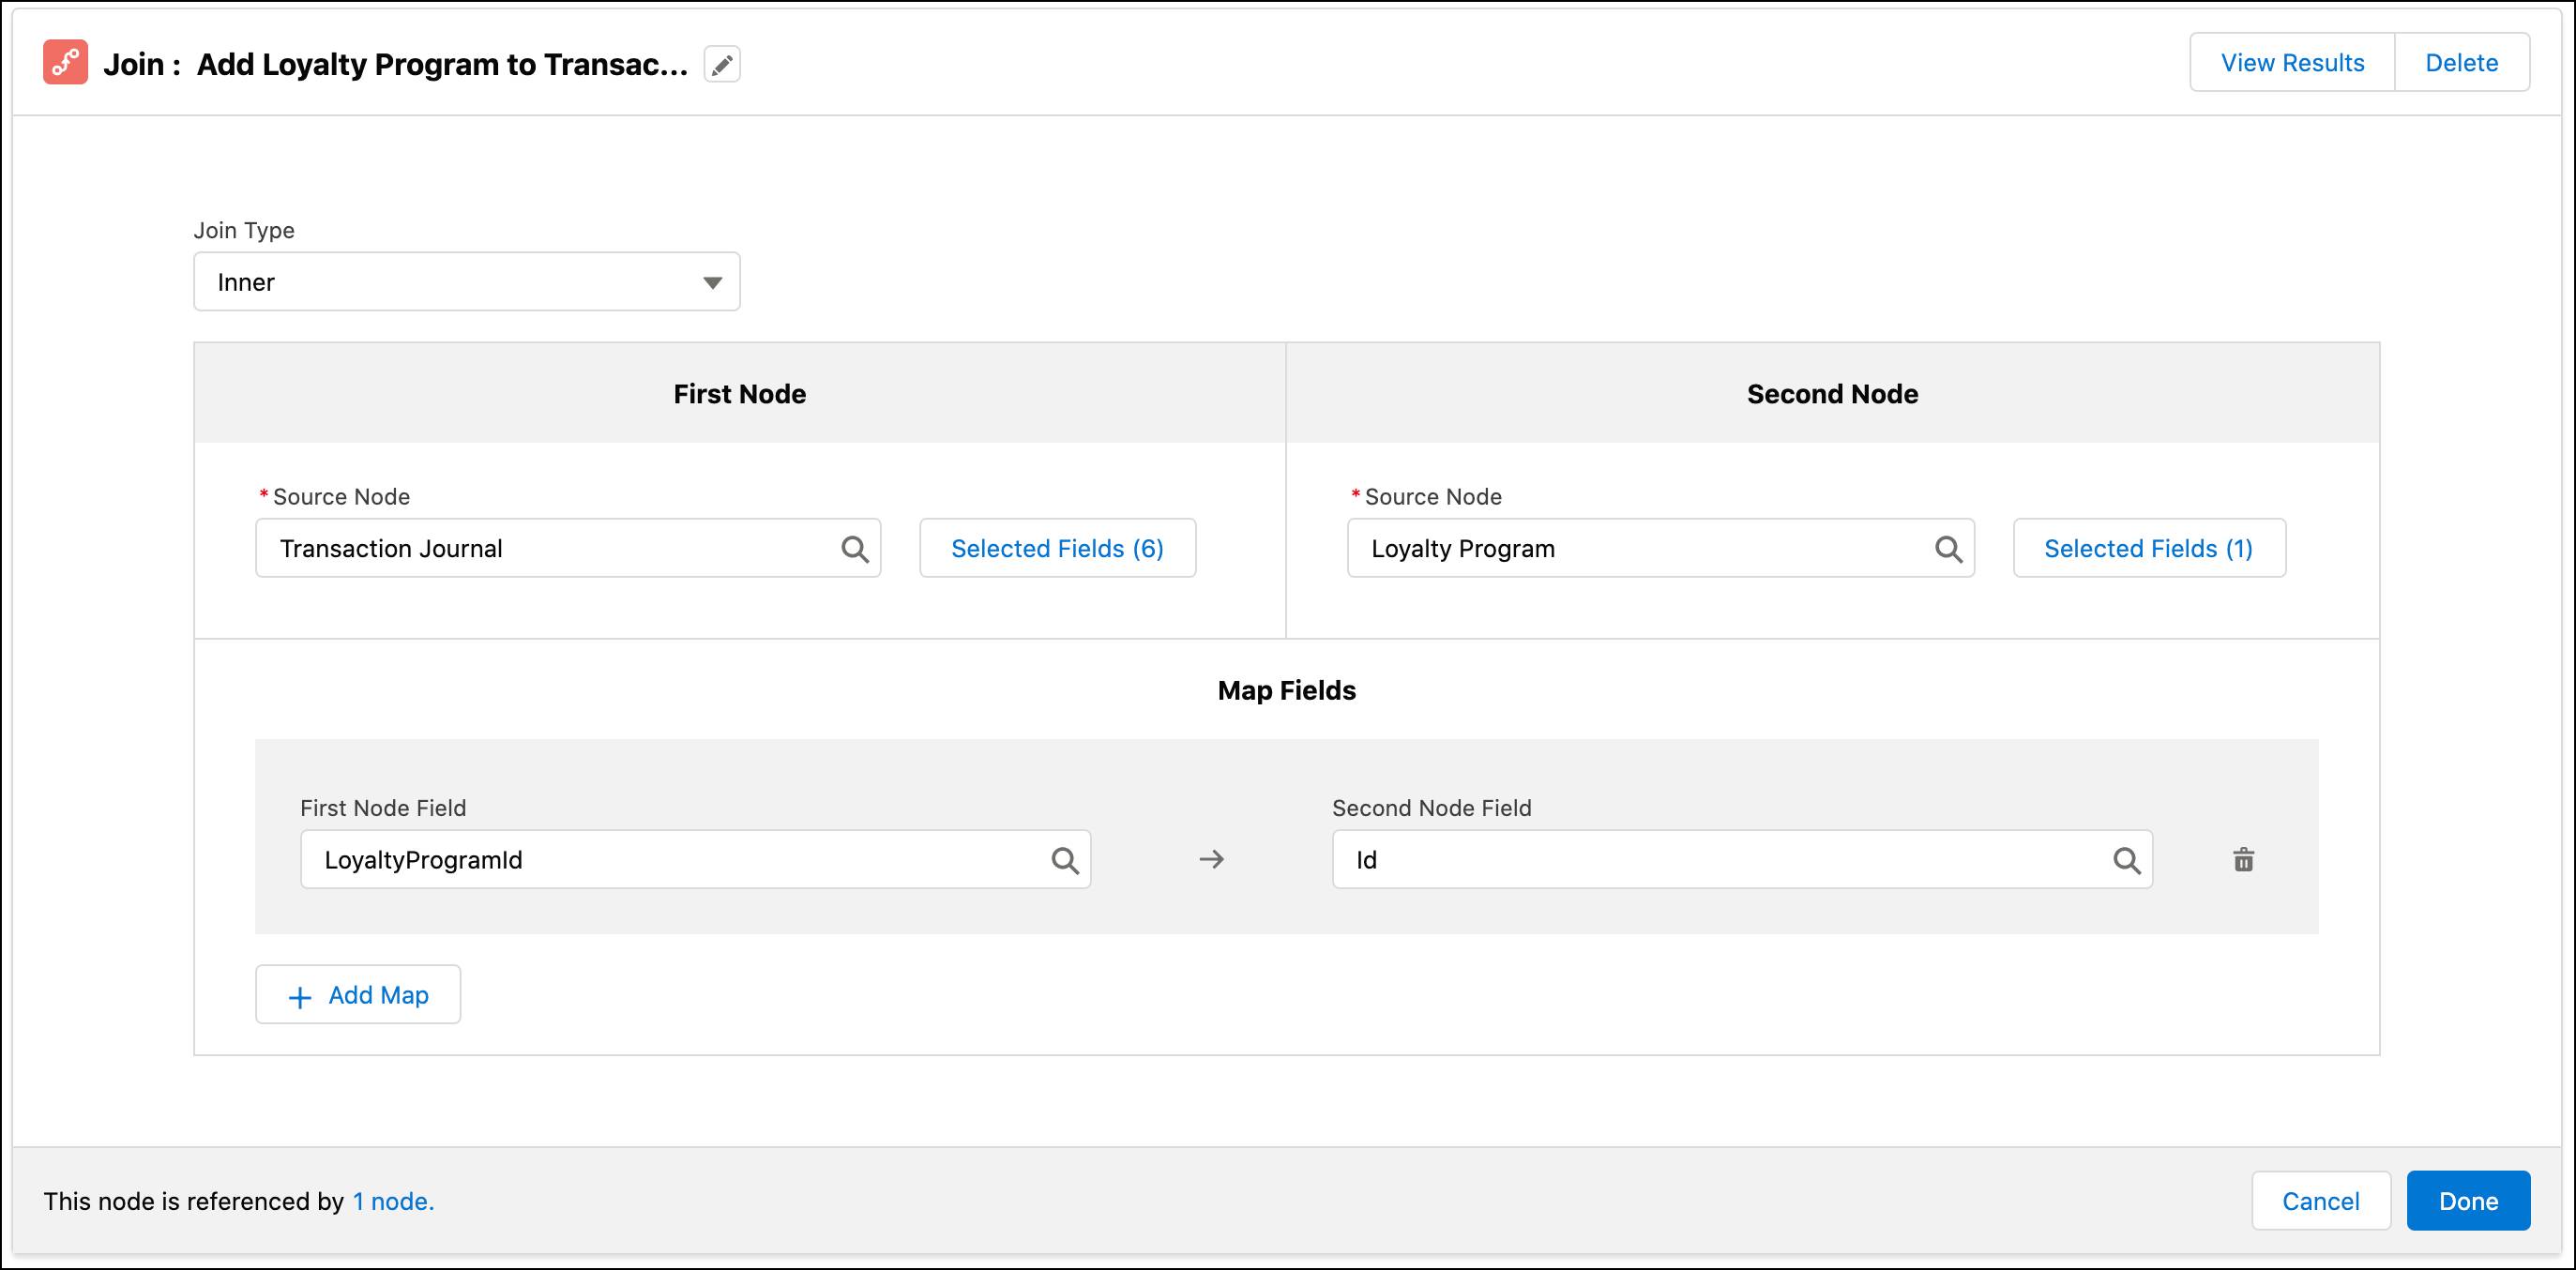
Next, Linda requires the program name associated with the transaction journals. To include the name, she joins the data from the two nodes to create a new output. She uses the inner join because she wants only matching fields to be part of the output.
- Click New Node and specify the following details.
- Select Node Type: Join
- Name:
Add Loyalty Program to Transaction Journals
- Click Save.
- Select Join Type as Inner.
- Specify the following details under First Node.
- Source Node: Transaction Journal
- Select Fields: Select all available fields
- Click Done.
- Specify the following details under Second Node.
- Source Node: Loyalty Program
- Select Fields: Name
- Click Done.
- Specify the following details under Map Fields.
- First Node Field: LoyaltyProgramId
- Second Node Field: Id
- Click Done.
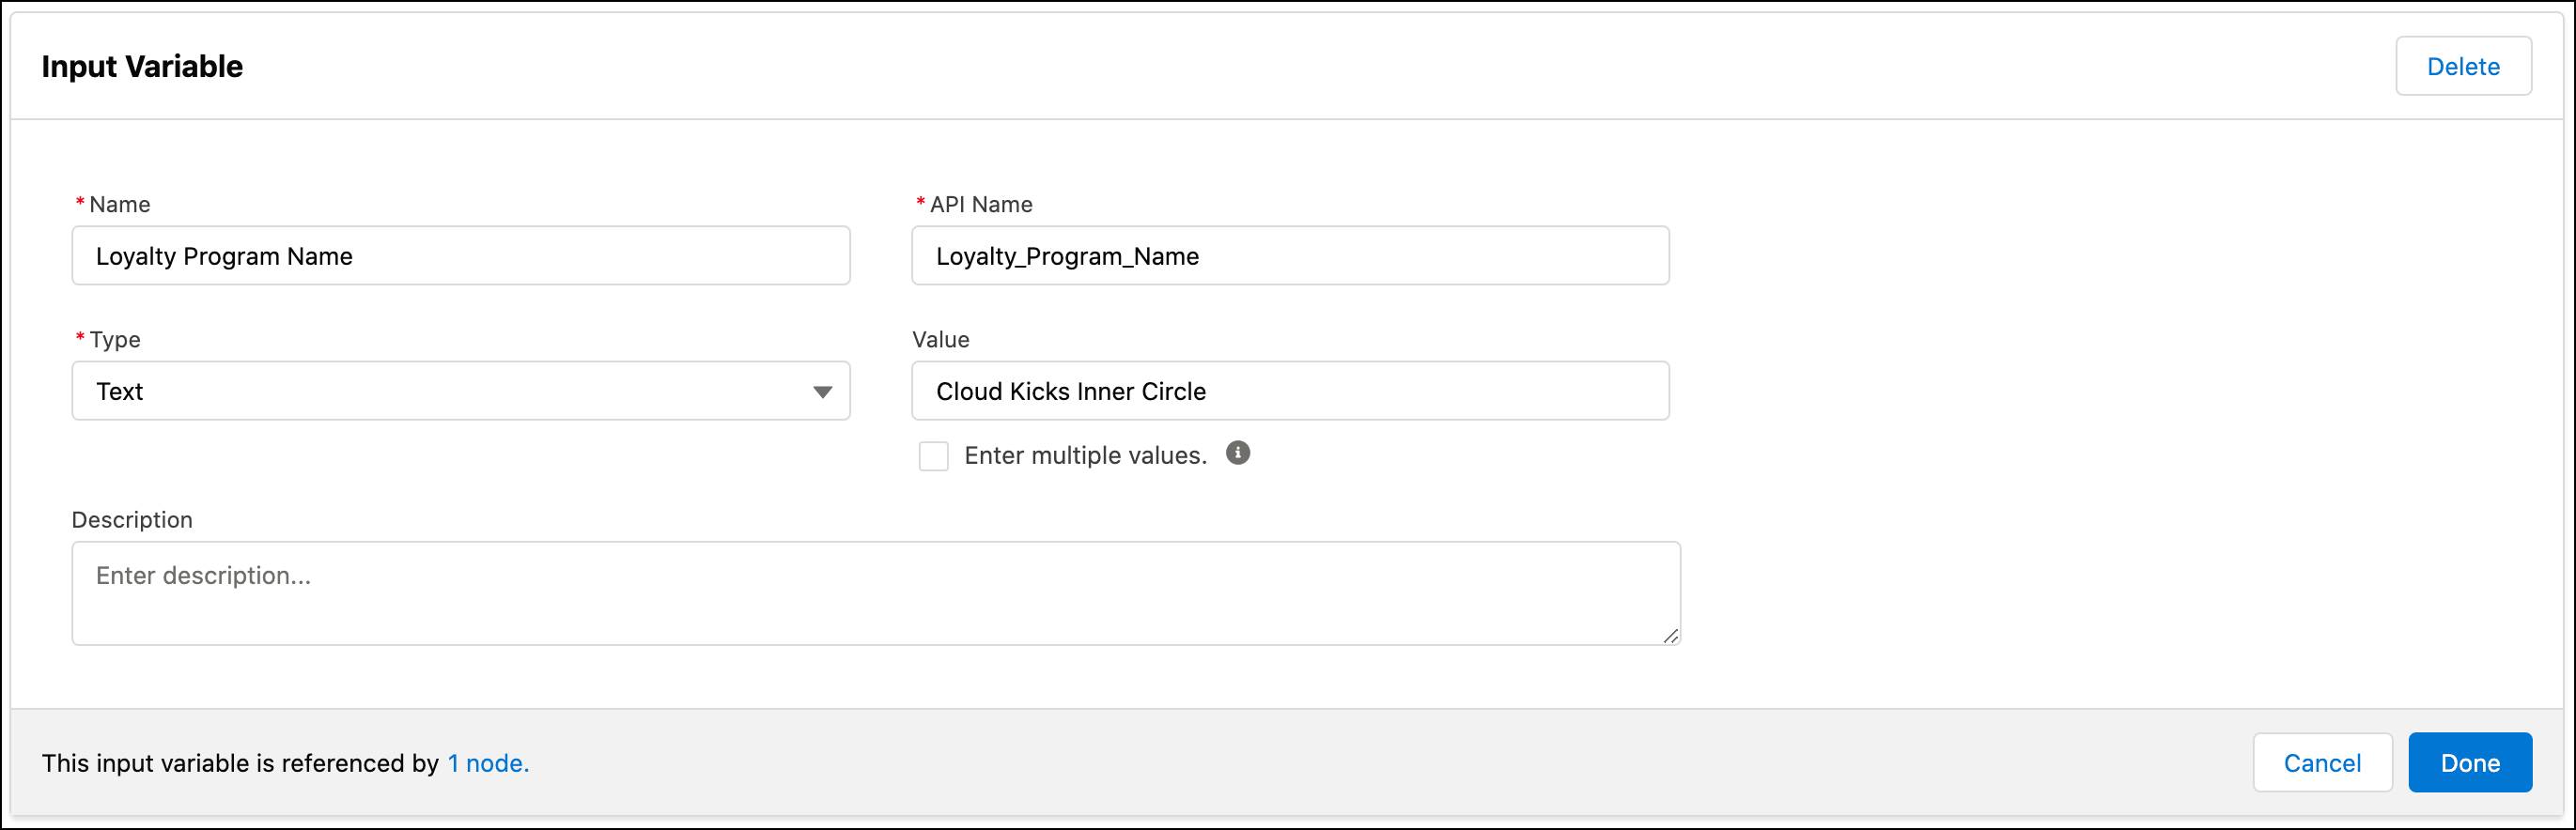
Next, Linda wants to filter out any irrelevant data. She needs both data related to weekly transactions, and also transactions particular to the Cloud Kicks Inner Circle loyalty program. Before she creates a filter for this, she creates two input variables to use in the filter. The first is for filtering with the date and the second is for the program.
- Click the Input Variable tab.
- Click New Input Variable.
- Specify the following details.
- Name:
Run Date - Type: Date/Time
- Name:
- Click Done.
- Repeat steps 3 and 4 with the following details.
- Name:
Loyalty Program Name - Type: Text
- Value:
Cloud Kicks Inner Circle
- Name:
She then creates the filter.
- Click New Node and specify the following details.
- Select Node Type: Filter
- Name:
Filter Based on Date and Program - Click Save.
- Select Source Node as Add Loyalty Program to Transaction Journals.
- Specify the following details for the first filter condition.
- Field: ActivityDate
- Operator: Greater Than or Equal
- Type: Input Variable
- Value: Run Date
- Click Add Condition.
- Specify the following details for the second filter condition.
- Field: Name
- Operator: Equals
- Type: Input Variable
- Value: Loyalty Program Name
- Click Done.
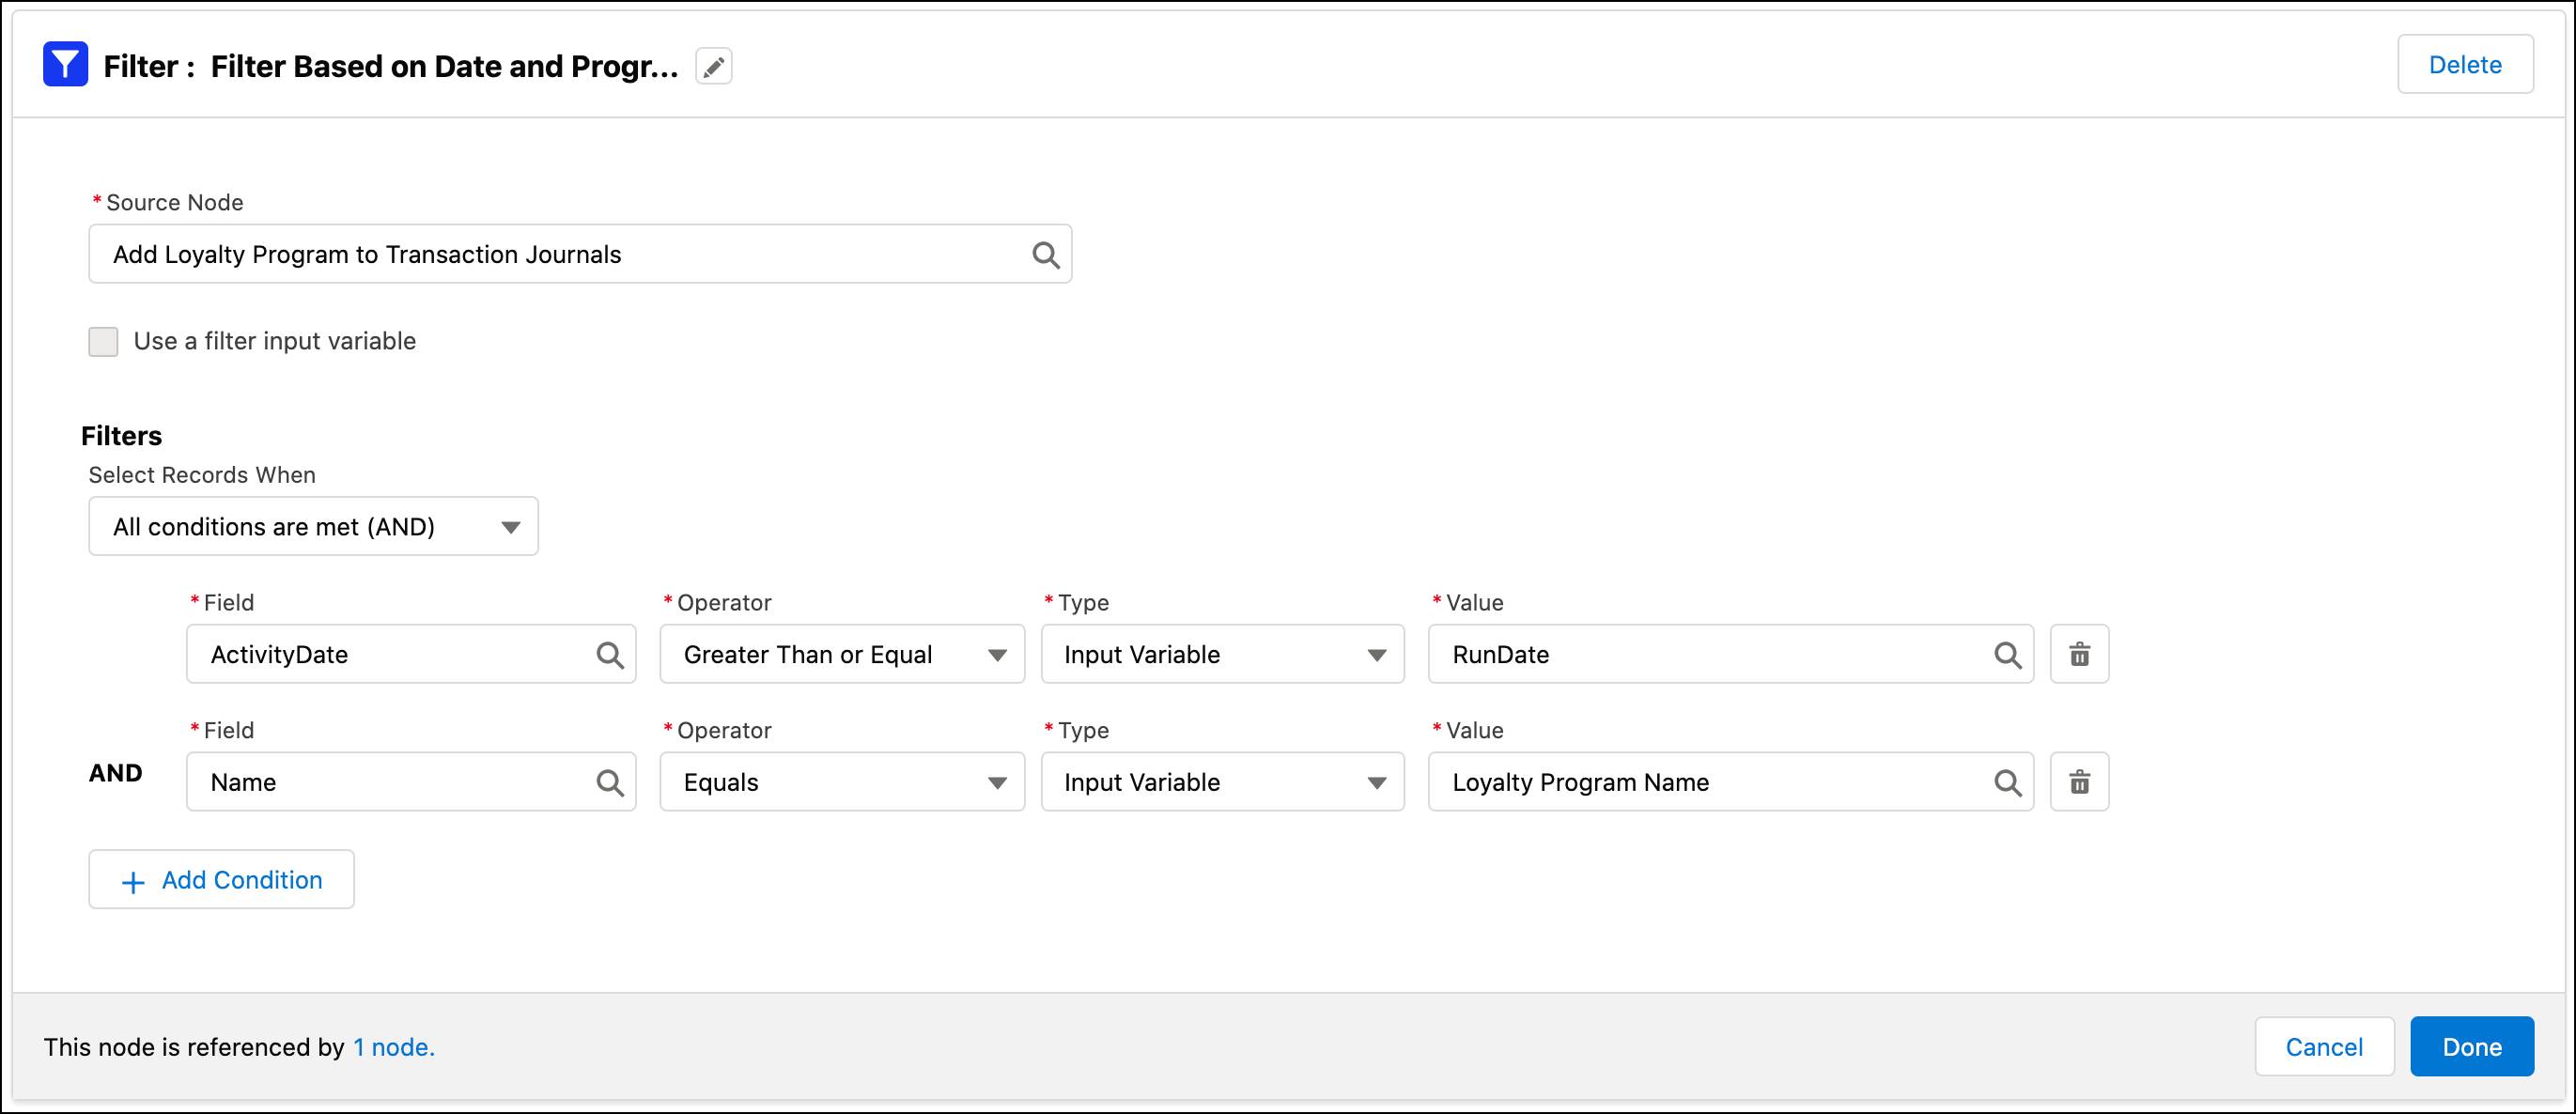
Linda now has filtered data about all the transactions that fall within a particular week. In the next unit, we follow along as Linda uses additional nodes to further transform the data.