Configure Identity Resolution Rulesets
Learning Objectives
After completing this unit, you’ll be able to:
- Create identity resolution rulesets.
- Follow best practices for identity resolution.
Create Identity Resolution Rulesets
Now that we’ve covered the fundamental concepts of unified profiles and data mapping, you are ready to put it into action. With requirements in hand, you can begin data ingestion and modeling. Be sure to review the Data 360 Connectors and Integrations Trailhead module. After your data has been ingested and mapped, you are ready to create up to two identity resolution rulesets from the Identity Resolutions tab. Here are the quick steps you can follow.
- Click New.
- Select the Individual entity.
- Add an optional ruleset ID of up to four text characters. Be aware that once you set a ruleset ID, it can’t be changed.
- Click Next.
- Name your ruleset and add an optional description to help identify its properties.
- Click Save.

NTO Use Case
To help you decide on what match rules make sense for your organization, let’s revisit the disconnected datapoints for Rachel, our NTO enthusiast. NTO has information about Rachel in Agentforce Service, Agentforce Marketing Engagement, Agentforce Commerce, and Loyalty Management. But in total, there are 6 total records of her. Let’s review the connections to determine what match rules they can use to unify Rachel’s profile.
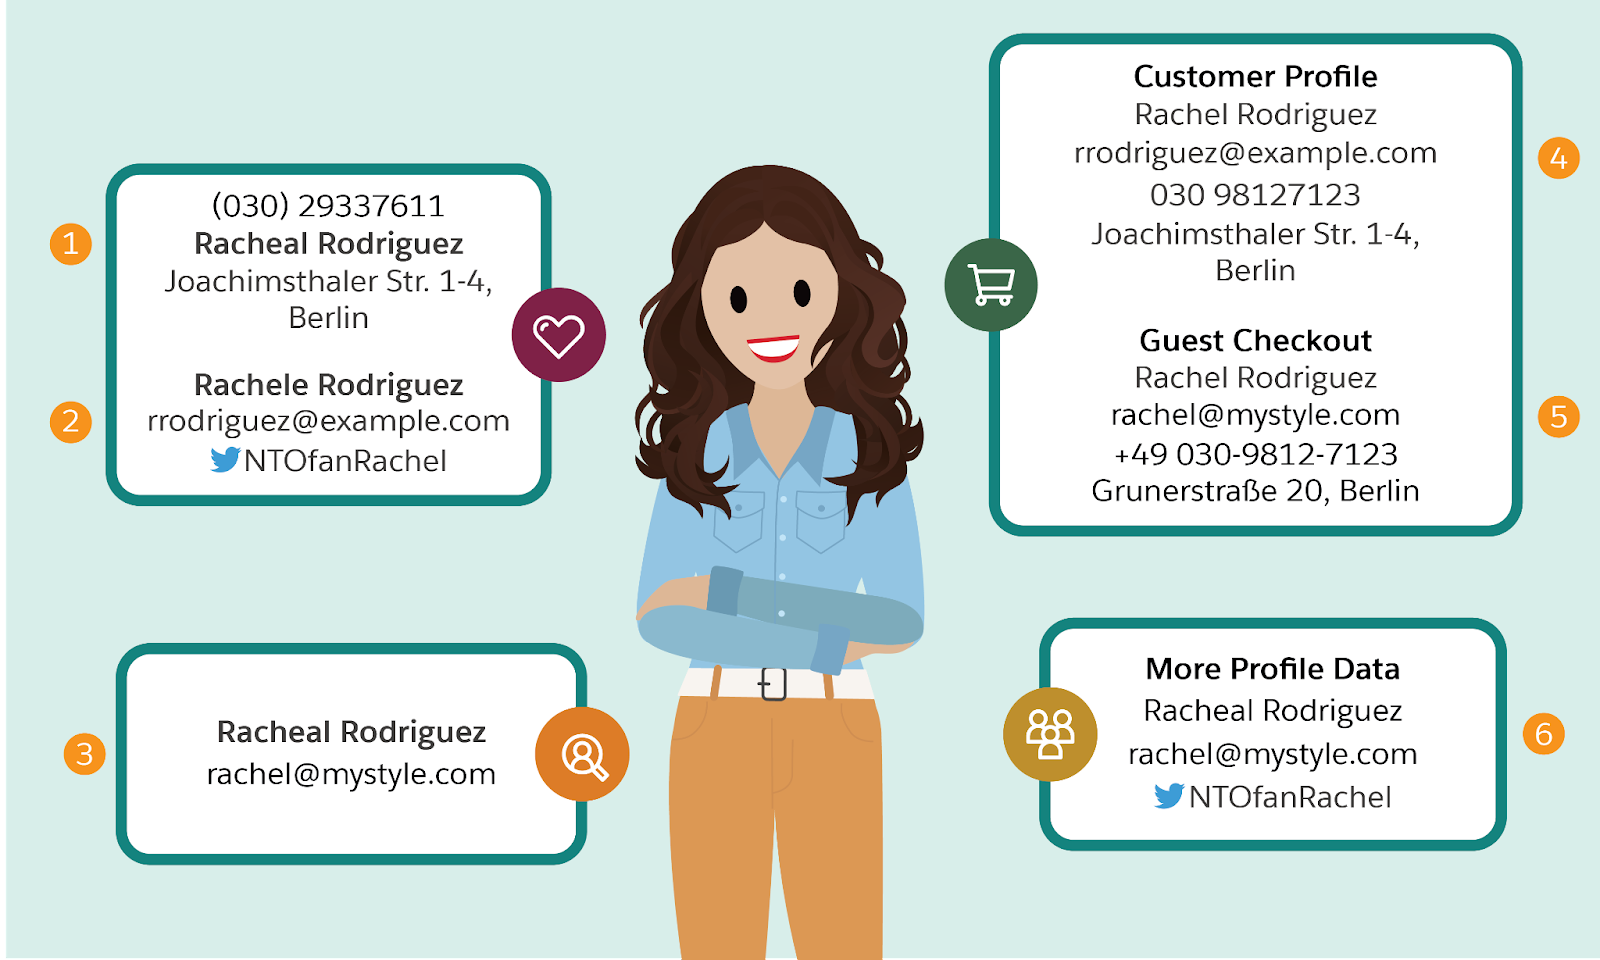
- Records (1) and (4) can be linked together as they share a fuzzy first name “Racheal” vs. “Rachel” and the exact address, Joachimsthaler Str. 1-4, Berlin.
- Records (2) and (6) can be linked together as they share a fuzzy first name “Rachele” vs. “Racheal” and the exact party identifier, a twitter handle “NTOfanRachel.”
- Record (3) and (6) can be linked together as they share an exact name and exact email address.
- Records (4) and (5) can be linked based on exact name and normalized phone number.
- Records (5) and (6) can be linked together based on a fuzzy name “Rachel” vs. “Racheal” and her work email address, rachel@mystyle.com.
Given this data, what matching rules might you use to create this unified individual profile of Rachel?

Here are the match rules NTO used to create Rachel's profile.
- Fuzzy first name AND exact normalized address OR
- Fuzzy first name AND exact party identifier OR
- Exact first name AND exact normalized email OR
- Exact first name AND exact normalized phone OR
Identity Resolution Home Page
After configuration, you can monitor and edit your rulesets from the Identity Resolutions tab. From the individual ruleset page, you can view the ruleset properties, details, and processing history.
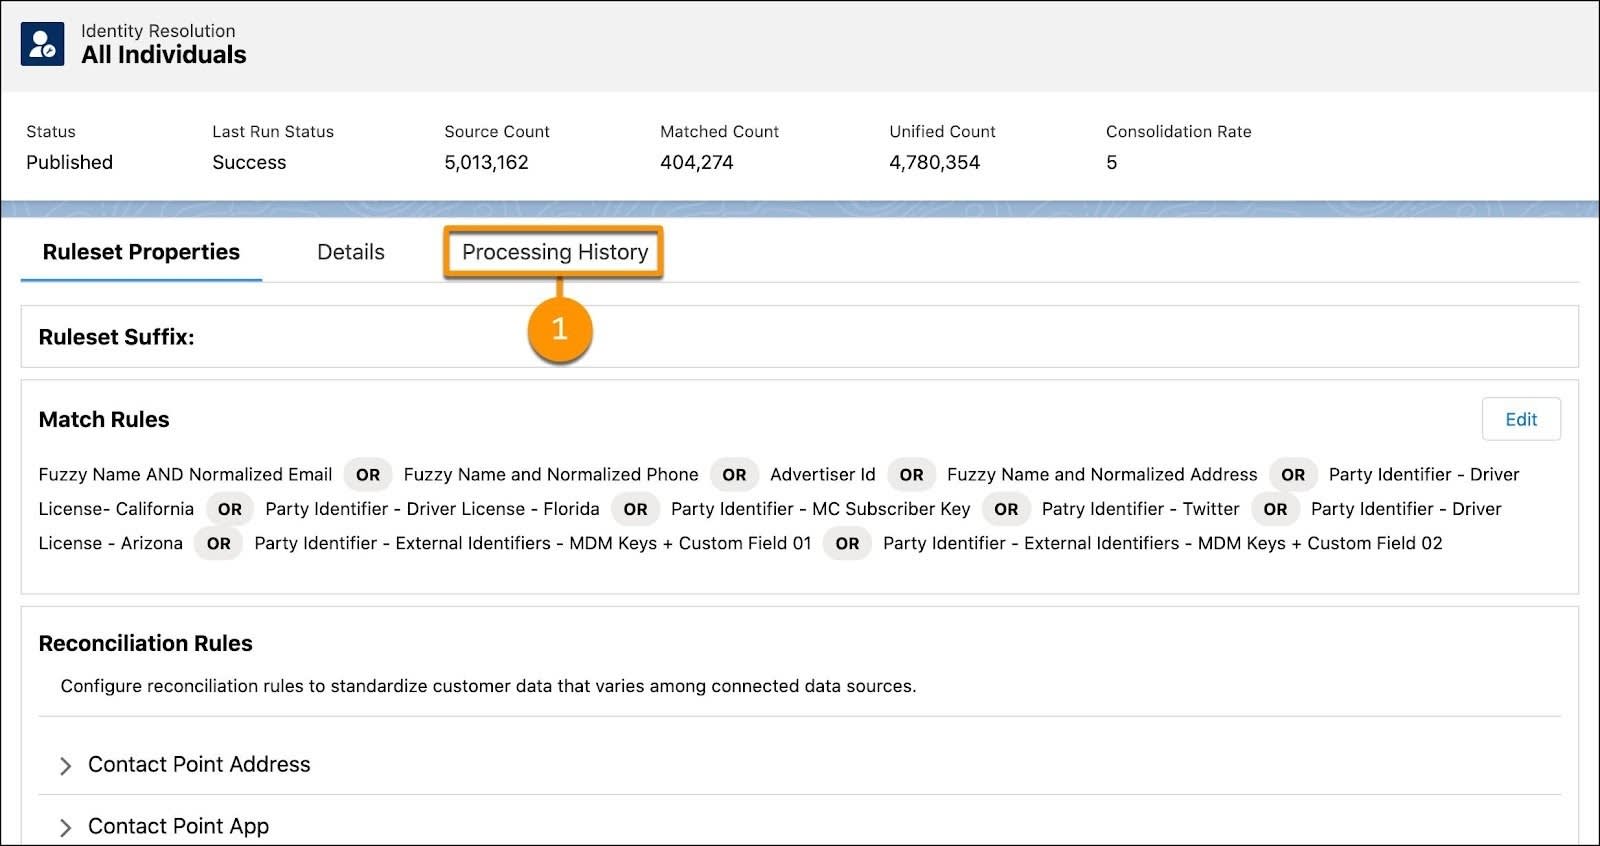
Click Processing History (1) to view the processing history of your Resolution Rules including last processing data, individual sources, matching, and consolidation rates. Match rules can be edited, so be sure to monitor regularly. To increase the consolidation rate, try adding more match rules. To reduce the consolidation rate, try removing some of the match rules.
Best Practices Wrap-Up
As you begin using Data 360 and identity resolution tools, it’s important to follow these best practices.
- Use rulesets to compare and test match and reconciliation rules. Once you have your first ruleset configured, you can create a second to conduct A/B tests.
- Consider the accuracy and cleanliness of your data. Can you clean any data before importing your raw data into Data 360?
- Determine matching rules and requirements before you begin mapping your data.
- Unified profiles are only as trustworthy as the source system data. What data source has the most up-to-date information? Use this as a guide for your match and reconciliation rules.
- Review your unified profiles regularly from Profile Explorer to see if tweaks need to be made to your ruleset.
Now that you understand how data mapping and requirements impact identity resolution, you can be sure Data 360 is set up to help you get the most out of your data.
Resources
- Trailhead: Data 360 Connectors and Integrations
- Salesforce Help: View Unified Profiles in Profile Explorer