Map Your Data and Define the Data Model
Learning Objectives
After completing this unit, you’ll be able to:
- Map your data to the Customer 360 Data Model.
- Prep for segmentation.
- Troubleshoot common scenarios.
Tie It Together
So far Warren brought the email bundle, runner profiles, and activity logs into the NTO Data Cloud account using Marketing Cloud Engagement and S3 cloud storage connectors. However, these disparate sources need to relate to one another in order for Warren and the NTO team to actually use this data in marketing activities. Let’s take a look at how Warren can create connections by mapping the data in Data Cloud.
Follow the Model
Data Cloud employs the Customer 360 Data Model to ensure standard data interoperability across cloud applications. The following subject areas, each comprising several objects, are represented in the model.
- Party data model provides information about trading relationships, such as customer and supplier information.
- Product data model provides information on a product available for sale or service.
- Sales Order data model provides information on future revenue or quantity for an opportunity, including product family, territory, and other information.
- Engagement data model provides information on interactions with a specific party, such as an email message or telephone call.
- Case data model provides information on any recorded issue, such as a mobile phone repair problem.
Additional data model subject areas include:
- Journey data model provides information on the complete set of experiences for a party when they interact with your company.
- Software Application data model provides information, programs, or apps designed for an end user.
Since Warren selected the Marketing Cloud Engagement Email Studio bundle during setup, part of this model is already adopted for him. More specifically, the Marketing Cloud Engagement Email Studio bundle uses objects from the Party, Engagement, and Journey subject areas.
Build Your Data Model
When deploying the email bundle, Warren sees that several data streams were automatically added to his data streams list view, and he clicks to review one of the data streams. In the data stream summary screen, he clicks to review mappings in the right-hand panel to see for himself that source data is automatically being shared via mapping with the data model layer. He finds the stream containing Ent Profile Attribute and completes the mapping for this single data stream. Because this stream represents custom data, it’s the only one in the bundle that cannot be automatically mapped on his behalf. Here are the specific steps Warren must follow to complete the email bundle install.
- On the data stream details page for the data stream containing Ent Profile Attribute, he selects Review Mappings in the right-hand panel. This action opens up the mapping canvas with the left side showing the data lake object (DLO) and the right-hand side showing the data model object called Individual.
- Locate a field on the left hand side that you would like to map. Then use the search bar on the right-hand side to find a field within Individual that closely represents the field from your source. Keep in mind that fields related to address, phone number, email, or other contact points don’t belong on the Individual object. There are specific reserved objects for these, namely Contact Point Address, Contact Point Phone, and Contact Point Email.
- Once you have located the field to map, click the field on the DLO, then click the field on the Individual object in order to establish the mapping connection.
- After you have completed mapping all desired fields, click Save.
What if you don’t see a reserved field within the Individual that represents the field in your source data? Follow these steps.
- Expand the Individual object by clicking the arrow next to Unmapped.
- Next, click Add New Field.
- When prompted, write in the Field Label, or display name, you would like to use for this custom attribute. The Field API Name auto-completes a suggestion according to naming convention requirements.
- Finally choose a Field Type. The Field Type must correspond to the data type of the source field. Click Save.
- Search for the attribute you just created within the Individual object search bar.
- Click the corresponding field in the DLO and then click the new custom field in the Individual object to establish the mapping connection.


Now that Warren has successfully completed mapping the one data stream that required his input in the email bundle, he is ready to complete the mapping for the other two streams he created: the runner profiles and the runner activity log.
On the Run
Let’s start with the runner profiles.
- Warren clicks on the Data Streams tab.
- In the search bar, he types in the name of his data stream which he called RUNNER_PROFILES.
- He finds the data stream in the list and clicks on it.
- On the data stream details page he finds Start Data Mapping in the right-hand panel and clicks on it.
- RUNNER_PROFILES appears on the left-hand side of the mapping canvas, but the right-hand side indicates that Warren must select the objects he would like to map to. Warren clicks Select Objects.
- Warren reviews his runner profiles data and identifies that there is both a MAID and an email address. Recalling that the Customer 360 Data Model offers separate reserved objects for each contact point, Warren types Contact Point Email in the search box.
- Next to Contact Point Email, Warren clicks the + icon.
- Warren also recalls that the runner profiles data has fields like First Name, Last Name, and the City in which the runner uses the app. He opts to map such profile-related information to the Individual object as well and searches in the box for Individual, then clicks the + icon.
- Next Warren clicks Done and he sees both Individual and Contact Point Email on the mapping canvas. He maps First Name and Last Name to the reserved fields on the Individual object and he sets his MAID source field as the Individual Id, or primary key, on the Individual object.
- He creates a custom field to store the City State designation. He doesn’t utilize the Contact Point Address object for such information because he doesn’t have the street address of the user. In context, he knows this City State simply represents the primary city of the runner and is sufficient to call an attribute of the Individual.
- On the Contact Point Email object, Warren knows from the required data mappings listed in Salesforce Help there are three fields he must map to get this right.
- Contact Point Email Id
- Party
- Email Address
- Contact Point Email Id is flagged as being the primary key of the Contact Point Email object, meaning that if a runner has more than one email address listed, this field would have to be a concatenation of both the runner and the email address. Warren confirms, though, that each runner only has one email address and so he maps his MAID source field to Contact Point Email Id.
- Next Warren maps his MAID source field to the Party attribute on the Contact Point Email object, because Party is a required field and Party is the foreign key that links back to the primary key on the Individual object. Recall that Warren set MAID as the primary key on the Individual Object in step 9, so setting the Party field to MAID as well establishes the connection between the Individual and Contact Point Email objects.
- Finally, Warren maps his source field Email Address to the field Email Address on the Contact Point Email object.
- Warren clicks Save.
Relationships
Now that the Runner Profiles data is in place, Warren does two quick checks: he reviews Relationships and also checks his Identity Resolution rules. Here’s how.
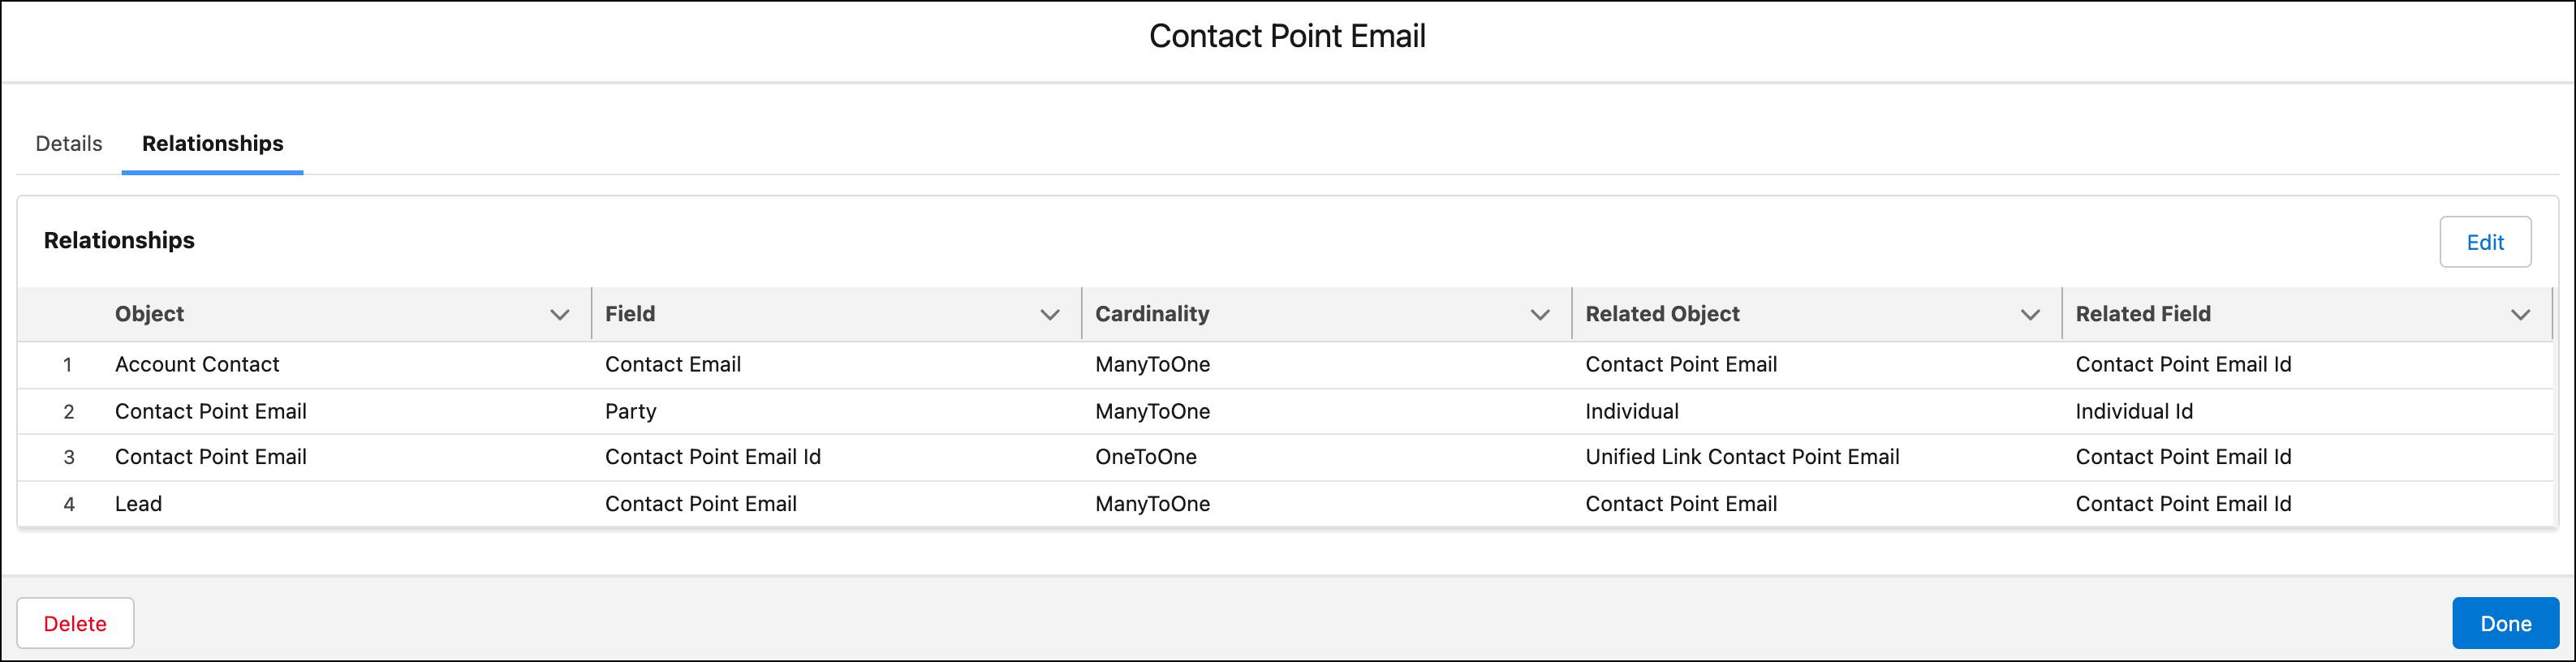
- He clicks the Data Model tab, finds Contact Point Email and clicks on it.
- He tabs over to Relationships and confirms that the relationship between Contact Point Email and Individual objects was established automatically when he successfully mapped the foreign key Party on Contact Point Email and the primary key Individual Id on Individual. Because an Individual can have multiple email addresses, that relationship reads Many email addresses to one Individual.
We’re almost done! Let’s navigate back to the data streams tab and map our engagement data stream.
- Warren clicks on the Data Streams tab.
- In the search bar, he types in the name of his data stream which he called RUNNER_STATS.
- He finds the data stream in the list and clicks on it.
- On the data stream details page he finds Start Data Mapping in the right-hand panel and clicks on it.
- RUNNER_STATS appears on the left hand side of the mapping canvas, but the right-hand side indicates that Warren must select the objects he would like to map to. Warren clicks Select Objects.
- Warren peruses all of the standard objects but ultimately decides to make his own custom object. He tabs over to Custom Data Model.
- He clicks New Custom Object.
- He reviews the Object Label and Object API Name which are inherited from his DLO and decides he wants his new custom object to include all fields from the DLO. He clicks Save.
- The data model custom object is now a mirror image of the DLO and all of the mapping is 1:1. Warren clicks Save to complete mapping.
- Because Warren introduced a new custom object, he must indicate how this new custom object relates to the rest of his data model. To do this, he proceeds to the Data Model tab.
- In the search bar, Warren looks for the data model custom object he created. When he finds it, he clicks on the object.
- He tabs over to Relationships and clicks New. Then clicks New Relationship.
- Warren recalls that both tables (RUNNER_PROFILES and RUNNER_STATS) have a MAID (foreign key concept). Warren configures the relationship as: RUNNER_STATS (object), MAID (field on object) is related to Individual (related object), Individual Id (related field on object). Remember that the RUNNER_PROFILES DLO was mapped to Individual which is why we relate the RUNNER_PROFILES and the RUNNER_STATS data sets. We do that by relating the data model objects to which they are mapped.
- To complete the relationship, Warren must set the cardinality. Recall that in the RUNNER_STATS data set, the same runner indicated by MAID could run multiple times. This means that the RUNNER_STATS data set may have multiple instances of the same MAID. The multiple MAID instances tie to a single MAID, or runner, in the RUNNER_PROFILES data set though, suggesting that the relationship between the objects is N:1. Warren selects N:1 in the dropdown.
- He clicks Save & Close.
Now that everything is mapped out, it’s time to make sure everything ends up in the right place. Warren is ready for identity resolution and troubleshooting, as we see in the next unit!