Create Data Streams
Learning Objectives
After completing this unit, you’ll be able to:
- Bring standard and custom data sources into Data Cloud.
- Create a data stream in Marketing Cloud Engagement.
- Manipulate your data to better suit your marketing tasks.
- Learn from formula expression use cases.

Let the Data Stream Flow

Warren Mehta, the resident IT systems specialist at Northern Trail Outfitters (NTO), is the person in charge of bringing all of the data into Data Cloud. Warren and Isabelle Givens, NTO’s digital marketing manager, plan out how they’re going to bring in data from Marketing Cloud Engagement, as well as separate sources for store locations, ecommerce, survey, and runner log data. They first list out all of their data sources on a whiteboard, then they itemize the key characteristics of each source (refer to the checklist in Unit 1). Then they start making spaghetti—at least, it looks like spaghetti. They’re really drawing lines from one data source to another to see how they relate. Then they get down to what they actually need. Marketing Cloud Engagement and Sales and Service Cloud data is easily handled with predefined bundles and connectors. But they also plan to bring in the ecommerce, survey, and runner log data that is hosted on S3. With a plan in hand, Warren is ready to get to work.
Northern Trail Outfitters is expanding its Salesforce suite to include Data Cloud. Given all the email marketing, web engagement, purchase, and loyalty data generated both online and in its stores, the company needs Data Cloud to properly segment and interact with its customers. NTO also needs to maintain unified profiles for all of its customers and include other forms of information—such as product types, store locations, email templates, and other collateral used in segmenting audiences. All of that information needs a lot of careful evaluation and mapping.
The First Step
Warren has a long history of bringing together disparate data sources, but he appreciates the ease this system provides. He’s been assigned the data-aware specialist user permission set in Data Cloud, which lets him access the tools he’ll need to get everything organized. Warren starts by ingesting the data from Marketing Cloud Engagement’s Email Studio. As you know from the first unit, this process uses one of the connectors that both (1) imports the source data and (2) maps that data automatically to the data model, since the data sets are all standard. Here’s how he does it.
- On the Data Streams tab, Warren clicks New.
- He selects the Marketing Cloud Engagement data source and clicks Next.
- Warren chooses the Email Studio Starter Bundle and clicks Next.
- He reviews the proposed list of data streams and the fields being ingested for each and clicks Next.
- He sees one final confirmation step summarizing all the streams that are about to be deployed. Upon agreement, he clicks Deploy.
- He sees that several data streams were automatically added to his data streams list view and he clicks to review one of the data streams.
- In the data stream summary screen, he clicks on Review Mappings in the right-hand panel to see for himself that source data is automatically being shared via mapping with the data model layer.
- He finds the stream containing “Ent Profile Attribute” in its name and completes the mapping for this single data stream. Because this stream represents custom data, it is the only one in the bundle that cannot be automatically mapped on his behalf.
This process solves one part of Warren’s mission, but now he needs to bring in two custom data sources as well. NTO tracks information about runners and the running activity they log. The runner profiles are stored in a Marketing Cloud Engagement Data Extension and the activity log is stored on AWS S3.
Take a look at these two data sets. The primary key of the runner profiles data set is the Mobile Advertising ID (MAID), while the primary key of the runner stats data set is RunID. RunID is the primary key because, as you can see, the same runner (indicated with a MAID) can log multiple runs. Take note that both tables have a MAID (foreign key concept), as this will be important during modeling when we want to link the tables together via a relationship.
Data Set 1: Runner Profiles Data
|
First Name
|
Last Name | MAID | City State | |
|---|---|---|---|---|
|
Lily |
James |
lily@example.com |
7d49b0ef-00c7-4469-b7ee-ca58c19e9913 |
Minneapolis, MN |
|
Donald |
Mui |
stephen@example.com |
b0c07401-da92-48ed-905d-779238e456ea |
Hopkins, MN |
|
Jamal |
Ali |
jamal@example.com |
43709968-dd25-4c83-a381-4131734a7c10 |
New York, NY |
Data Set 2: Runner Statistics Data
| MAID | Date | RunID | KmRun |
|---|---|---|---|
|
7d49b0ef-00c7-4469-b7ee-ca58c19e9913 |
10/12/2020 |
1001 |
10.3 |
|
b0c07401-da92-48ed-905d-779238e456ea |
10/14/2020 |
1002 |
20.4 |
|
7d49b0ef-00c7-4469-b7ee-ca58c19e9913 |
10/15/2020 |
1003 |
4.9 |
|
43709968-dd25-4c83-a381-4131734a7c10 |
10/17/2020 |
1004 |
6.7 |
Following along with his checklist, Warren identifies that he needs to use the formula expression library to write a formula that flags all the customers in Minnesota so they can get special offers on cold weather gear. He expects that each day he’ll extract the full list of runner profiles to make sure he captures all changes in his master list. For the stats data set, he knows that such a full extract is unnecessary because once the runner stat is logged, the record doesn’t change.
Armed with this forethought, Warren is ready to put it into action!
- After Warren starts the process to add another Marketing Cloud Engagement data source, he chooses the Data Extensions tab and finds the business unit he needs in the dropdown.
- He then peruses the list of Data Extensions and selects RUNNER_PROFILES.
- The Source field is preconfigured for him and he reviews the proposed Object Label and Object API Name that closely resemble the name of his data set.
- In the next screen, he sets the Category as Profile since this data set represents a list of runners.
- He chooses the MAID field as his Primary Key.
- Warren clicks New Formula Field to flag customers in Minnesota for cold weather gear.
- He sets the Field Label to Is Minnesota and the Field API Name to Is_Minnesota.
- He sets Formula Return Type to Text.
- Warren enters a formula in the syntax editor as:
IF(EXTRACT(sourceField['City State'], ", ", 1) == "MN", "TRUE", "FALSE").
- In the test input box, he enters these combinations to validate the formula:
- “City State” with the value of “Minneapolis, MN” returns “TRUE”.
- “City State” with the value of “Hopkins, MN” returns “TRUE”.
- “City State” with the value of “New York, NY” returns “FALSE”.
- He saves the formula and verifies that “Is Minnesota” is added as a new field.
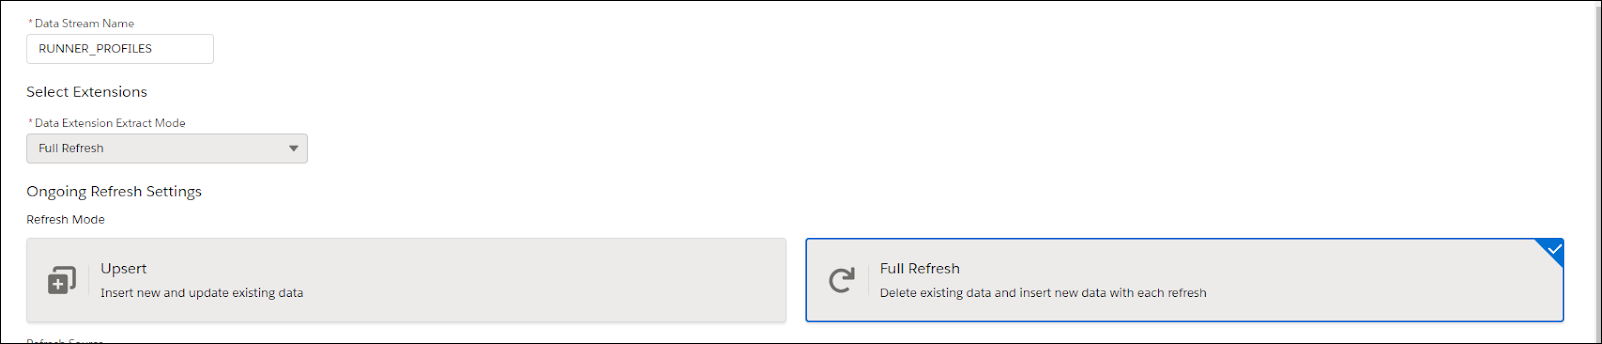
- He clicks Next and, remembering that he needs the full master list to be updated regularly, he makes sure that the data set is set to export from Marketing Cloud Engagement (Data Extension Extract Mode) as Full Refresh and that Data Cloud is prepared to accept a Full Refresh (Refresh Mode).
- Warren clicks Deploy and his new data stream is ready to go!
More Data from the Cloud
Now that Warren has the runner profiles imported in Data Cloud, he’s ready to bring in the actual running logs—engagement data—that these runners completed. And to do that he must set up a connection to AWS S3.
He navigates to the Data Streams tab and clicks New.
- He selects the Cloud Storage data source, clicks Next, and enters the NTO S3 credentials. This information includes access key and secret as well as the location of the data inside the S3 bucket, using the Directory and File Name fields.
- Warren adds the Source, Object Label, and Object API Name information as well. The Object Label and API Name are akin to the data set name, so he opts to name them both RUNNER_STATS.
- He chooses the Engagement category, since this data is action-oriented and has the time tracked in association with each action. He selects Date as the Event Time Field value and he sets RunID as the primary key. Note that if RunID had not been included in Warren’s data set, he could have created a new formula field concatenating fields together and assigned the resulting formula field as the primary key.
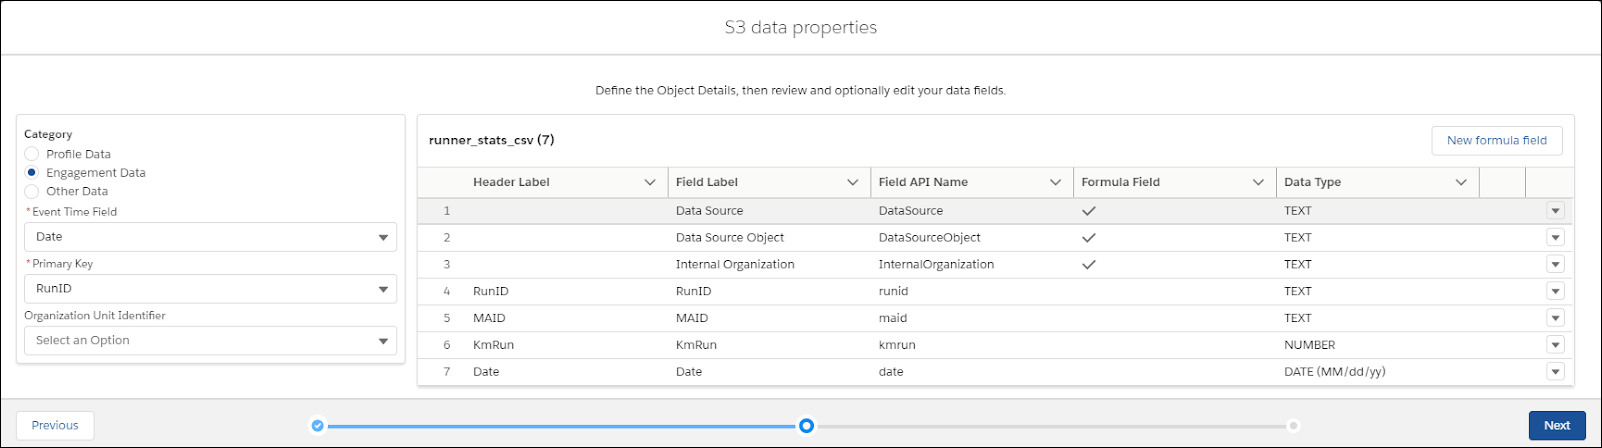
- All of the fields look OK and he confirms that the Date format for his Event Time field was interpreted properly as MM/dd/yy (that’s two digits each for month, day, and year), so Warren moves on to the deployment details. Because he’s only going to send new records, he doesn’t need to select Full Refresh this time and instead chooses Upsert.
- Finally, he indicates he wants the data set to be retrieved Daily, and he clicks Deploy.
These examples show how to bring in Profile and Engagement category data. Since Warren also plans to include Other category data such as store location data, he continues to follow the process of creating one stream for each data set until he has all source data copied into Data Cloud.
Crossing the Streams
Obviously, Warren is going to include many more data streams in his Data Cloud account. These three examples represent just a small part of what NTO needs to consider in the larger planning of marketing activities. This process demonstrates the power and ease of connecting your Marketing Cloud Engagement and Cloud Storage data to Data Cloud. So what’s the next step after you connect all of your data streams to your account (aside from giving them a little time to get all of the data properly ingested)? You get to tell Data Cloud how all of the data streams relate to one another, so you can properly create and segment your audiences. To do that, you must map the data streams to the data model. That’s up next.