Send and Analyze WhatsApp Messages
Learning Objectives
After completing this unit, you’ll be able to:
- Collect opt-in consent from your audience.
- Honor opt-out requests.
- Send WhatsApp messages in Journey Builder.
- Review WhatsApp performance.
Manage Consent
Opt-In Management
Now that all of your messages are created and ready to go, it’s time to queue them up. Remember that in WhatsApp, you can send template messages as part of a transaction, or you can reply to incoming messages via session messages. In any case, WhatsApp requires that you make sure customers explicitly agree to receive your messages. Consider one of these steps.
- Gather opt-in information from a website or landing page.
- Include an opt-in field when a customer purchases a product or service.
- Record an opt-in using some other message type, such as email, voice, or SMS.
- Add an opt-in field when you gather contact information in a sign-up form.
To obtain customer consent, you can use other communication channels such as email, SMS, Push, Facebook, Instagram Paid media, and sign-up forms. For template messages, you also need to register the opt-in information in Marketing Cloud Engagement. If you don’t register this information, your message isn’t sent.
For service conversations, customers must send a chat message first so that you can engage them. If you don’t answer a session message within 24 hours, you can wait until they send another message or respond with an approved template. Consider using embedded links in other channels, such as SMS or email messages, to prompt that initial chat message. For other conversation types, you can send the first message only by using an approved template.
Opt-Out Management
To make sure your business complies with all global privacy laws, provide an opt-out option to your customers. This option gives your customers a way to leave your channel whenever they want. It also discourages users from blocking or reporting your business when they don’t want to receive more messages from you, which ensures a higher quality rating for your business. Consider one of these steps.
- Include an opt-out message in the footer of your template message and create an exit path for customers in Journey Builder.
- Store all opt-out and unsubscribe requests in Journey Builder.
Send It Out
Template Messages
After you get permission, you’re ready to send out your template messages (that is, messages sent as part of a transaction or event). Here’s how.
- In Journey Builder, click Create New Journey.
- Under Multi-Step Journey, click Build.
- Drag your entry source onto the canvas. You can use Data Extension or API Event.
- To configure your entry source, click it.
- Click Summary.
- Click Done.
- Drag the WhatsApp activity onto the canvas.
- To configure your message, click it.
- Add an activity name and description.
- Click Select Message.
- In the Content Builder Messages screen, select the template message you want to use.
- Click Summary.
- Next to Message Configuration, click Edit.
- Select the App Channel you want to use from the dropdown.
- Click Summary.
- Click Done.
- Configure the rest of your journey, and click Activate.
Session Messages
To answer all of your customer’s incoming questions you need to send out your session messages. Here’s how.
- In Journey Builder, click Create New Journey.
- Under Multi-Step Journey, click Build.
- Drag the Inbound Chat entry source onto the canvas.
- Configure your Inbound Chat data extension entry source.
- Click the entry source, and then click Edit next to App Channel.
- Select the App Channel you want to use from the dropdown.
- Choose whether you want to use data extension logging.
- To configure your Keywords, click Keywords.
You can configure up to 10 keywords for a single journey. The same keyword can’t be used in more than one journey at the same time.
- Click Summary.
- Click Done.
- Drag the WhatsApp activity onto the canvas.
- Add an activity name and description.
- Click Select Message.
- Select a previously created session message.
- Click Summary.
- Next to Message Configuration, click Edit.
- Select the App Channel you want to use from the dropdown.
- Click Summary.
- Click Done.
- Configure the rest of your journey, and click Activate.

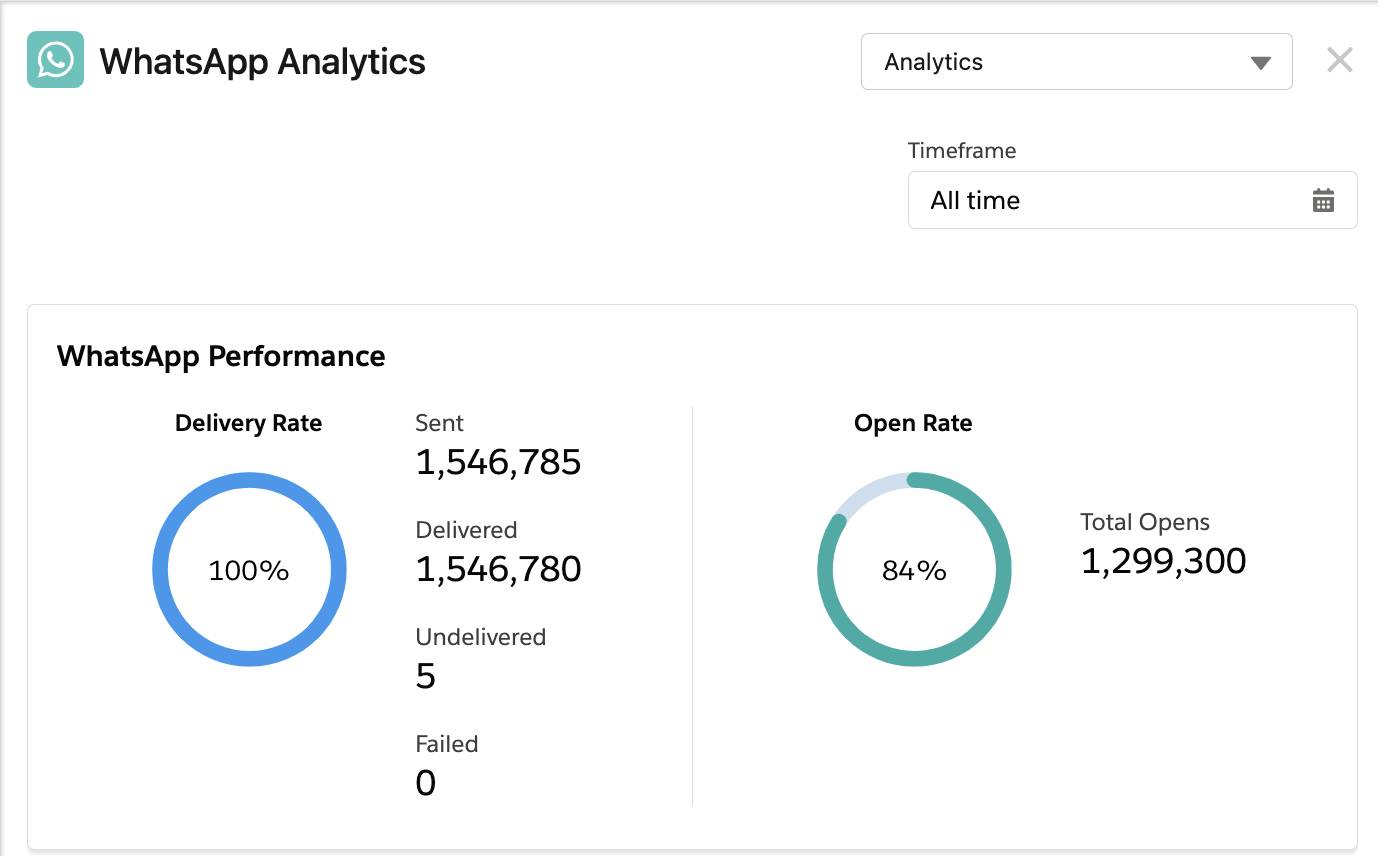
Measure How You’re Performing
After you activate your journeys and start sending your messages, you can use the Journeys Dashboard in Journey Builder to evaluate the effectiveness of your messages.
- In the Journeys Dashboard, click the journey you want to view.
- Click the WhatsApp activity.
- Select the time frame you want analytics for.
- View message delivery and open rates.
Long-time marketers may notice the lack of an unsubscribe count. After all, if you must get permission to send messages, knowing how many customers unsubscribed is an important number to track. Although WhatsApp doesn’t provide information on opt-out, Marketing Cloud Engagement provides a report on bounced messages for each user you send to. You can use this bounce information to help determine who opted out and stop sending messages. Monitor these reports consistently—too many bounces can result in a lower quality score for your business.
Marketing Cloud Engagement also provides reports about inbound message details and user engagement. For more information about exporting WhatsApp data from Marketing Cloud Engagement, see Create a Chat Messaging Data Extract in Marketing Cloud Engagement.
Get Going
You’re good to go. Get your messages ready, build your journeys, and talk to your customers using WhatsApp.