Manage Duplicate Contacts and Accounts
Learning Objectives
After completing this unit, you’ll be able to:
- Prevent the creation of duplicate data.
- Merge contacts.
- Merge accounts.
Prevent Duplicates in NPSP
What’s the big deal about duplicates? Duplicate data results in unnecessary clutter, inaccurate reporting, and reduced efficiency. That’s a big deal for your organization’s efficiency and effectiveness in program management, fundraising, and communications.
Imagine this scenario: You have two contact records for a major donor in your Salesforce org. A new fundraiser looks at the record that says the donor never made a gift. What would happen if that fundraiser approached the donor as if they had never given?
While many donors might overlook the mistake, they may also wonder if their past contributions were really appreciated. Plus, that fundraiser may never trust your system again.
Your best defense against duplicate contacts and accounts is to not create them in the first place, of course. That means that training for your users is crucial! Be sure that your training materials encourage users to search before entering new contacts and accounts.
Nobody’s perfect, though, and mistakes happen even with the best training. The good news is that Salesforce has a nifty tool that can help.
Salesforce Duplicate Management searches for existing records upon creation and edit, then alerts the user and adds potential duplicates to a report.
Duplicate management consists of:
-
Matching rules, the criteria for finding duplicate records.
-
Duplicate rules, the action that is taken when a user starts to create a potential duplicate.
Salesforce standard matching detects potential duplicate records based on exact matches, such as two contacts with the same name. But you can also set up a rule to identify fuzzy matching for first names. That means that Robert Alvarez and Roberto Alvarez would be identified as potential duplicate records.

To get you started, Nonprofit Success Pack (NPSP) comes preconfigured with matching and duplicate rules. You just need to review and activate them.
Activate NPSP Matching and Duplicate Rules
The NPSP matching rule matches on first name (fuzzy), last name (exact), and personal email (exact). Let's take a look at the matching rule, create and edit a duplicate, and activate both.
- Click the gear icon (
 ), then click Setup.
- Enter
duplicatein the setup Quick Find search box.
- Click on Matching Rules under Duplicate Management.
- To review the matching criteria, click on the NPSP Contact Personal Email Match rule.
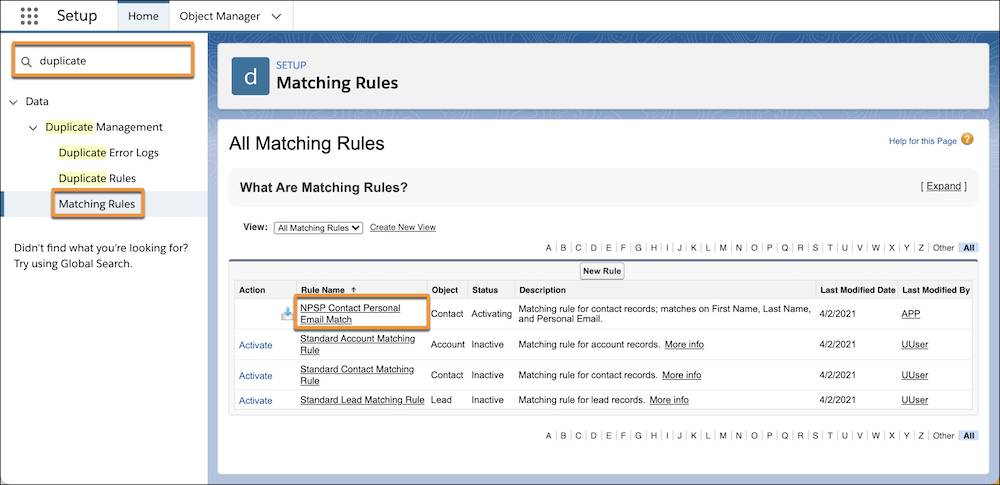
- In this example the NPSP rule matches on first name (fuzzy), last name (exact), and personal email (exact). The NPSP matching and duplicate rules have been designed to return the best possible set of matching candidates.
If this meets your needs, then click Activate to activate this matching rule if that option is available.
If your matching rule is locked in Activating status (a known bug that doesn’t allow you to activate this rule), click Clone, give it a memorable name, click Save, then click Activate.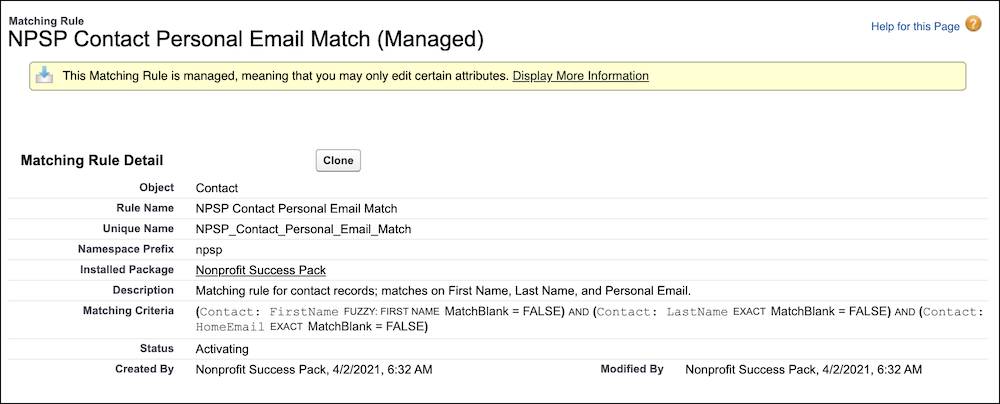
Now we need to activate the duplicate rule for what happens when a user starts creating a potential duplicate contact, account, or custom record.
- Navigate back to the Duplicate Management menu in Setup and click Duplicate Rules.
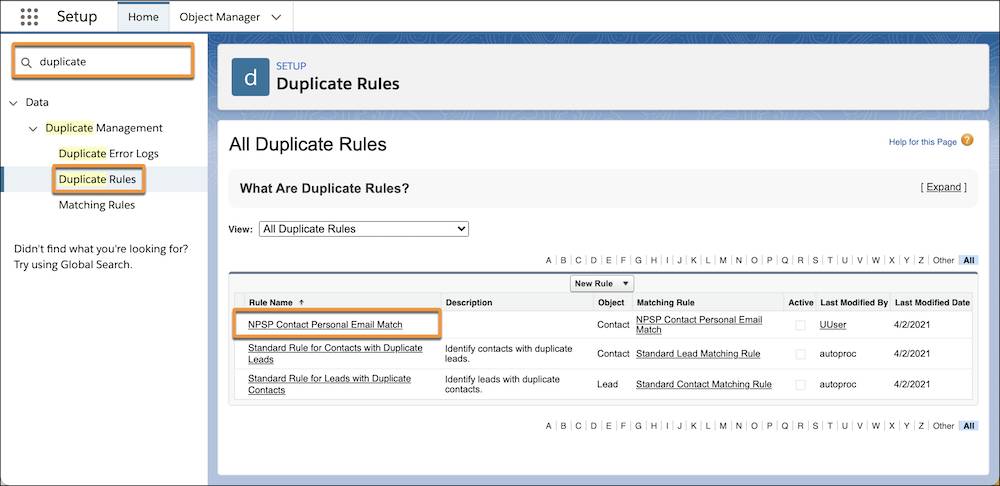
- Click NPSP Contact Personal Email Match.

- You can choose to allow or block users from creating or editing potential duplicates with the Action On Create and Action On Edit settings (1). You can also determine if they receive an alert about the potential duplicate. By default, NPSP allows creation and editing.
- You can also choose if you want to alert the user to a potential duplicate or report the duplicates either on create or on edit (2). By default, NPSP alerts and reports the potential duplicate records on creation.
- You can also select the matching rule to use (3). By default, NPSP uses the NPSP Contact Personal Email Match matching rule we activated a few moments ago. (If you had to activate a clone of that matching rule, you need to change this setting to your new matching rule.)
- Click Activate.
Just like that you are one step closer to keeping user confidence in your data high and driving deeper adoption.
We recommend that you start by activating the default NPSP duplicate and matching rules, then add more if needed. Make sure your users know about the rules’ criteria and ask them for feedback so you can fine tune as you go along.
Duplicate Management in Action
Sofia Rivera, a Development Associate at our (fictional) nonprofit No More Homelessness (NMH), creates a new contact in Salesforce.
She usually searches for existing contacts first, but this is a new donor list from a new event so she assumes all of the contacts are new. Sofia enters the donor’s name and email address then clicks Save.
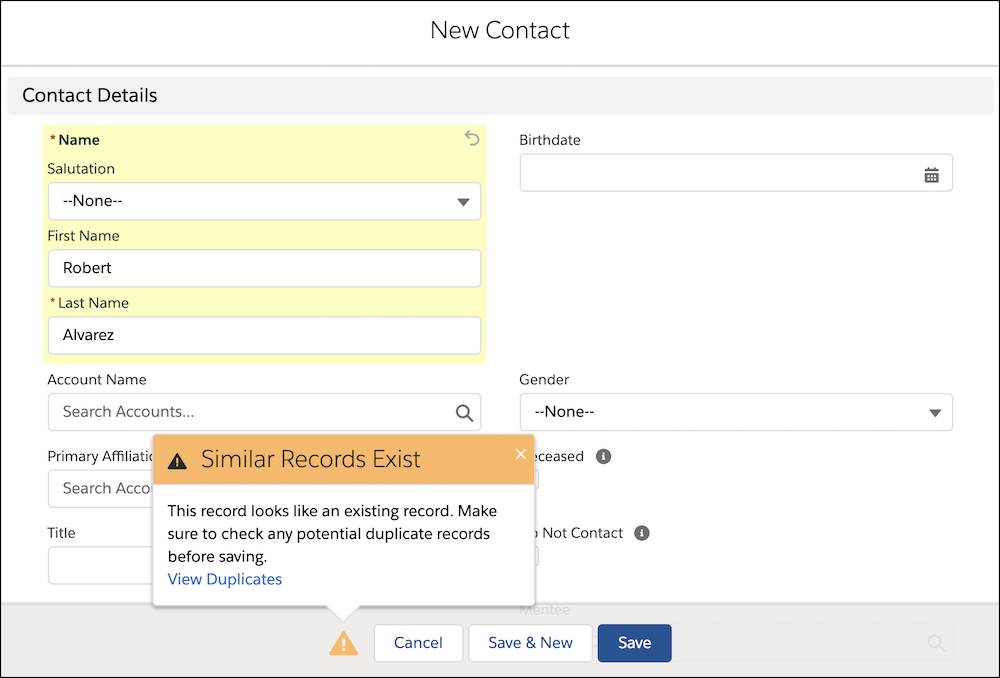
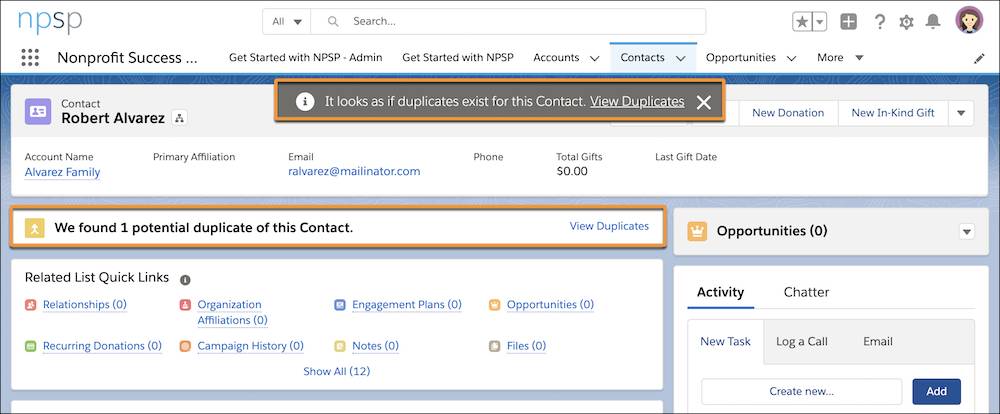
Based on the criteria in the NPSP contact matching rule, Salesforce alerts Sofia that she may be creating a duplicate contact. Remember that the NPSP duplicate rule determines Sofia’s options. Here she can click View Duplicates to choose to edit an existing contact or she can continue to create this record and save it.
If Sofia continues and clicks Save again on the potential duplicate, she will again see an alert about a potential duplicate on the new record. It will also show an alert in the potential duplicates component on the record detail page.
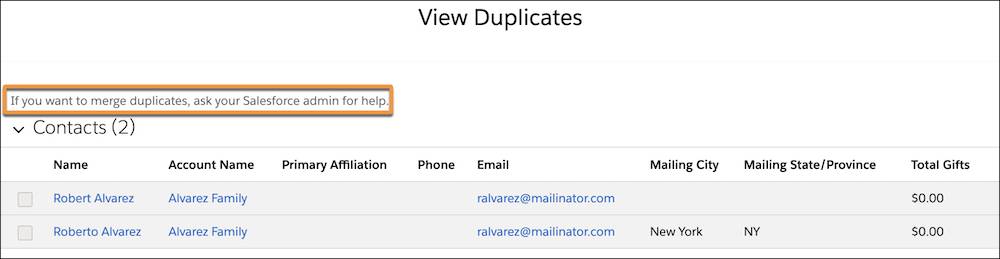
Finally, if Sofia clicks View Duplicates, she can see the potential duplicate records, but she can’t merge them. Only an admin or another user with sufficient security permissions can merge contacts.
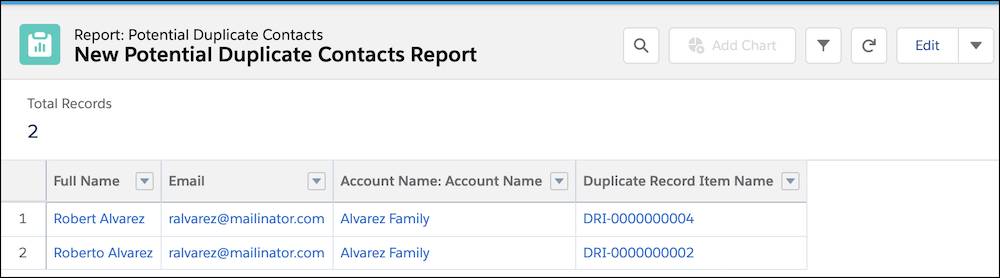
So it’s a good thing that the duplicate rule also adds the potential duplicate to a report for her Salesforce Admin, Gorav Patel, to see and clean up later if needed. (You can learn how to set up this type of report by checking out Create Reports on Duplicate Records in Resources.)
How do duplicates happen? It’s possible that a third-party integration or a data import may have caused the issue, or a colleague may have skipped the initial search that we recommended earlier. Despite our best efforts, duplicates sometimes (hopefully rarely) happen. And when they do, a handy tool in NPSP can help.
Use the NPSP Contact Merge Tool
With NPSP Contact Merge, you choose which contact to keep and what data to use from each duplicate contact. All related items from each contact, such as opportunities and payments, move to the newly-merged contact so that no data is lost.
There’s also standard Salesforce functionality that allows you to merge contacts, but it does not distinguish between a household and an organizational account in the same way that NPSP does. If you use the standard tool, any merged contact in NPSP will end up with an anonymous household, so we recommend that you always use the NPSP Contact Merge.
To merge contacts, a user must have security settings that allow them to delete contacts, access every field on contact records, and access both contacts. This extra layer of security is there because merging contacts is destructive and it's easy to make mistakes. Once you merge and delete records, there’s no way to revert back to the original versions.
We recommend that only admins merge contacts — so let's follow along as Gorav merges the contacts he found in his duplicate contacts report:
- Find and select Contact Merge through the App Launcher (
 ).
).
- Click Search Contacts to find contacts you would like to merge. We could also select See Duplicate Contacts to see all potential duplicates.
- Enter the name of the duplicate contact in the search bar, then click Search. You can use
*as a wildcard. In our example, one contact is Robert Alvarez and the other is Roberto Alvarez, so we enterRobert* Alvarezto find both contacts.
- In the Found Contacts list, select the contacts to merge. You can select up to three contacts.
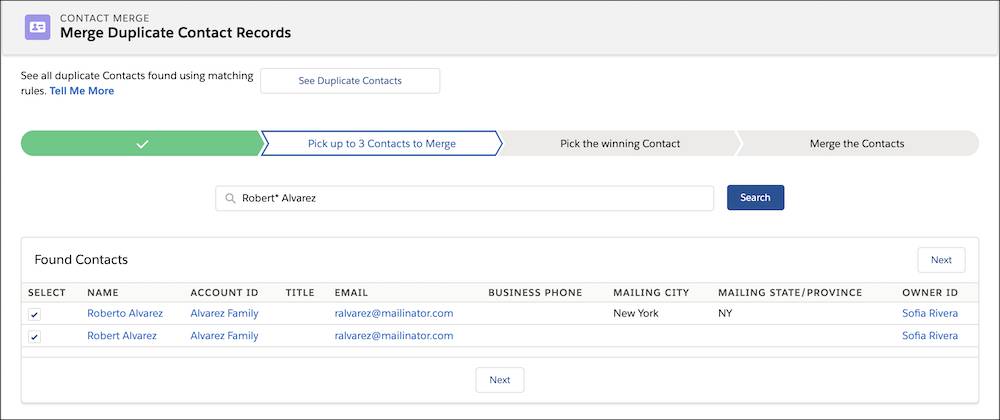
- Click Next.
- Select a primary record — but be careful! This determines which account record the contact will be associated with after the merge, removing it from the other account. Gorav examines the accounts associated with each of the contacts to merge and determines which should be the master account after the merge.
- Choose fields from either record to include in the final merged record. Note that fields not chosen will be overwritten.
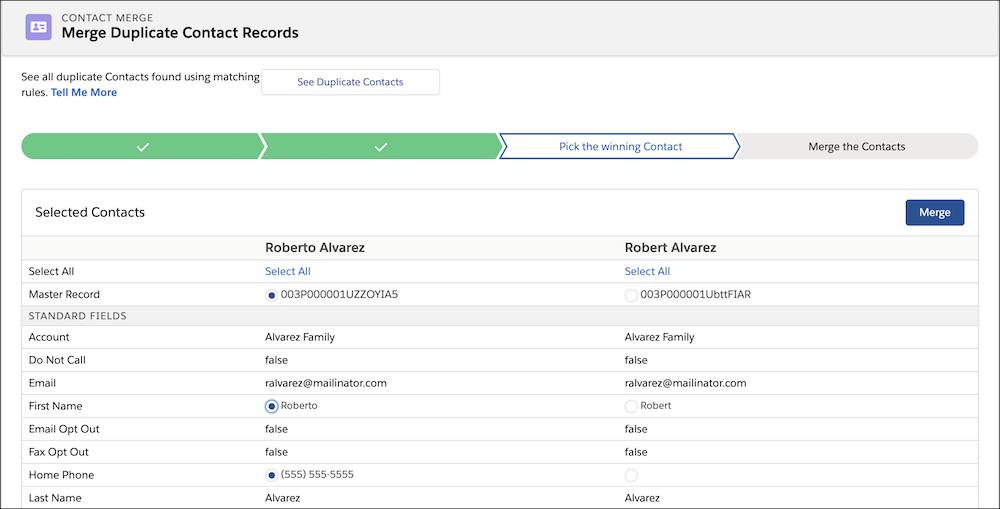
- Click Merge.
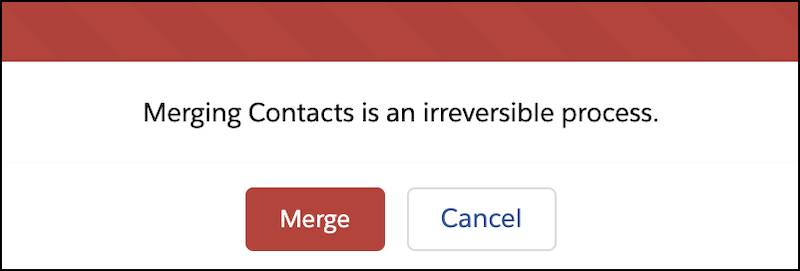
- Then click Merge again on the red, somewhat-intimidating pop-up warning that merging is irreversible.
After merging, Gorav looks at Roberto’s record to ensure that everything was merged correctly and reviews his report to ensure that he has taken care of all the duplicates. His data is now clean!
How to Merge Household Accounts
Any user with edit and delete permissions who has access to the accounts can merge household accounts, and the process is simpler than with contacts.
Go to the household record you would like to merge, click Manage Household, then search for and add an existing contact to that household by clicking the plus symbol ( ).
).
If the household to be merged has more than one member, you can choose to move just the user you searched for or all members of the household.
Flex Your Contact and Account Setting Skills
In this module you’ve learned how to configure household naming, manage addresses, create custom relationships, and manage duplicate contacts and accounts — all critical skills to keep your nonprofit and your Salesforce org in tip-top shape.
If you’re working your way through the Administer Nonprofit Success Pack (NPSP) trail, continue on to learn about opportunity settings for donations.
Resources
- Salesforce Help: Find and Merge Duplicate Contacts
- Salesforce Help: Merge or Split Households
- Salesforce Help: Show Duplicate Records in Lightning Experience
- Salesforce Help: Create Reports on Duplicate Records
- Video: Nonprofit Salesforce How-To-Series: NPSP Merge and Split Households
- Video: Nonprofit Salesforce How-To-Series: NPSP Merge Duplicate Contacts