Make and Capture Customizations to Your App
Learning Objectives
- Describe how to retrieve changes on your computer.
- Explain the sequence of steps development projects go through.
With the project all set up on GitHub, it’s time for Tasha and her team to start implementing their planned changes that will be included in their Food Bank app. They’ll use GitHub to track progress and CumulusCI to automatically build scratch orgs and capture their customizations for the project.

Create a GitHub Issue to Track the Proposed Changes
What does a food bank need to track in their Salesforce org? Food deliveries are a good place to start. For food deliveries, food banks need to track the delivery date, food item, and the supplier. Tasha wants to make sure everyone on the team is kept up to speed on proposed additions to the Food Bank app; so, she creates an issue in GitHub to track what they’re working on. Tracking app improvements and bug fixes in the same GitHub repository as where the work will be done tracks the full development process, end-to-end—from proposed solution, to discussion about adding new config to the app, and finally the work done to deliver the new feature. Follow along as Tasha completes the steps.
- If you don’t have it open from the last unit, open your repository on GitHub by selecting View on GitHub from GitHub Desktop
- Click the Issues tab, then click New Issue.
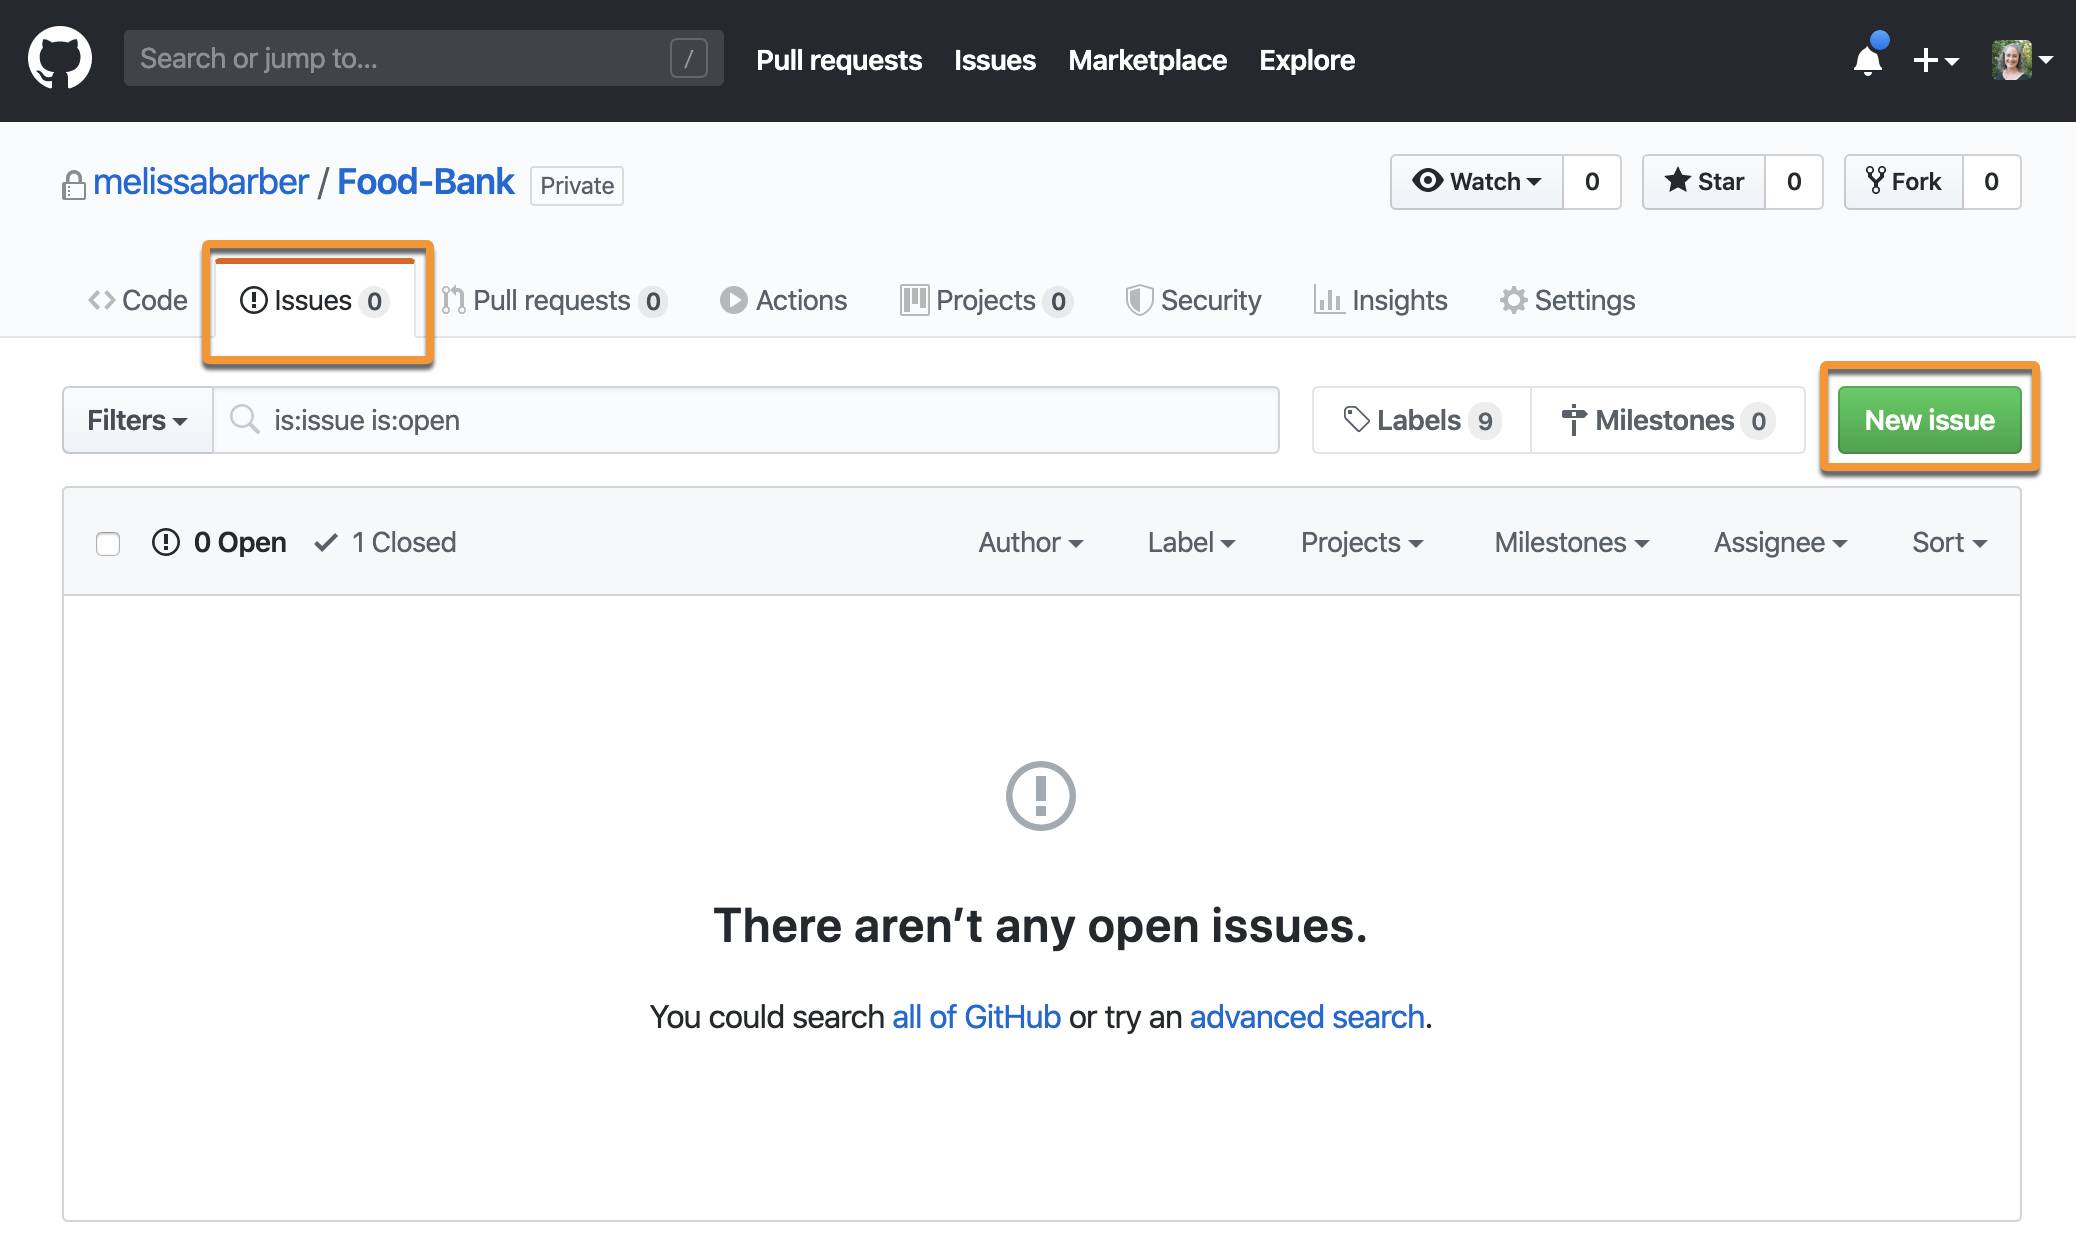
- Select enhancement from the Labels on the right to categorize the issue.
- Add a Title:
Add support for tracking deliveries. - Under Write add details about what needs to be done:
Food banks need a way to track scheduled deliveries of food and which items are being delivered. Create the Delivery and Delivery Item objects to support this use case. - Click Submit new issue.
Create Objects & Fields for Deliveries
Tasha needs a temporary scratch org so she can configure it to handle food deliveries. Now, create a scratch org to act as your development environment while you build your changes.
- In the GitHub Desktop menubar, select Repository→Open in Visual Studio Code to open your repository in VS Code Terminal.
- Run the following command in the Terminal:
cci flow run dev_org --org dev
The automation will take a few minutes to run. While that automation is running, let’s look at what you instructed CumulusCI to do. The first part of your command, cci flow run, kicked off a CumulusCI flow, which is just a series of tasks. The flow you told it to run is dev_org. This flow creates and configures a scratch org, and you’ll use this new scratch org to develop your customizations. The dev_org flow automates:
- Creating a scratch org
- Installing dependencies, such as other managed packages that our app builds upon
- Deploying our application
- Running any post-install configuration we’ve defined.
The last part of the command, --org dev, tells CumulusCI in which scratch org to run the flow. In this case, the scratch org is called dev.
Capture Changes Locally on Your Computer
Time to start implementing! In the scratch org you just created and configured with CumulusCI, create objects and fields for tracking deliveries.
- If you don’t already have VS Code open, open your repository in the VS Code Terminal by choosing Repository→Open in Visual Studio Code in GitHub Desktop.
- Open the scratch org named
devin a new browser window by running the following command:cci org browser dev - Now that the scratch org is open in your browser window, build the customizations you outlined in your GitHub Issue:
- Object:
Delivery(Auto Number record label name)
Note: Create a new custom tab for this object- Field:
Scheduled Date(Date/Time) - Field:
Status(Picklist)- Requested
- Scheduled
- Completed
- Canceled
- Field:
Supplier(Lookup to Account)
- Field:
- Object:
Delivery Item- Field:
Delivery(Lookup to Delivery) - Field:
Food Storage(Picklist)- Non-refrigerated
- Frozen
- Refrigerated
- Field:
Food Expiration Date(Date)
- Field:
- Object:
With customizations created in the dev scratch org, it’s time to capture the changes to the GitHub repository on your computer.
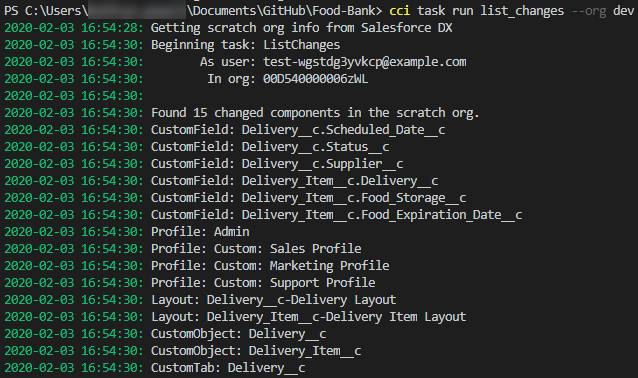
- To show a list of all the changes detected in your dev scratch org, type the following command in the VS Code Terminal:
cci task run list_changes --org dev - You’ll notice the list includes your schema changes—the objects and fields you just created—as well as some others: page layouts and profiles that were automatically updated as you made your changes.
- It’s best to leave profiles out of a managed package. Modify the command to exclude profiles:
cci task run list_changes --org dev -o exclude "Profile:"
With the list of changes looking good, you’re ready to capture your changes. Use a command similar to the list one you used a moment ago to retrieve all changes and exclude those profile changes.
Pro Tip: You can edit and re-run a command so that you don’t have to type it out again. Press the up arrow on your keyboard to recall the last command you used, then, edit it and press Return to run the command.
Enter this command to retrieve: cci task run retrieve_changes --org dev -o exclude "Profile:"
Your changes should now appear in GitHub Desktop. GitHub Desktop tracks changes to files in your repository automatically and shows them to you so you can store them in version control and share them with teammates (you’ll do this in the next unit).
All changes to the project will go through this same cycle. Like riding a bicycle: the same process is used on any CumulusCI project. Learn this once and you can reuse it everywhere!
Resources
- Website: GitHub Help, Creating an issue
- User Documentation: Salesforce Help, Create a Custom Object in Lightning Experience
- User Documentation: Salesforce Help, Create Custom Fields
- Trailhead: Add Custom Fields
- Developer Documentation: Scratch Orgs
- Get Help: CumulusCI group on the Trailblazer Community