Explore Command Structure and Navigation
Learning Objectives
After completing this unit, you'll be able to:
- Name the three main parts of a command structure.
- Identify the command used to change directories through the command line.
General Commands
Let's take a look at some commands to help you learn fundamental skills such as navigating in the command line and creating directories. These skills help you get more comfortable working in the command-line tool.
Before you run a command, let's take a look at how commands are structured.
Command Structure
All commands have three parts. Let's go through each of these parts, and then run some commands.
Command example:
$ command -flag arguments
Here is an example of a Salesforce command to create a new Salesforce DX project that contains a flag and an argument.
sf project generate -n MyProject
- The command is:
sf project generate - The flag
-nis required and tells the system what to name your new project.
- The argument is
MyProjectwhich is the name we are assigning to the project.
Let's take a look at each section of the command and explore how the command is structured today.
-
Command. The command (sometimes referred to as utility) comes first. This tells the system what actions you want the tool to take.
-
Flag. Flags (sometimes called options) specify a value that triggers a process or tells the command what other variables to include. Most values in flags are Boolean (true or false) or tell the system you want to set a variable such as naming a project.
Flags are identified by one or two hyphens---and followed by a value. Some commands may have required flags. Some flags may require arguments. For example, when creating a new Salesforce DX project, if you want to name your project, you use the-nflag and then add the name of your project as the argument-n MyProject.
Switches are a lot like flags but don't require arguments. For Salesforce CLI commands, we've baked in a lot of flag options as switches to simplify working in the command-line tool.
-
Arguments. Arguments tell the system what variable you want to set or which process you want to invoke. Arguments usually follow a flag after a space.
Example:-n MyProject

Now that you know what flags and arguments are, let's discuss why and when you use them.
Flags, Switches, and Arguments
You've learned that most commands may have additional text required called flags, switches, or arguments. Depending on what commands you're running, some flags and arguments can change the outcome of your project.
For example, let's take a look at the Salesforce CLI command to create a scratch org and learn how using flags can streamline running commands later.
sf org create scratch -f project-scratch-def.json -d
-
Command: The first part of the text is the command,
sf org create scratch. We are telling the system we want to create a scratch org.
-
Flags: The remaining part of the command has two flags.
- The first flag
-ftells the system to reference the scratch org definition file that outlines what template to reference to create the scratch org.
- The second flag
-dsets the newly created scratch org as the default. This flag does not require an argument because you can also write this flag as a switch--set-default. This flag tells the system to remember your username so when you run commands for this scratch org later (such as when you push or pull metadata), you won't have to enter the username or an alias because you've set the scratch org as your default using the-dflag.
-
Argument: The file's name being referenced,
project-scratch-def.jsonis the argument in this command. This file determines what features and special org set up (if any) is needed for this new scratch org.
Next, let's learn how to run commands in the command-line window.
For mac, the commands below are executed in bash or zsh. For windows, the commands below are executed in PowerShell.
How to Run Commands
To run a command, you type the command in the command-line window and press enter. If you see the dollar sign $ (macOS / Linux) or the greater symbol > (Windows) on the next line, the command passed. If a command doesn't pass, an error returns in the command-line window, and usually has a description of the error. As you run commands, keep in mind capitalization matters. For example, myProject and MyProject are two different project names.
Now that you know how to run commands in the command-line tool, practice this skill with navigation commands.
Navigation Commands
Navigation commands are the most frequent command you'll likely run. As you create projects and build directories, you need to learn how to navigate in and out of each directory.
Read the command line to see where you are now:
To see where you are in your directory, always refer to the command-line path. If you open up a new command-line window, you'll likely land on the starting directory path.
-
macOS starting directory:
yourname-ltm:~ yourname$ -
Windows starting directory:
PS C:\Users\yourname>
Change your directory:
To navigate to one step into the next directory, type cd (stands for change directory) and write out the directory name. Let's go ahead and navigate to the Documents directory. This command is the same for both OS.
cd Documents
Create a new directory:
Now create a new empty directory by typing the mkdir command with the name of the directory you'd like to create. This command is the same for both OS.
mkdir Resume
You've just created a new directory inside the Documents directory.
Navigate through multiple directories:
Now let's say you want to navigate deeper into multiple directories, you still use the cd command, but you add the directory path where you want to navigate. Depending on your OS, this path can be written differently. Now navigate to a directory named Resume in Documents. Imagine you are navigating to a folder that is within another folder. (Remember, capitalization matters!)
-
macOs:
cd ~/Documents/Resume -
Windows:
cd ~\Documents\Resume
You should now be in the Resume directory.

Navigate one level back:
Sometimes you navigate into directories and want to navigate one directory level back up. To do this, you still use the cd command and follow with two periods side by side. This command is the same for both OS.
cd ..
You should now be back at the Documents directory level.
If you get lost and need to see your current working directory:
Run this command if you want to see the directory path and location of your current location.
-
macOs:
pwd -
Windows:
cd
Now you're navigating like a pro!
View Your Command-Line History
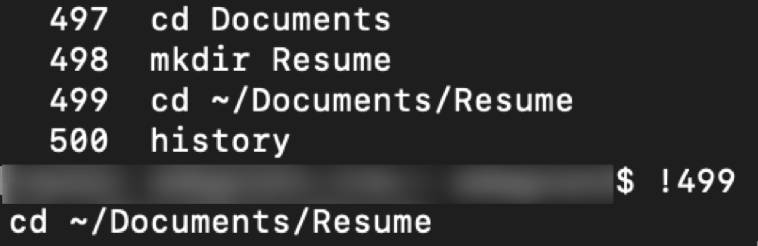
To see a history log of the commands you've run, type: history (or in Windows: keyboard shortcut F7). Once you run the command, you'll see a log of commands with numbers beside each command.
If you want to rerun a command for macOS/Linux, you can type !, add the number of the command, and press Enter to rerun the command.
For example: !499 will rerun the change directory command.
Next, let's set up the command-line tools.