Subscribe to an Event Channel
Learning Objectives
After completing this unit, you’ll be able to:
- Enable objects for change event notifications in the Change Data Capture page.
- Use Pub/Sub API to subscribe to a change event channel.
- Generate change event notifications by making updates in Salesforce.
Now that you’ve learned the basics of Change Data Capture, let’s get hands-on by generating some changes in Salesforce and receiving change events. For this section, we’re going to be creating and modifying an employee record.
Create the Employee Custom Object
Before we can start this exercise we need to define the Employee custom object. The first step is creating the custom object. You can complete the tasks in this unit in your own personal Trailhead Playground. To access your Trailhead Playground, click your profile image in the upper-right-hand corner, click Hands-on Orgs, then click the username of the org you want to launch.
- In Setup, click the Object Manager tab, and then select Create > Custom Object.
- Enter the following values.
- Label:
Employee - Plural Label:
Employees - (If available, select Starts with vowel sound.)
- Object Name:
Employee - Record Name:
Employee Name
- Label:
- Select Launch New Custom Tab Wizard after saving this custom object.
- Click Save.
- In the New Custom Object Tab page, select the Building tab for the tab style.
- Click Next | Next | Save.
- Click Fields & Relationships, then click New.
- Follow the field wizard to create these three fields:
- Data Type: Text, Field Label:
Last Name, Field Name:Last_Name, Length:50, Required: Yes
- Data Type: Text, Field Label:
First Name, Field Name:First_Name, Length:50 - Data Type: Number, Field Label:
Tenure, Length:18, Decimal Places:0, Field Name:Tenure
- Data Type: Text, Field Label:
Enable the Employee Object for Change Notifications
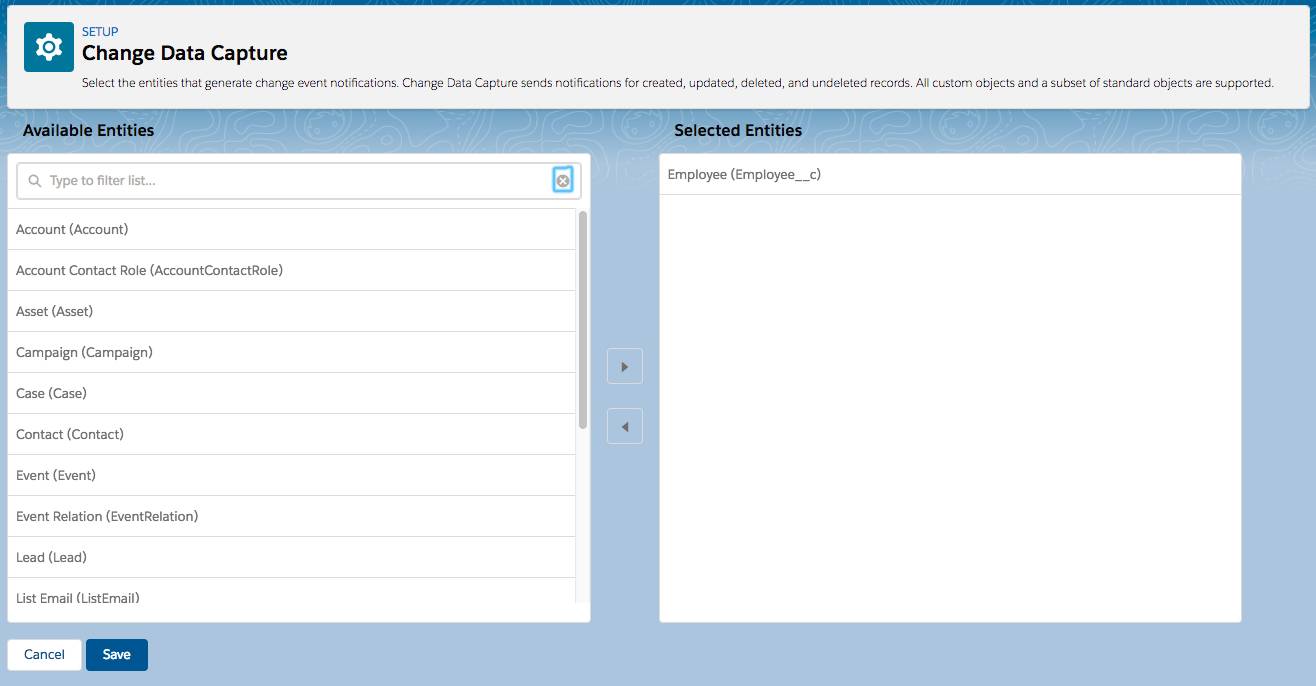
Before you can receive change notifications, you need to select the objects you’re interested in. Otherwise, even if you subscribe to the right channel, you won’t receive any notifications. In this section, we select the Employee custom object to listen to Employee record changes.
- From Setup, enter
Change Data Capturein the Quick Find box, and click Change Data Capture.
- In Available Entities, select Employee (Employee__c) and click the > arrow.
- Click Save.
Subscribe Using Pub/Sub API
Next, we show you how to generate and subscribe to change events for Employee records using a Pub/Sub API Java client. In this section, we provide the steps for generating and receiving change events so you can see examples of change events. You don’t need to follow the steps to complete this badge. You can refer to the steps when you use Pub/Sub API for subscribing to change events later.
Prerequisites
- If you have not set up a range of trusted IP addresses for your org, you need a security token that you append to your password. For more information, see Reset Your Security Token and Set Trusted IP Ranges for Your Organization.
Steps
- To set up the Pub/Sub API Java client, follow the steps in Step 2: Clone and Build the Client of the Java Quick Start for Pub/Sub API in the Pub/Sub API Developer Guide.
- In Step 3: Configure Client Parameters, supply the configuration parameters in
arguments.yaml.
- Keep the default values for
PUBSUB_HOSTandPUBSUB_PORT.
- For
LOGIN_URL, enterhttps://login.salesforce.comor your My Domain login URL, such ashttps://mycompany.my.salesforce.com. - Get the username and password for your Trailhead Playground org in the Playground Starter app. For more information, see Get Your Trailhead Playground Username and Password unit in the Trailhead Playground Management module.
- For
USERNAME, enter your Trailhead Playground username.
- For
PASSWORD, provide the Trailhead Playground password and append the security token to your password. To get a security token, see Reset Your Security Token in Salesforce Help.
- For
TOPIC, provide/data/Employee__ChangeEvent - Set
PROCESS_CHANGE_EVENT_HEADER_FIELDStotrue. This value ensures that some fields, such aschangedFields, in ChangeEventHeader are expanded. For more information, see Event Deserialization Considerations in the Pub/Sub API Developer Guide.
- Save your changes.
- In a Terminal window, navigate to the top-level
javafolder.
- To subscribe to change events, enter:
./run.sh genericpubsub.Subscribe
Once you subscribe to the channel for Employee__c, any changes to Employee records or creation of new records generates notifications that the client prints to the console.
Create an Employee Record
Let’s make a few record changes so that we receive some change event notifications. First, create an employee record.
- From the App Launcher (
 ), find and select Employees.
- Click New.
- Populate the following fields.
- Employee Name:
e-100 - Last Name:
Smith - First Name:
Patricia
- Click Save.
When you save the employee record, a change notification displays in the console, as follows.
{
  "ChangeEventHeader": {
    "entityName": "Employee__c",
    "recordIds": [
      "a00ak00000FqAsJAAV"
    ],
    "changeType": "CREATE",
    "changeOrigin": "com/salesforce/api/soap/61.0;client=SfdcInternalAPI/",
    "transactionKey": "0001b7b1-5ff1-499e-0b32-4b2aff2f6922",
    "sequenceNumber": 1,
    "commitTimestamp": 1722538034000,
    "commitNumber": 1722538034362728400,
    "commitUser": "005ak000004FkWTAA0",
    "nulledFields": [],
    "diffFields": [],
    "changedFields": []
  },
  "OwnerId": "005ak000004FkWTAA0",
  "Name": "e-100",
  "CreatedDate": 1722538034000,
  "CreatedById": "005ak000004FkWTAA0",
  "LastModifiedDate": 1722538034000,
  "LastModifiedById": "005ak000004FkWTAA0",
  "Last_Name__c": "Smith",
  "First_Name__c": "Patricia",
  "Tenure__c": null
}
Update an Employee Record
Next, let’s update the record we just created by adding a value to the Tenure field and then modifying the first name.
- In the employee record detail page, click Edit.
- Change the First Name field to
Trish.
- For Tenure, enter
3.
- Click Save.
Updating the employee record generates the following change event message. Notice that the populated fields in the change event are only the new and modified record and system fields, in addition to header fields. The unmodified fields are present in the event message but are null.
{
  "ChangeEventHeader": {
    "entityName": "Employee__c",
    "recordIds": [
      "a00ak00000FqAsJAAV"
    ],
    "changeType": "UPDATE",
    "changeOrigin": "com/salesforce/api/soap/61.0;client=SfdcInternalAPI/",
    "transactionKey": "0001b7b6-4696-a4a3-c6a5-8b65014da623",
    "sequenceNumber": 1,
    "commitTimestamp": 1722538057000,
    "commitNumber": 1722538057223217200,
    "commitUser": "005ak000004FkWTAA0",
    "nulledFields": [],
    "diffFields": [],
    "changedFields": [
      "0x0320"
    ]
  },
  "OwnerId": null,
  "Name": null,
  "CreatedDate": null,
  "CreatedById": null,
  "LastModifiedDate": 1722538057000,
  "LastModifiedById": null,
  "Last_Name__c": null,
  "First_Name__c": "Trish",
  "Tenure__c": 3
}
The changedFields field contains the fields that were changed. The changedFields field is a bitmap field that isn't readable. It must be decoded first by the client. The subscriber client decodes this field and prints it out after the change event message. In this example, the changedFields field contains the two fields that were changed: First_Name__c and Tenure__c. It also contains the system field, LastModifiedDate, which holds the timestamp of the update.
2024-08-01 11:47:37,738 [grpc-default-executor-1] java.lang.Class - ============================
2024-08-01 11:47:37,739 [grpc-default-executor-1] java.lang.Class -        ChangedFields
2024-08-01 11:47:37,739 [grpc-default-executor-1] java.lang.Class - ============================
2024-08-01 11:47:37,739 [grpc-default-executor-1] java.lang.Class - LastModifiedDate
2024-08-01 11:47:37,739 [grpc-default-executor-1] java.lang.Class - First_Name__c
2024-08-01 11:47:37,739 [grpc-default-executor-1] java.lang.Class - Tenure__c
2024-08-01 11:47:37,739 [grpc-default-executor-1] java.lang.Class - ============================
Delete an Employee Record
Now let’s see what happens when we delete the employee record.
- In Trish’s detail page, select Delete from the dropdown menu.
- Click Delete in the confirmation popup.
The deletion results in the following event message. Change events for deletions don’t include any values for record or system fields. All record and system fields are included but with empty values.
{
  "ChangeEventHeader": {
    "entityName": "Employee__c",
    "recordIds": [
      "a00ak00000FqAsJAAV"
    ],
    "changeType": "DELETE",
    "changeOrigin": "com/salesforce/api/soap/61.0;client=SfdcInternalAPI/",
    "transactionKey": "0001045a-a442-5723-cd1f-07e8e39c5c1d",
    "sequenceNumber": 1,
    "commitTimestamp": 1722538082000,
    "commitNumber": 1722538082479947800,
    "commitUser": "005ak000004FkWTAA0",
    "nulledFields": [],
    "diffFields": [],
    "changedFields": []
  },
  "OwnerId": null,
  "Name": null,
  "CreatedDate": null,
  "CreatedById": null,
  "LastModifiedDate": null,
  "LastModifiedById": null,
  "Last_Name__c": null,
  "First_Name__c": null,
  "Tenure__c": null
}
Undelete an Employee Record
When you delete a record, it is “soft deleted” and can be restored within a certain time limit. Let's restore the record through Apex.
- Click the quick access menu (
 ), and select Developer Console.
- In the Developer Console, click Debug and select Open Execute Anonymous Window.
- In the new window, enter the following and replace the ID placeholder with the ID value returned in the recordIds header field. You can find the
recordIdsfield in the change event message you received after deleting the record in the previous step.
Employee__c record = [SELECT Id,Name FROM Employee__c WHERE Id='ID_Placeholder' ALL ROWS];
undelete record;
- Click Execute.
The undeletion results in the following event message. The change event for an undeleted record contains fields from the original deleted record.
{
  "ChangeEventHeader": {
    "entityName": "Employee__c",
    "recordIds": [
      "a00ak00000FqAsJAAV"
    ],
    "changeType": "UNDELETE",
    "changeOrigin": "com/salesforce/api/soap/61.0;client=devconsole",
    "transactionKey": "0001b7d4-927c-6028-fe72-7f28dc5cba83",
    "sequenceNumber": 1,
    "commitTimestamp": 1722538187000,
    "commitNumber": 1722538187363508200,
    "commitUser": "005ak000004FkWTAA0",
    "nulledFields": [],
    "diffFields": [],
    "changedFields": []
  },
  "OwnerId": "005ak000004FkWTAA0",
  "Name": "e-100",
  "CreatedDate": 1722538034000,
  "CreatedById": "005ak000004FkWTAA0",
  "LastModifiedDate": 1722538187000,
  "LastModifiedById": "005ak000004FkWTAA0",
  "Last_Name__c": "Smith",
  "First_Name__c": "Trish",
  "Tenure__c": 3
}
Resources
-
Salesforce Developers: Java Quick Start for Pub/Sub API
-
Salesforce Developers: Change Data Capture Developer Guide
-
External Site: Pub/Sub API GitHub Repo