Set Up a Page Designer Development Environment
Learning Objectives
- Identify three steps you must take to configure your environment.
- Explain why compatibility mode is important.
- List three environmental dependencies for the local machine.
- Describe the basic steps you must take to import sample data.
Introduction
Vijay Lahiri, the Cloud Kicks developer is ready to set up his development environment to get started with Page Designer page and component types. To do this, he uses various tools on his local machine, such as git and his integrated development environment (IDE). He uses a browser to access GitHub and Business Manager, the Salesforce B2C Commerce storefront configuration and management tool.
Here are the steps he takes.
- Check the compatibility mode in Business Manager.
- Check the dependencies for the local machine.
- Download or clone repos from GitHub to your local machine. The Page Designer elements are included in the base SFRA repository.
- Upload the cartridges to the server with Business Manager.
- Configure the cartridge path in Business Manager.
- Import the storefront content data into the server with Business Manager.
- Review the pages and components in Page Designer in Business Manager.
- Customize or create files.
This module assumes you are a B2C Commerce developer with the proper permissions to perform these tasks. If you’re not a B2C Commerce developer, that’s OK. Read along to learn how your developer would take these steps in a sandbox instance. Don't try to follow our steps in your Trailhead Playground. B2C Commerce isn’t available in the Trailhead Playground.
If you have a sandbox instance of B2C Commerce, you can try out these steps in your sandbox. If you don't have a sandbox and you’re a customer or partner developer, ask your manager if there is a sandbox that you can use.
To follow these steps you need site administrator rights in your sandbox. If you’re not a site admin, ask your administrator which login credentials to use to connect to the sandbox.
Page Designer is automatically enabled for each instance type.
Check the Compatibility Mode
Compatibility mode refers to a specific Salesforce B2C Commerce API version where its changes impacted backward compatibility with the previous API version. Not every API version impacts backward compatibility, so only some API versions have a compatibility mode. Vijay knows that API versioning enables him to actively select from multiple compatibility modes, with the full knowledge and acceptance of incompatible changes. He also knows that to be able to use Page Designer without side effects from the usage of Page Designer components, he needs to make sure that compatibility mode is set to 17.7 or higher.
Here’s how Vijay checks his site’s compatibility mode.
- Open Business Manager.
- Select Administration > Site Development > Code Deployment.
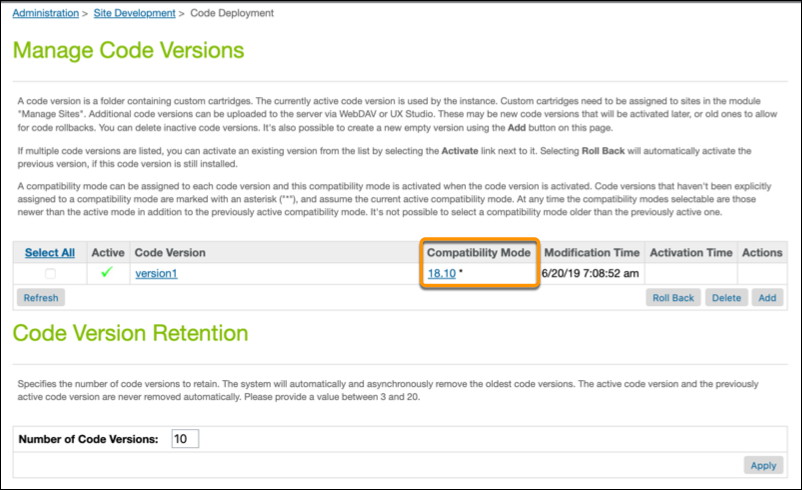
- The compatibility mode is sufficient.
See the Compatibility Mode Changes for details on the latest compatibility mode.
Check Dependencies
Next, Vijay checks that the environment on his local machine supports these dependencies.
"dependencies": {
 "bootstrap": "4.0.0",
 "cleave.js": "^1.0.2",
 "flag-icon-css": "^2.3.0",
 "font-awesome": "^4.6.3",
 "jquery": "^3.1.1",
 "popper.js": "^1.14.0" },
He also checks that he has Node.js and npm installed. Here’s how he does it.
- Open a command prompt.
- Enter the following to see if you have Node.js and npm installed.
- node -v
- npm -v
- Make sure you have version 6.x or later.
You can download Node.js from here: https://nodejs.org. Node.js includes npm.
Download Data and Files from GitHub
Many developers want to create the page and component types themselves. Vijay, however, wants to use the Page Designer examples that are in the SFRA repository in GitHub. You can take the Tools & Resources for Salesforce B2C Developers Trailhead module to learn how he downloads SFRA. (After you take this module, you might want to bookmark it!)
Install Page Designer Cartridges
Vijay’s ready to install the cartridges on his local machine. Here are the steps he takes.
- In the command prompt, navigate to the top level of the repository, for example, storefront-reference-architecture.
- Enter this command: npm install
- Repeat these steps for each repository. The npm client installs any packages a repository needs.
- Compile the JavaScript and Style Sheets.
- Navigate to the top level of the repository.
- Enter this command: npm run compile:js
- Enter this command: npm run compile:scss
- Enter this command: npm run compile:fonts
Upload Cartridges
To upload the SFRA cartridges, Vijay creates a file that includes information about his sandbox.
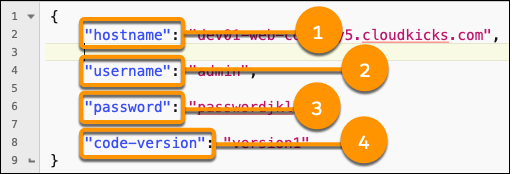
He uses a text editor to create a file named dw.json. Always place this file at the top level of the storefront-reference-architecture repository, as a sibling of the cartridge directory. It must be valid JSON that includes the following information.
{
 "hostname": "dev01-web-company5.cloudkicks.com",
 "username": "admin",
 "password": "passwordjkl",
 "code-version": "version1"
 }
Here’s what he specifies.
- For hostname (1), enter the fully qualified domain name (FQDN) of your sandbox. For example, dev04-web-company5.cloudkicks.com.
- For username (2), enter the name of a user with Site Development rights. For example, admin.
- For password (3), enter the password for the user.
- For code-version (4), enter version1 for a new sandbox.
Here’s how he uploads the cartridges.
- Navigate to the top level of the storefront-reference-architecture repository.
- Enter the following command: npm run uploadCartridge (The app_storefront_base and modules cartridges are uploaded to the sandbox that he specified in the dw.json file.)
- Open Business Manager in your browser.
- Select Administration > Site Development > Code Deployment.
- Click the version of the code you specified in the dw.json file (version1 for a new sandbox). The app_storefront_base and modules cartridges are on the list of cartridges on the Version Summary page.
Configure the Cartridge Path
Vijay updates the path for his cartridges in Business Manager so that the server knows to add the new code. Here are the steps he takes.
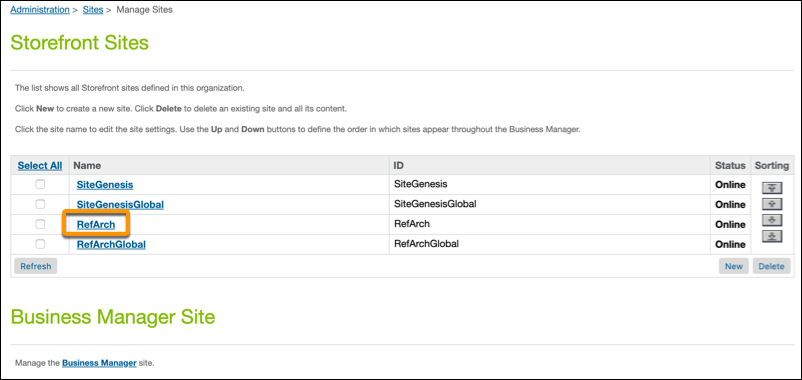
- Open Business Manager.
- Select Administration > Site > Manage Sites.
- In the Business Manager Site section, click the RefArch link. (You select your own application.)
- Click the Settings tab.
- Enter your cartridge names For SFRA, enter:
- RefArch cartridge path: app_storefront_base
- Business Manager cartridge path: bm_app_storefront_base
Vijay uses the SFRA sample data to start, though his administrator already has a content asset import and management process. Sample data includes the graphics that he can use on his test pages. He uses Business Manager Site Import to upload and import the sample data from the site-template directory in the repository that he downloaded from GitHub. Keep in mind that these names can change as new features are added.
- For SFRA sites, zip up the site_template_sfra directory or use the site_template_sfra.zip file.
Here are the steps he takes.
- Open Business Manager.
- Click Administration > Site Development > Site Import & Export.
- Click Choose File and select the zip file.
- For SFRA sites, select site-template-sfra.zip.
- Click Upload.
- When the Status is Successful, select the file and click Import.
- Select the site: RefArch
- To rebuild the indexes, click Merchant Tools > Search > Search Indexes.
- Select the indexes.
- Click Rebuild.