Create and Monitor an On-Demand Sandbox
Learning Objectives
After completing this unit, you’ll be able to:
- Describe the tools used to create, start, and stop on-demand sandboxes.
- List three steps a developer might include in their automated process.
- List the three types of REST API actions.
- Explain the Business Manager configuration settings that are required for API client access to instances.
Introduction
Linda Rosenberg, the Cloud Kicks administrator, wants to set everything up so that her developers can get right to work. After configuring users and client IDs, she wants to create a sandbox. Vijay Lahiri, one of the lead developers, is eager to create a new process to speed feature rollout. Once he and the development team are up and running, Linda will monitor credit consumption and step in if problems occur.
On-demand sandbox administrators and developers like Linda and Vijay use these tools to create, start, stop, remove, and manage sandboxes in their realm.
-
REST API: exposed in a Swagger user interface (UI)
-
Community-based command line interface (CLI): part of the Commerce Cloud Community Suite on GitHub. (You must have GitHub credentials).
Linda wants to explore the REST API first; then she’ll help Vijay get ready to use the CLI. He wants to use CLI to create an automated development process similar to this:
- Acquire a sandbox.
- Deploy code to the sandbox.
- Deploy test data to the sandbox.
- Run automated tests.
- Delete the sandbox.
The REST API
Linda uses the REST APIs to create an on-demand sandbox. To get started, she makes sure that she:
- Can access a realm that’s been enabled for on-demand sandboxes
- Is assigned the Sandbox API User and Business Manager Administrator roles
- Has a client ID
Here are the steps she takes to access the REST APIs.
- Open the browser.
- Enter this URL: https://admin.dx.commercecloud.salesforce.com/
- Click Authorize to log in with the API Client ID she configured using Account Manager.

- Click Authorize.
- Enter the client ID.
- Click Authorize again.
- Click Close. The Authorize lock icon changes to locked.

Actions
The REST APIs control credit consumption. Linda uses them to create, start, stop, and remove sandboxes. The main page has two sections, with commands at the top and models at the bottom.

She can run actions:
- For general purpose API endpoints
- At the realm level
- At the sandbox level
She uses realm actions to get information about her realm, or to patch her realms.
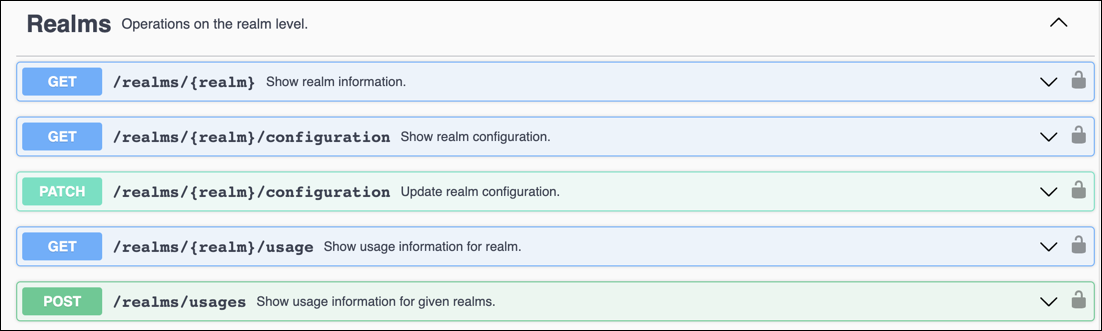
She can use a variety of sandbox actions, such as creating a sandbox, running a sandbox operation, deleting a sandbox, or showing sandbox usage.

Linda starts by listing sandboxes and then creating a new one. Once she has a sandbox ID, she can manage individual sandboxes.
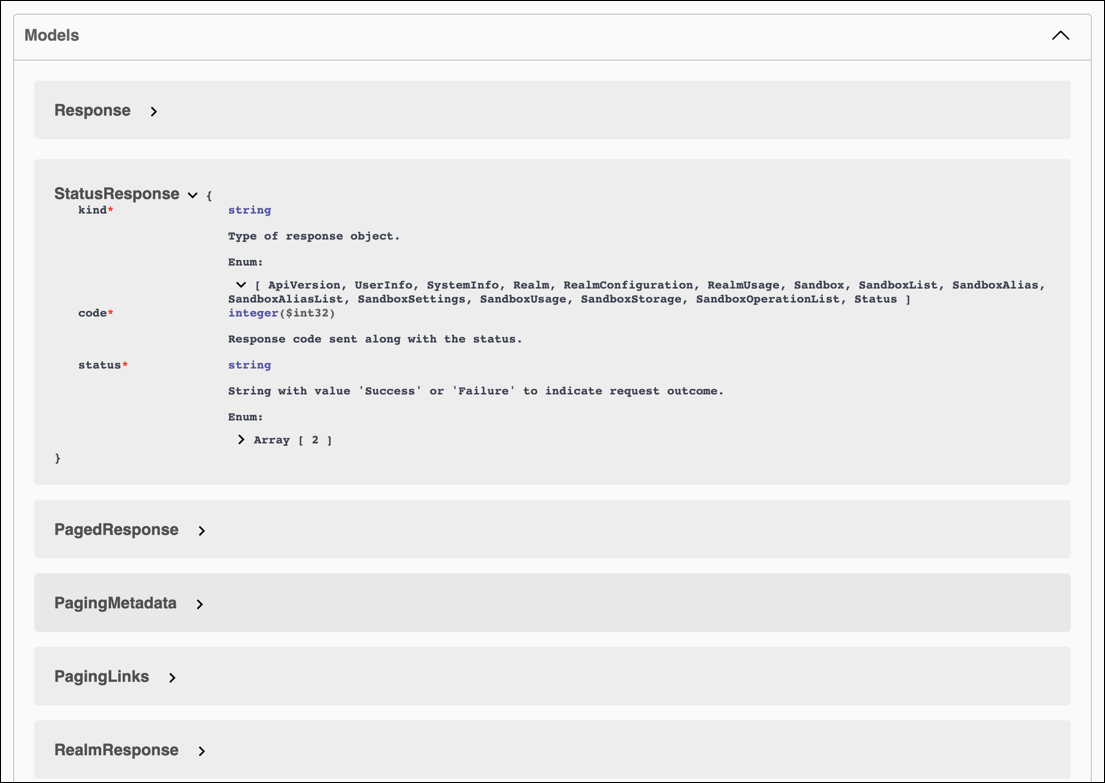
Models
Linda studies the model details so she can understand her results and specify requests correctly. Here’s the StatusResponse model, for example.
Create an On-Demand Sandbox
Now that Linda is familiar with the REST APIs, she creates an on-demand sandbox. Here are the steps she takes.
- Open the browser.
- Enter this URL: https://admin.us01.dx.commercecloud.salesforce.com/
- Authorize via the client ID.
- Click POST beside /sandboxes Create sandbox.

- Enter the details in the <your realm id> and <your client id> fields.

- Click Execute.
- View the results in the Responses section.
In this example, time-to-live (TTL) is set to 24. This value defines how many hours the sandbox needs to live. If TTL is set to 0 or less, the sandbox lives forever.
Monitor Sandboxes
To keep things running smoothly, Linda reviews on-demand sandbox log messages that are collected in a dedicated log center. She clicks a link like this to view the logs for her realm: https://logcenter.us01.dx.commercecloud.salesforce.com/
Credit Usage
The on-demand sandbox system notifies her Salesforce account manager when Cloud Kicks reaches 85% of its usage consumption. It’s up to the account manager to notify her management. If consumption exceeds the amount her company purchased, the sandboxes continues to function and consume credits, but with overage charges.
It’s easy for Linda to keep track of credit usage. She uses the GET usage requests API in the REST APIs for realm (1) and sandbox (2) usage data.

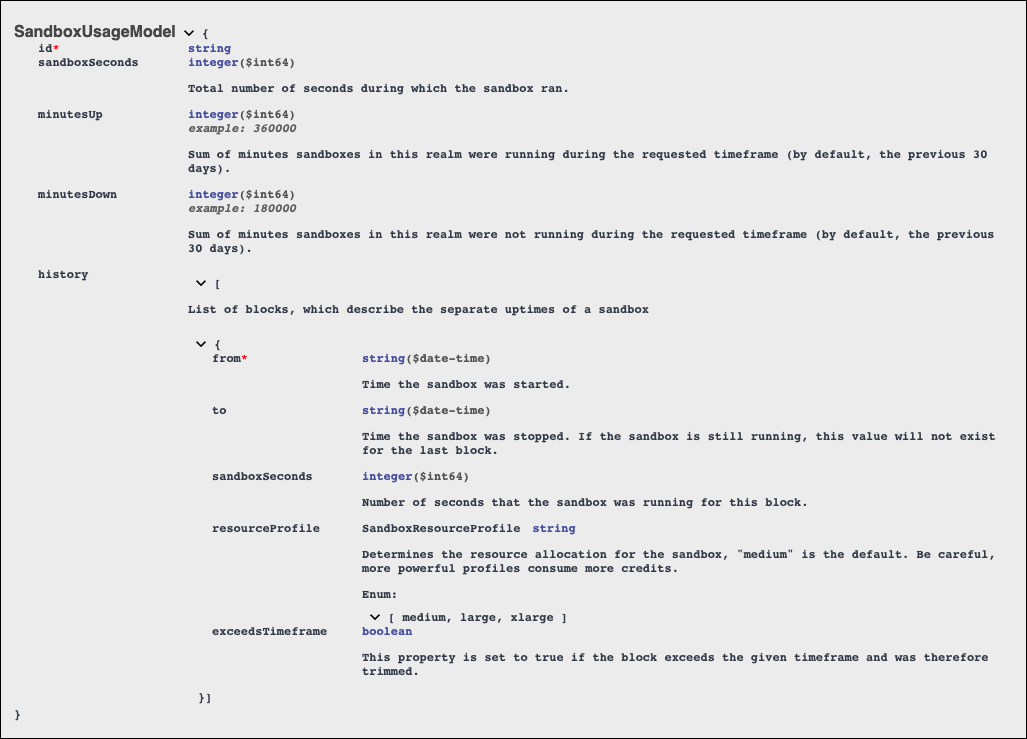
She can look at the models for the details. Here’s the realm usage model. Important information to track includes sandboxSeconds, minutesUp, and minutesDown against what her management has purchased.

Here’s the sandbox usage model. It tells Linda how many seconds the sandbox ran, and of that time how many minutes it was up (running) and how many minutes it was down (not running). Remember, the cost is higher when the instance runs than when it doesn’t.
Delete a Sandbox
On-demand sandboxes consume credits until they are deleted. So Linda is quick to delete sandboxes as soon she or the developers no longer needs them.
In some cases, she or Vijay create an on-demand sandbox using POST/sandboxes, and configure an optional time-to-live (TTL) setting for the number of hours the sandbox exists. When they only need a sandbox for a short time, they specify a TTL that covers only the time required.
When Linda needs a sandbox for a project with an uncertain end schedule, she doesn’t configure the TTL or she specifies a really large TTL, such as 2,100 hours, and then deletes the sandbox as soon as the project is finished. The maximum value for TTL is 2,160 hours. After she creates a sandbox, she can change the TTL value using the PATCH/sandboxes command.
Get Ready for the Command Line Interface (CLI)
Vijay is ready to create a (CI/CD) development process using the CLI. Although this tool is not an official Salesforce product, it’s a popular tool for developing automated processes. It saves time and eliminates problems typically caused by error-prone manual processes. With this type of process, he can automate Salesforce B2C Commerce code validation and delivery on his on-demand sandbox.

He can use the CLI from any machine, either locally or from build tools such as Jenkins, Travis CI, Bitbucket Pipelines, and Heroku CI. The CLI comes with a basic JavaScript API that he can use to integrate with higher level applications on Node.js.
Here are some of the functions he can perform.
- OAuth2 interactive and headless authentication (no Business Manager user needed)
- Create, start, stop, and remove on-demand sandboxes
- Configure multiple instances, including aliasing
- Deploy code and data with code version management
- Execute and monitor system jobs
- Execute and monitor custom jobs
- Connect via WebDAV
Linda already configured the API client ID for Vijay to use. She also configured redirect URIs, default scope, and gave him administrator-level access to the CLI. Now he needs to Grant API client ID access to the instances.
Grant API Client Access
For some CLI commands, Vijay needs to make API calls to other B2C Commerce instances. That means Linda must grant global access in Business Manager. Here’s how she does it.
- Open Business Manager.
- Click Administration > Site Development > Open Commerce API Setting.
- Select Data API and Global.
- Add the permission set for the client ID to the settings.
- You can copy this snippet and paste it into the settings field. Replace my_client_id with your client ID. If you already have OCAPI settings (for other API client IDs) merge this permission set into the existing list.
{ "_v": "19.5", "clients": [ { "client_id": "my_client_id", "resources": [ { "resource_id": "/code_versions", "methods": ["get"], "read_attributes": "(**)", "write_attributes": "(**)" }, { "resource_id": "/code_versions/*", "methods": ["patch"], "read_attributes": "(**)", "write_attributes": "(**)" }, { "resource_id": "/jobs/*/executions", "methods": ["post"], "read_attributes": "(**)", "write_attributes": "(**)" }, { "resource_id": "/jobs/*/executions/*", "methods": ["get"], "read_attributes": "(**)", "write_attributes": "(**)" }, { "resource_id":"/role_search", "methods":["post"], "read_attributes":"(**)", "write_attributes":"(**)" }, { "resource_id":"/roles/*", "methods":["get"], "read_attributes":"(**)", "write_attributes":"(**)" }, { "resource_id":"/roles/*/user_search", "methods":["post"], "read_attributes":"(**)", "write_attributes":"(**)" }, { "resource_id":"/roles/*/users/*", "methods":["put","delete"], "read_attributes":"(**)", "write_attributes":"(**)" }, { "resource_id":"/user_search", "methods":["post"], "read_attributes":"(**)", "write_attributes":"(**)" }, { "resource_id":"/users", "methods":["get"], "read_attributes":"(**)", "write_attributes":"(**)" }, { "resource_id":"/users/*", "methods":["put","get","patch","delete"], "read_attributes":"(**)", "write_attributes":"(**)" } ] } ] } - Click Administration > Organization > WebDAV Client Permissions.
- Add the permission set for your client ID to the permission settings. You can copy this snippet and paste it into the settings field. Replace my_client_id with your client ID. If you already have WebDAV Client Permissions configured (for other API client IDs), merge this permission set into the existing list.
{
 "clients":
 [
   {
     "client_id": "my_client_id",
     "permissions":
     [
       {
         "path": "/impex",
         "operations": [
            "read_write"
         ]
     },
     {
         "path": "/cartridges",
         "operations": [
            "read_write"
         ]
        }
      ]
    }
  ]
}
Vijay is ready to create an automated process using on-demand sandboxes. The instructions for setting up and using SFCC-CLI are on the B2C Commerce B2C Commerce GitHub repositories. He follows the instructions in the Tools & Resources for Salesforce B2C Commerce Cloud Developers Trailhead module to learn how to access to this repository.
Let's Wrap It Up
You learned how to use the REST API to create and delete an on-demand sandbox. You also learned how to monitor the sandboxes and credit usage. You got ready to use a CLI by learning about its prerequisites and how to grant API Client Access to other instances. This level of control and access can make you super efficient as you roll out amazing new features on your B2C Commerce storefront.
Now test your knowledge and earn an amazing badge.
Resources
- External Site: Swagger: B2C Commerce Developer Sandbox REST API
- External Site: Salesforce B2C Commerce GitHub Repository (you must have the proper credentials)
- Trailhead: Tools & Resources for Salesforce B2C Commerce Cloud Developers