Create and Configure Jobs
Learning Objectives
After completing this unit, you’ll be able to:
- List three tasks you can perform with the Jobs module.
- Create a job.
- Assign resources to a job.
- Add a job step to one or more flows.
- Create a global parameter.
Introduction
Now that Linda understands jobs and knows about system and custom job steps, it’s time for her to create and configure a job. She needs access to the Business Manager Jobs module to do this. The Jobs module lets her create and schedule jobs, set up email notifications for job failures, and use job resources to prevent conflicts.
To access Business Manager, you must have a B2C Commerce implementation. In this module, we assume you are a B2C Commerce administrator with the proper permissions to perform these tasks. If you’re not a B2C Commerce administrator, that’s OK. Read along to learn how your administrator would take these steps in a staging instance. Don't try to follow our steps in your Trailhead Playground. B2C Commerce isn't available in the Trailhead Playground. If you have a staging instance of B2C Commerce, you can try out these steps in your instance. If you don't have a staging instance, ask your manager if there is one that you can use.
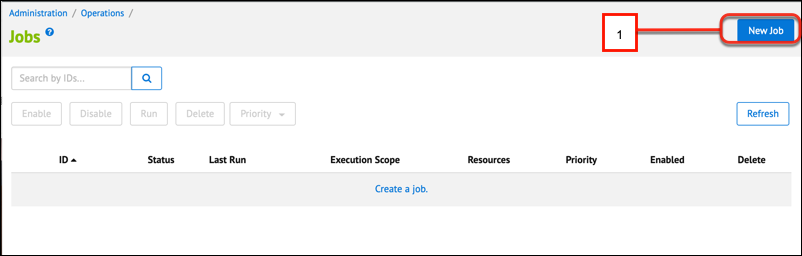
Create the Job
Here’s how Linda creates a job to import a catalog.
- Open Business Manager.
- Select Administration > Operations > Jobs.
- Click New Job (1).
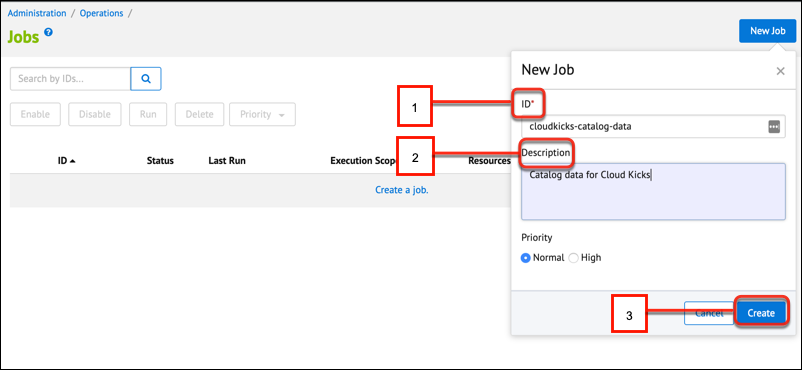
- Enter cloudkicks-catalog-data as the ID (1) and Catalog data for Cloud Kicks as the Description (2).
- Click Create (3).
- Click the Schedule and History tab.
- Select Enabled to run the job on a schedule. If the job isn't enabled, you can still trigger it manually.
- Select Once to trigger the job to run once, or select Recurring Interval.
- For jobs that you want to run on a recurring interval, use the calendar icon to select a date in the past. If you don’t schedule a date in the past, you have to wait for the date you specified for the job to run. You can also select a day of the week, a time, an interval, and a number of times the job should run.
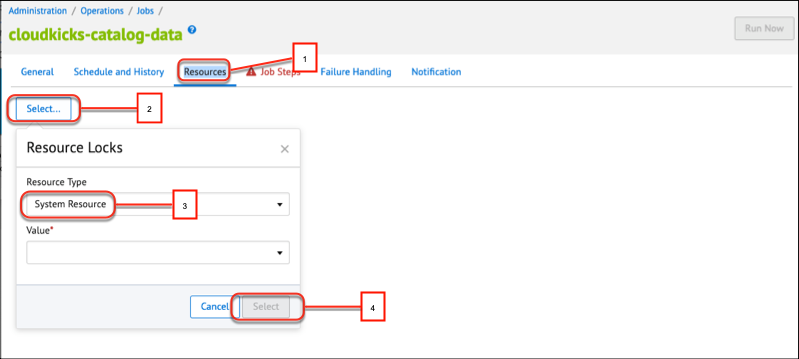
Lock Resources
Linda can lock a resource to prevent another user or job from changing it while her job operates on it. For example, while she updates her catalog, she doesn’t want other jobs or users to update or change the catalog, categories, or products. Here’s how she locks it.
- Click the Resources tab (1).
- Click Select (2).
- Select System Resource (3).
- Add the objects that the job changes or updates as resources (for example, order).
- Click Select (4).
Add the Job Step to a Flow
Linda wants to add job steps.
- In a new job, click the Job Steps tab. An empty flow is already set up. This first flow is represented on the Job Steps page as a gray rectangle (1).
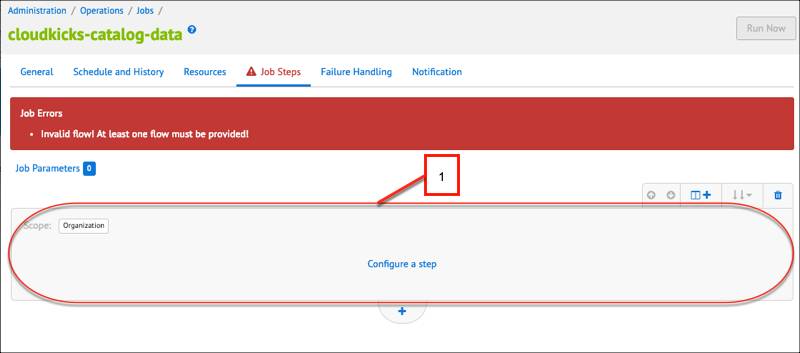
- Click Configure a step to create a new step in the flow.
- In the Select and Configure step pane, choose the system or custom job step you want to add to the flow. Linda selects ImportCatalog.
- Specify the job step parameters. Each job step has its own unique parameters. Hover over a parameter name to get more information about the parameter. Here are the parameters for the ImportCatalog job step in our example.
- Enter a unique step ID.
- Add a description. This is visible on the workflow and job.
- Specify the working folder. This contains the catalog files you want to import relative to IMPEX/src. If you don’t define this value, B2C Commerce uses IMPEX/src as the working folder.
- Enter the FileNamePattern. This is the name of the file you want to import. Use a regular expression (regex) to specify multiple files. If you don’t define this value, Salesforce B2C Commerce imports all files in the working folder.
- Specify NoFilesFoundHandling, for what happens if B2C Commerce doesn’t find any files to import.
- Specify ImportFailedHandling, for what happens if the import fails.
- Specify AfterImportFileHandling, for what happens to the file(s) after import.
- Specify the ArchiveFolder. If it’s set to Archive or Archive zipped, this setting defines where B2C Commerce stores files relative to the IMPEX directory. If it’s not defined, B2C Commerce archives the files in IMPEX/archive.
- Select the import mode:
-
Delete: Delete the object.
-
Merge: Create the object if it doesn’t exist, then do an update.
-
Replace: Re-create the object with the data provided.
-
Update: Update an existing object.
- Select Always execute on restart if you want B2C Commerce to restart the job if it fails. This step should always be included in the execution, even if B2C Commerce completes the job before the restart.
- Specify Error Handling, for how the system should respond to job errors.
- For Scope, leave the value at its default of Organization. The ImportCatalog job step must be run with a scope of Organization.
Add a New Flow
When Linda creates a job, one flow is already configured for her. She can add all her job steps to that flow. She can also create up to four sibling flows, which Business Manager represents side by side on the Job Steps tab. She can configure sibling flows to run sequentially or in parallel.
However, as you learned earlier, if there aren’t enough resources for parallel execution or if a step type doesn’t support parallel execution, B2C Commerce executes the sibling flows sequentially.
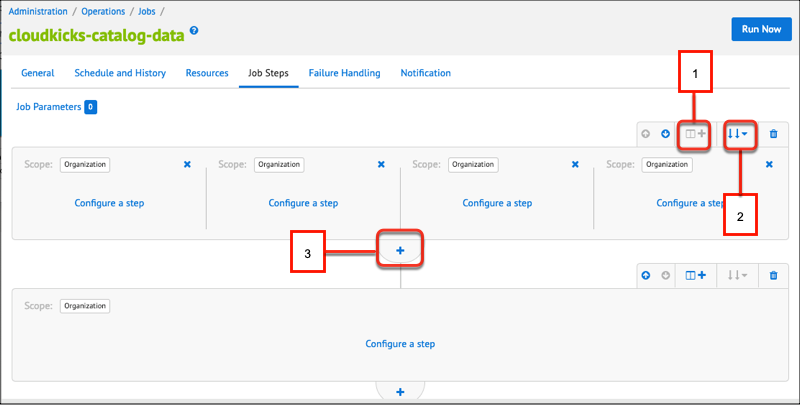
The following graphic shows the flow options on the Jobs tab.
- Add a sibling flow.
- Toggle between sequential and parallel processing of sibling flows.
- Add a new sequential flow
Configure Troubleshooting Settings
Linda wants to configure troubleshooting settings to help isolate problems. She takes these steps.
- Click the Failure Handling tab and select a failure rule. B2C Commerce invokes the rule if a job step uses Error Handling On ERROR and specifies Error Handling Action as STOP.
- Click the Notification tab if you want to be notified about the status of a job.
- Select Enabled.
- Select which events you want to receive notifications about.
- Enter the required email information.
- Select Enabled under Long Runtime Detection and enter the runtime threshold.
Run a Job Manually
Sometimes Linda receives a request for an important/emergency job or needs to run a job manually when troubleshooting. Here’s what she does.
- Open Business Manager.
- Select Administration > Operations > Jobs.
- Select the job you want to run.
- Click Run Now.
- Examine the history section at the bottom of the page to see if there are errors or problems with the job.
- You can also select Administration > Operations > Job History to monitor the status of jobs.
Create a Job Parameter
Linda can create a job parameter to use in different job steps. For example, she can create a parameter for ReplicationProcessID and set it to the ID of a specific replication process. She can use the parameter in different job steps. If she needs to use a different replication process, she can change the value of the parameter, and B2C Commerce updates all the steps that include the parameter.
After she configures a job parameter, she can reuse it only for step parameters that are defined in exactly the same way as the original parameter.
Examples:
- Linda creates a job parameter for a step parameter that requires a Boolean true/false value. She can’t use it for a step parameter that requires strings.
- Two steps have a string parameter FileName with a pattern constraint *.xml. She can define a job parameter for both steps.
- One step has a string parameter FileName with a pattern constraint .xml, and another step has a string parameter FileName with a pattern constraint .txt. She can't define a job parameter to use in both steps.
If you want to set custom job steps with the same job parameter, the step parameters must have identical type definitions in the steptypes.json file. In other words, all of the attributes of the parameter must be defined identically. For example, Linda can’t use the same job parameter to set the following two custom step parameters because the @type attribute for MyParameter1 is “long” and the @type attribute for MyParameter2 is “double.”
{
 "@name":"MyParameter1",
 "@type":"long",
 "@required":"false",
 "description":"An optional long parameter. The default value is 10 when not defined.",
 "default-value":"10"
},
 "@name":"MyParameter2",
 "@type":"double",
 "@required":"true",
 "@trim":"true",
 "description":"A required double parameter were the raw
  value is trimmed, value must be between -10 and +10.",
 "min-value":"-10",
 "Max-value":"10"
},
Create a Job Parameter
Linda wants to create a job parameter. Here’s what she does.
- Create a job step or select an existing one.
- Click the field that you want to create a parameter for.
- Click Job Parameters.
- Click Add Job Parameter.
- Enter a unique name for the parameter.
- Enter the value for the parameter.
- Click Save.
- Click Assign.
- To use the parameter in another job step:
- Click the field that you want to use the parameter for.
- Click Job Parameters.
- Select the parameter to use.
- Click Assign.
Modify a Job Parameter
To modify a job parameter:
- Select Job Parameters on the Job Steps tab.
- Select the parameter you want to change and enter the new value.
- Click Save.
Next Steps
In this unit Linda learned how to schedule, create, and configure jobs. Next, she learns how to recover from job failures.
Resources
- Trailhead: Build Your Ecommerce Site with Salesforce B2C Commerce
- Trailhead: Salesforce B2C Commerce Import/Export
- Trailhead: Salesforce B2C Commerce Replication
- Help: Create a Job