Install an AgentExchange Solution
Learning Objectives
After completing this unit, you’ll be able to:
- Describe Salesforce Labs solutions.
- Install an AgentExchange solution in your org.
- Add an AgentExchange solution to a process flow.
Follow Along with Trail Together
Want to follow along with an expert as you work through this step? Take a look at this video, part of the Trail Together series.
(This clip starts at the 20:32 minute mark, in case you want to rewind and watch the beginning of the step again.)
Introduction
Grab your mouse and your sense of adventure. In this unit, we take you step-by-step through the process of installing and using an AgentExchange solution. Then, you get to apply what you learned with a hands-on challenge.
Here’s a high-level summary of the tasks at hand.
- Install the Service Agent Script for Salesforce Flow component.
- Create a flow.
- Add the component to the flow.
- Run the flow.
Get to Know Salesforce Labs

In this exercise, we use a Salesforce Labs solution. If your mind just conjured up an image of mad scientists and petri dishes, think again. Salesforce Labs is a program that lets Salesforce engineers and other trailblazing employees create solutions and share them with you on AgentExchange. They range from simple utilities to entire vertical solutions and are:
- Free.
- Ready to install.
- Designed to solve common business challenges.
- Open source. You can peek under the hood to see how they work and customize them as needed. It’s a great way to learn more about how the platform works.
Last but not least, Salesforce Labs solutions are an excellent way to see what’s new and exciting from Salesforce. We’re constantly launching Labs solutions that use our newest products and features.
Install a Flow Component
Your first task is installing the Service Agent Script for Salesforce Flow component in your Trailhead Playground.
Let's get started by opening your Trailhead Playground and getting your username and password. Scroll to the bottom of this page and click Launch. If you see a tab in your org labeled Get Your Login Credentials, great! Follow the steps below.
If not, click  to launch the App Launcher, then click Playground Starter and follow the steps. If you don’t see the Playground Starter app, check out Find the Username and Password for Your Trailhead Playground on Salesforce Help.
- Click the Get Your Login Credentials tab.
- Make a note of your Trailhead Playground username, which is displayed on the page.
- Click Reset My Password. This sends an email to the address associated with your username.
- When you get the email, click the password reset link.
Enter a new password, confirm it, and click Change Password.
Now log in to AgentExchange and install the Service Agent Script for the Salesforce Flow component.
- Open a new private browsing window. In Chrome, click File | New Incognito Window. In Safari, click File | New Private Window.
- In the private browsing window, navigate to https://appexchange.salesforce.com.
- Click Log In.
- Click Salesforce.
- On the login page that appears, enter the username and password you just got from your Trailhead Playground and click Log In.
- If the Link to Trailblazer page appears, click Link and Log In to continue.
- In the search bar, enter
Service Agent Script for Salesforce Flowand click the component listing. (If you can’t find it, here’s a direct link. On the login page that appears, log in with your Trailhead Playground credentials.)
- Click Get It Now.
- From the Connected Salesforce Accounts dropdown, choose your Trailhead Playground username, if necessary.
- Click Install in Production. Yes, production. Your Trailhead Playground is a production instance for your personal use. You can make customizations in your playground without impacting anything else (in this case, your production org).
- Check the username on the installation confirmation screen to confirm that you're installing the package in your Trailhead Playground, then select the box to agree to our terms and conditions.
- Click Confirm and Install.
- If prompted, enter your Trailhead Playground credentials again and click Log In.
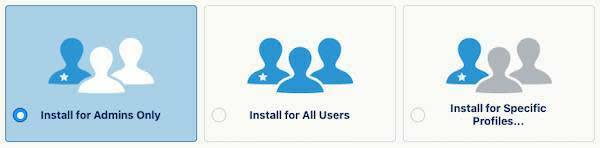
- You’re the only user who needs access to this solution, so select Install for Admins Only and click Install.
- The package might take a few minutes to install. Once you see a message telling you the installation is complete, click Done to see the package in your org.
Your org displays the Installed Packages page in Setup. From here, you can view the details of individual packages and perform administrative tasks, such as uninstalling packages.
Enable Lightning Runtime for Flows
Service Agent Script for Salesforce Flow is an Aura component. To run a flow that contains an Aura component, you must enable Lightning runtime for flows in your playground org.
- In your playground, click
 and select Setup.
- Enter
process automationin the Quick Find box, and select Process Automation Settings.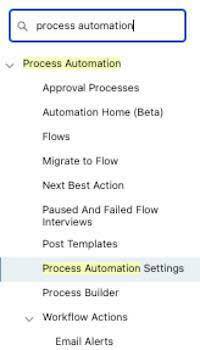
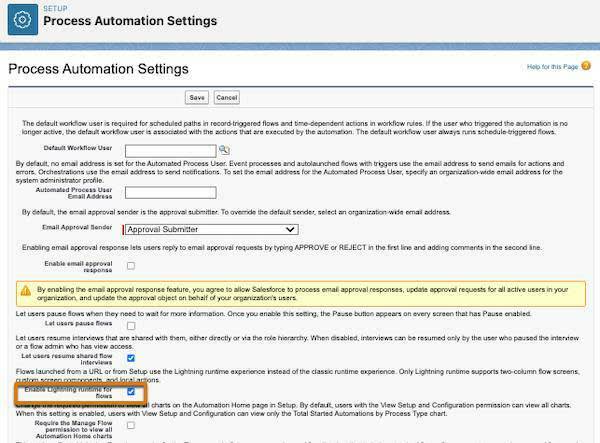
- Verify that Enable Lightning runtime for flows is selected. If it isn’t, select it and click Save.
Create a Flow
Now, create a flow that uses the Service Agent Script for Salesforce Flow component to display a script from within the flow.
- Click the App Launcher (
 ).
).
- In the Search apps and items box, enter
autoand then select Automation.
- In the Flows panel, click New.
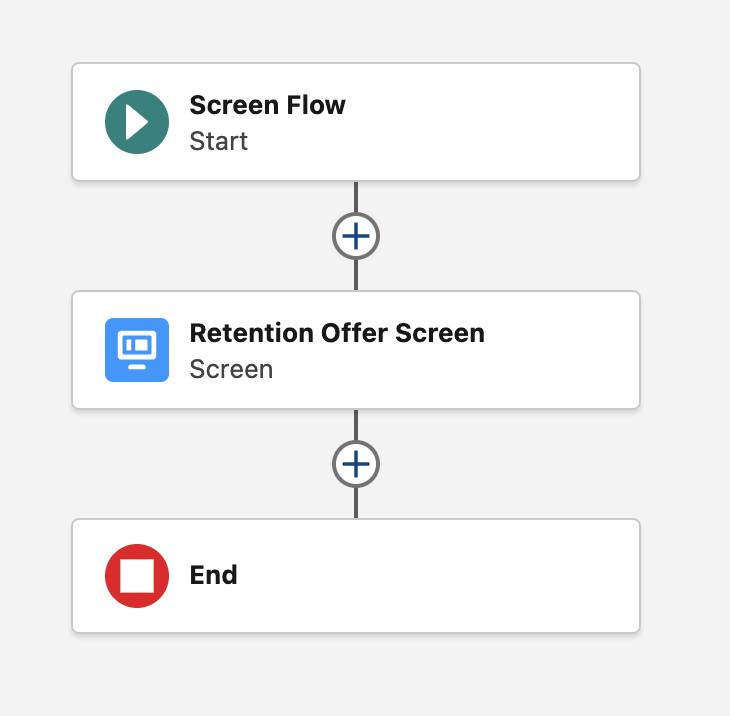
- Under Frequently Used, select Screen Flow.

Add a Screen Element to the Flow
Flow Builder is a point-and-click tool for building flows. To add an element to the canvas, click  and review the list of available elements in the Add Element menu. To include a visual element in a flow, such as a script, use the Screen element. Flow Builder opens by default in Auto-Layout.
- On the flow canvas, on the path after the Start element, click
 . Select Screen.
- In the New Screen window, set the screen’s Label to
Retention Offer Screen. The API Name automatically populates as Retention_Offer_Screen.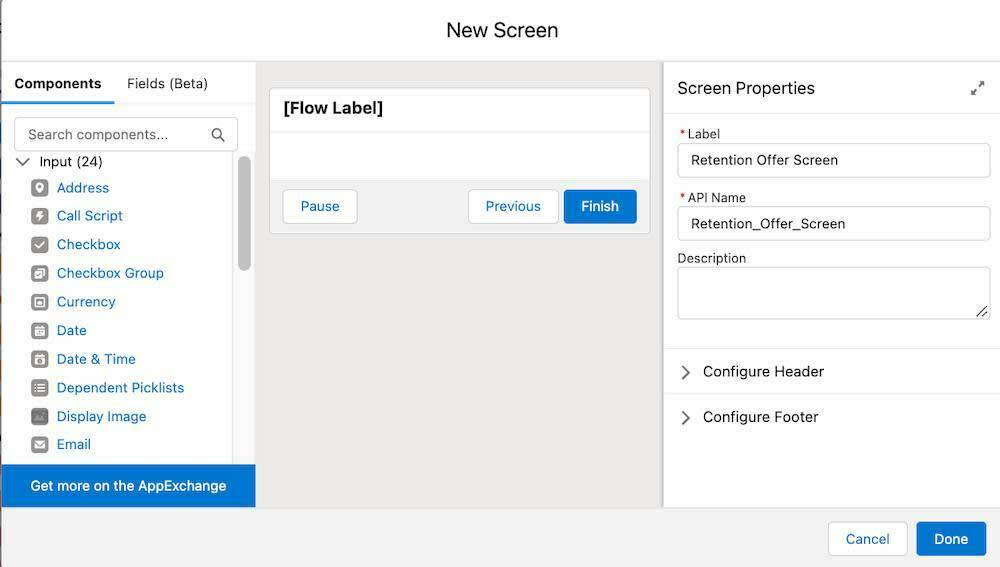
- Drag the agentScript component onto the screen element. You can find the flow solutions that you install from AgentExchange in the Custom section of the components list.

- Select agentScript and, for API Name (1), enter
retention_offer_script.
- For Script (2), enter
We have a special offer for you.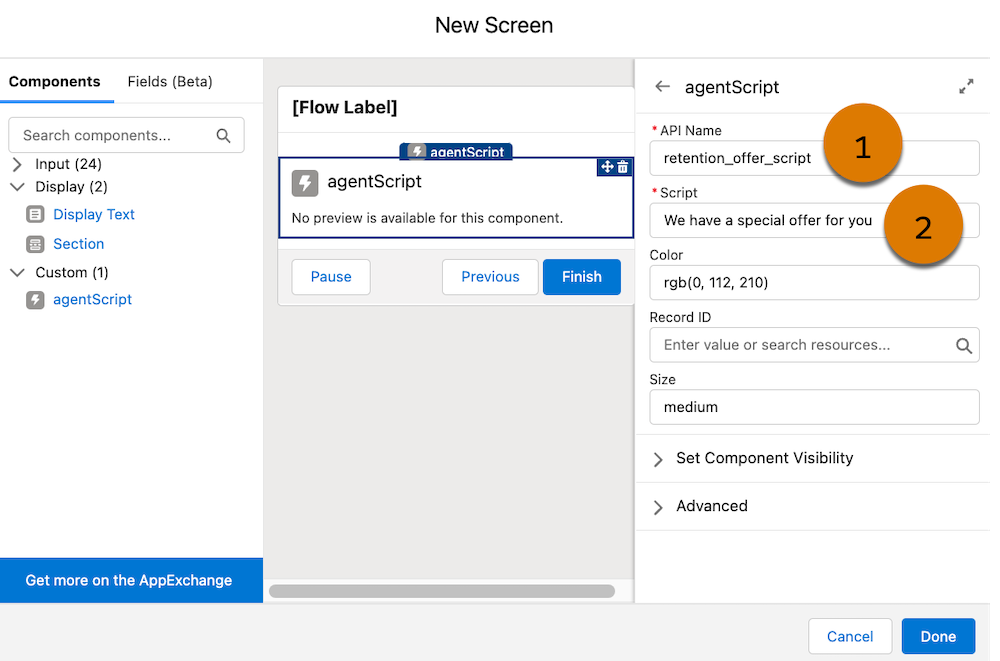
- Click Done.
Save and Run the Flow
You’ve configured the screen element and added it to the flow. Save the flow and you’re ready to run.
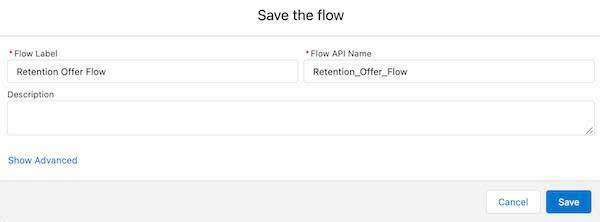
- Click Save.
- For Flow Label, enter
Retention Offer Flow. The Flow API Name automatically populates with Retention_Offer_Flow.
- Click Save.
- Click Run.
- Verify the script displays on the screen.
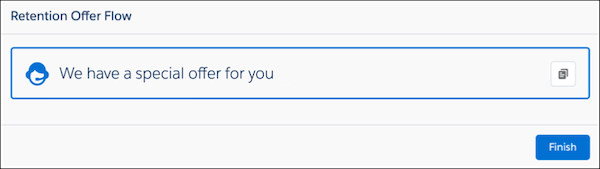
Well done! You used Flow Builder to create a flow that uses the Salesforce Flow component you installed from AgentExchange.
Resources
- FAQ: Technical Questions for AppExchange Customers
- Salesforce Help: Find the Username and Password for Your Trailhead Playground
- Salesforce Help: Install a Package or App to Complete a Trailhead Challenge
- Trailhead: Build Flows with Flow Builder