Send Location-Based Messages
Learning Objectives
After completing this unit, you’ll be able to:
- Identify use cases for location-based messages.
- Configure a geofence message.
- Configure a beacon message.
Right Message, Right Place
No matter what type of business you are in, location is important. From ad placement to content location in an email template, marketers need to consider the user experience and how to reach their customer in unique ways. Location-based messages are a great way to surprise and delight your customers. That being said, as we shift towards more personalized messages, we need to find a balance between knowing a customer’s physical location and using that information in the right way. Check out how you can use MobilePush and location-based messages to enhance your marketing strategy.
Geofencing and Beacons
There are two main types of location-based messaging: Geofencing and beacons. Let’s compare the two.
- Geofence messages use GPS on a customer’s device (with location enabled) to determine the user’s latitude and longitude. Once created, contacts receive messages when their mobile device enters or exits the specified geofence.
- Beacon messages are based on beacon hardware instead of GPS. So, contacts receive messages when their mobile device gets within range of the beacon.
So, what is the main difference between a geofence message and a beacon message? Anyone can create a geofence location, while beacons require enablement and purchased hardware. Additionally, geofences allow you to target your marketing at the macro level, such as when a customer enters a parking lot. And beacons allow you to target your marketing at the micro level, such as when a customer enters the bar area of a restaurant vs. the dining room.
See It in Action
Simone Wright, digital manager for Scott’s Restaurant and Bar has plans for both geofence and beacon technology messages. Scott’s has recently expanded to include two more restaurants, and Simone wants to add geofence locations at each restaurant. Plus, she wants to create a beacon message to pilot a campaign that sends happy hour specials to bar customers. To get started, she first needs to create geofence locations for all Scott’s restaurant locations.
Create a Geofence Location
Let’s follow along as Simone sets up a geofence location for each restaurant.
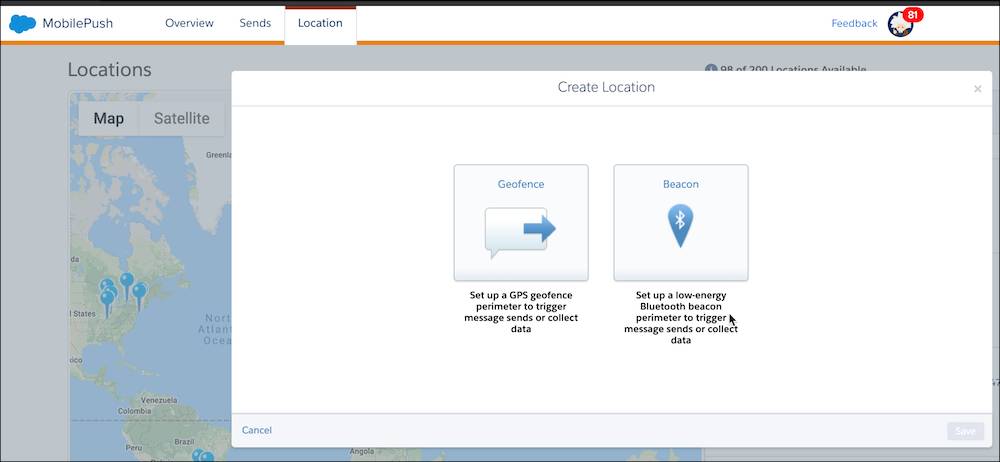
- Simone navigates to MobilePush and the Location tab.
- She clicks the Create Location button on the top right side of the screen and then selects Geofence.
- Simone enters the address of one Scott’s Restaurant and once found, she clicks Select.

- Next, she updates the location label, adds additional description notes, and then updates the Geofence Radius.
- She reviews that the information is correct and clicks Save.

Simone repeats this step for each of the restaurant locations.
Create a Geofence Entry Message
Now that Simone has geofence locations set up, she can use these locations to create a location entry or exit message based on mobile devices that enter that location. Let’s follow along as Simone creates an entry message.
- In the MobilePush Overview tab, she clicks Create Message and selects the Location Entry template and clicks Next.
- Simone enters the message name, selects Scott’s app, and then chooses Alert.
- Next she selects all three restaurant locations and clicks Next.
- From here she defines the content of her message, including title, subtitles, the message, and optional settings.
- Once she previews the message and it looks good, she clicks Next.
- On the Review and Send screen, Simone reviews a summary of her message.
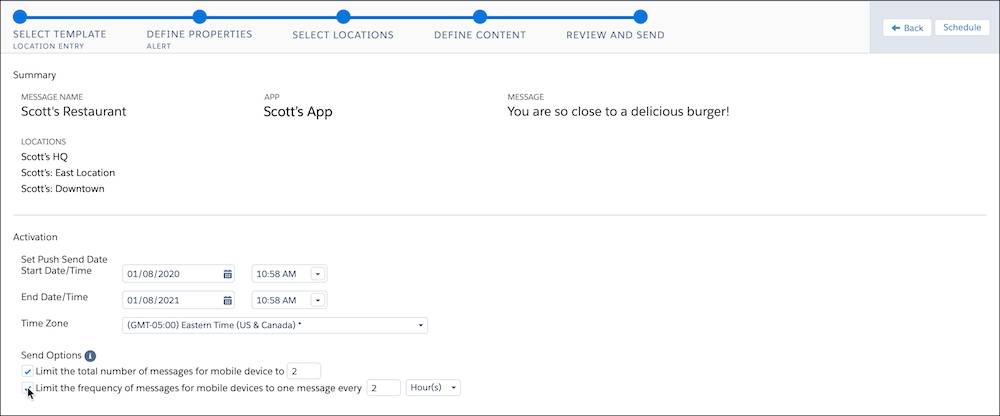
- She reviews activation and sets the start date and time. Finally, she adds send options to limit the number of messages that will be sent to one person.
- Once reviewed, Simone clicks Schedule.
Beacon Technology
Now that Simone is done with the geolocations, she moves on to her beacon message. As we mentioned, beacon messages allow marketers to fine-tune their location-based messages. In order to use beacon technology for a happy hour campaign in their flagship store, Simone needs to work with her developer to complete some prerequisites.
| Developer Steps |
|---|
Developers need to follow these steps to support beacon technology.
|
Create a Beacon in MobilePush
Once the hardware is properly configured, Simone needs to navigate to MobilePush and the Location tab.
- In the MobilePush Location tab, she clicks the Create Location button on the top right side of the screen and then this time selects Beacon.
- Simone types the address of their flagship restaurant and clicks Select.
- She enters a name for the beacon.
- Then she carefully enters the beacon UUID into the GUID field. This is the unique identifier assigned to your beacon by the hardware manufacturer. This value must exactly match the identifier assigned to your beacon hardware.
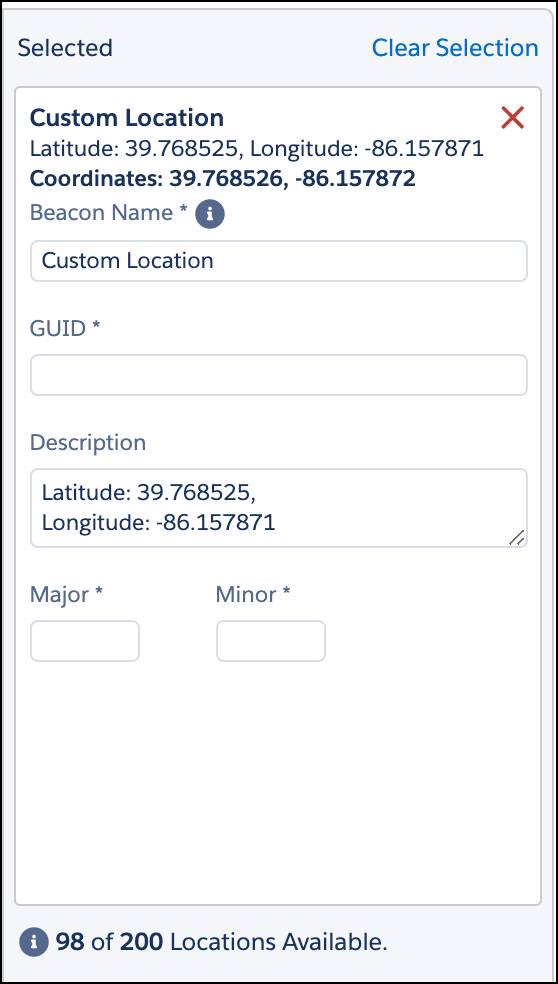
- While you can change the description to name your beacon, Simone leaves the default value of latitude and longitude as is.
- Next, she enters the Major and Minor values for her beacons. Again, these values must exactly match the values assigned to your beacon hardware.
- Finally, she reviews for accuracy and clicks Save.
Beacon Best Practices
Before you start using beacons, take a look at the following tips.
- Place beacon hardware at least 30 feet apart.
- Use the highest possible transmit power setting (amount of power going to your device’s signal).
- Here’s when you might use low transmit power: If you set up one beacon in the produce section of a grocery store and another beacon in the deli section, lower the transmit power setting. This prevents both the produce message and the deli message from being triggered in both places.
- Here’s when you might use high transmit power: If you set up beacons at two ends of a large stadium and in the stadium parking lot, it is likely that are far enough apart to use a higher Transmit Power setting.
- Use a 65-meter buffer zone between beacons and geolocation to avoid sending multiple messages to a single mobile device.
- Limit your messages to one per hour; more than that can irritate your customers.
Create a Beacon Message
Now that Simone’s beacon is ready to go and she has confirmed she is following best practices, she is ready to create a message. Similarly to location messages, she heads to Create Message from the MobilePush Overview tab.
- This time she selects the template, Beacon.
- She enters a name for her message and then selects Scott’s app.
- Next she selects the push method of Alert and then the Next button.
- Simone selects the location of her recently added beacon. (You can select multiple beacons for a single message.)
- Once done, she clicks Next.
- From here, she builds her message and previews it.
- She sets the message activation date/time and chooses to limit the total number of messages to be sent to a mobile device.
- She also limits the total number of times a mobile device can receive this message during the active period. (We recommend no more than one message per hour.)
- Once she reviews, she clicks Activate.
Once activated, don’t expect immediate results. Be patient, it can take up to 2 minutes to activate or schedule the message.
Simone is excited to see the impact these location-based campaigns have on sales. How will you use location-based messaging in your marketing strategy?
Congratulations, you’ve just added a new channel to your marketing toolbox! To recap, you implemented MobilePush, created messages in Mobile Studio and Journey Builder, and analyzed performance. Not to mention, you have the tools in place to send those messages using location-based technology. You are all set to explore the world of MobilePush messaging.