Use Advertising Audiences
Learning Objectives
After completing this unit, you’ll be able to:
- Determine Advertising Audiences use cases.
- Prepare your data for audience creation.
- Create audiences in your account.
The Scoop About Advertising Audiences
Advertising Audiences allows marketers to easily reach customers on the channels they visit the most, whether it be Facebook, Google, Instagram, or others. The best part? It uses first-party data, which is a key advantage for advertisers. With Advertising Audiences, you can customize experiences and create specific audiences based on valuable info you already have.
Suggested Audiences
Data can be gathered from any existing list or data extension. You can create a Salesforce report and use data import to create a new data extension. Here are some action-based audience ideas to help you brainstorm what might work for your company.
- They just opted into email or SMS.
- They visited your store.
- They reached a certain milestone or anniversary (for example, one year as a member; it’s their birthday).
- They engaged with your brand via social media.
- They engaged with an email (opened, clicked).
- They called customer support and have a complaint.
- They reached a certain loyalty status.
- They made their first purchase or perhaps a repeat purchase.
- You haven’t heard from them in a while.
Next, try different strategies based on what you know about your customers.
Suppression Audience |
Targeted Audience |
Look-alike Audience |
|---|---|---|
Angry customers (based on social media or from a support case) |
Recent purchaser (Recommendation based on type of purchase. If they bought a house, maybe they need furniture?) |
VIP/Loyalty program customers |
Existing customers (Already engaged with email or SMS) |
Anniversary |
Customers with largest spend |
A recent purchase of something infrequent (for example, a house, car, and so on) |
Customers who haven’t engaged with an important email |
Seasonal purchaser profile (only buy around holidays, sales, and so on) |
Suppression audiences that are refreshed regularly improve customer experience. If a customer takes advantage of an offer, makes a purchase, or logs a customer service issue, ad campaigns can be stopped quickly.
Data Is Boss, Remember?
Now that you know what data you want to use, let’s make sure that data is going to work for you. But first, a quick note on security. Data never leaves the Marketing Cloud Engagement in its original format. All shared data is sent via a secure API to the ad network using a hashing method called SHA-256. This same algorithm is used by Facebook and other platforms. So when a matching user is active on that platform and your company’s ad won, your ad displays to that user. Now that you know that your data is secure, here are some data considerations by channel.
-
Facebook and Instagram
- Matches data based on standard or advanced data points. The more attributes you can match, the better your match rate since it preserves the 1:1 relationship.
-
Standard Unique Attributes: email, phone, mobile advertiser ID, or Facebook app user ID.
-
Advanced Match Data Points: first name or initial, last name, city, state/province, county, date of birth, year of birth, age, zip/postal code, and/or gender.
- Requires a minimum of 20 matches, but won’t show match rate less than 1,000 users.
-
X
- Matches to X user IDs using email, device ID, or X handle/ID.
- Requires a minimum of 500 matches and users must have been active within the last 30 days.
-
Google Ads Ecosystem
-
Standard: Matches data to a logged in user on any Google property using email.
-
Google Customer Match: Matches on email, mobile ID, and phone number.
- Requires a minimum of 1,000 matches.

-
LinkedIn
- Matches data on email.
- Requires a minimum of 300 matches but recommends 10k+ for optimal performance.
-
Pinterest
- Matches data on email.
- Requires a minimum of 100 matches.
Before creating your audience, it’s important to review your data to make sure it includes the base requirements for each channel. Here are some additional best practices for the data that will be used for your audiences.
- Limit the number of columns in tables and remove any unnecessary data to avoid long processing times.
- Use the appropriate data type and field length, but avoid lengths of over 100 characters.
- All data extensions used for audiences require an email with the email data field type, even if it is left blank.
- If including a phone number, also include the country code (for example, +1 for the US).
Advanced Match
Advanced Match is a dating service’s dream. A match is made when the destination network recognizes the contact information that was sent in the audience and can confirm a 1:1 match. Both Facebook and Google allow the use of multiple identifiers to help find more matches. Why use it? Audience match rates only increase with more identifiers. Higher match rates with better identifiers = more of the right people seeing your ad.
Create an Audience
Remember Linda from Cloud Kicks? Linda plans to create a top purchasers audience to use for suppression. She knows it reduces ad spend—why advertise to customers who already know and love their brand?
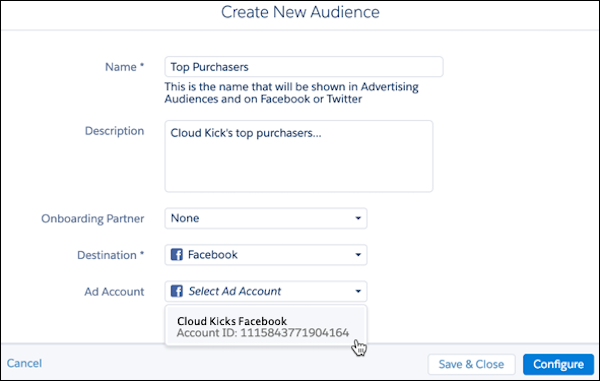
Linda’s first step is to navigate to the overview page and select Create New Audience. She then names the audience Top Purchasers and adds a description. Next, she selects Cloud Kick’s Facebook account as the Destination and confirms the correct account is selected under Ad Account. She then selects Configure.
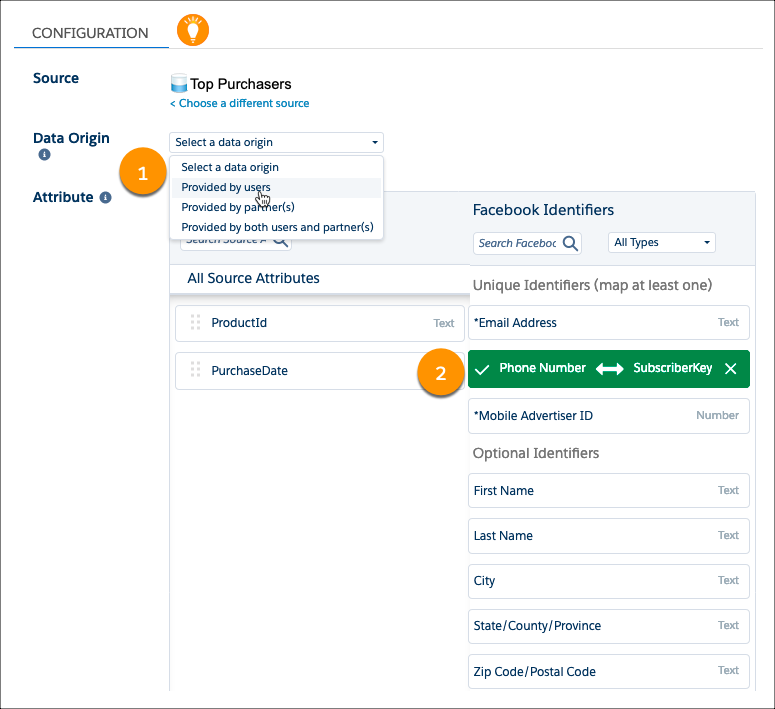
Under Configuration, Linda selects Data Extension and locates her already created data extension Top Purchasers. For Facebook accounts, Linda needs to confirm where Cloud Kick’s obtained the data. Select from three options for Data Origin (1): provided by users/first-party data, provided by partners/third-party data, or a combination of data that is provided by users and partners. Since this data is from their Marketing Cloud Engagement account, she selects Provided by users. Next, she maps the data extension attributes to the Facebook Identifiers (2). Remember that the more identifiers, the better the match!
Next, she adds her email under the checkbox to receive a notification if Any event occurs related to this audience.
Linda reviews her configuration and finally she selects Activate. She is given the option to Refresh manually or Schedule refreshes. Linda is all about efficiency, so she selects Schedule refreshes and then chooses to refresh the audience daily. Once done, she clicks Activate.

After activation, it takes time to start seeing match counts. Wait 24–48 hours for a stable audience before utilizing.
Two days later, patience has been rewarded, and Linda’s team can now begin using the created audience!
Doppelgänger
No, not your celebrity doppelgänger, let’s chat about your customer lookalikes. When creating a Facebook-based audience in Marketing Cloud Engagement (MC) you have the option to create Lookalikes. How does this work? Facebook compares the data in the MC audience with its own users and generates a new audience who resembles individuals in your original list. You have two options for matching.
-
Optimize for Similarity: Find the top 1% of users that match.
- Pros: Closer match to your current customers.
- Cons: Smaller audience size.
-
Optimize for Reach: Find the top 5% of users that match.
- Pros: Bigger audience.
- Cons: May not be ideal customers.
Linda knows that this feature can help Cloud Kicks target individuals who resemble its most loyal customers. Now that she has a stable audience, she navigates to the Top Purchaser audience and clicks Add.
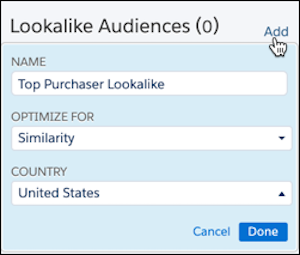
Linda enters a name for the Lookalike audience and then selects Optimize for Similarity and then chooses Country. Once completed she clicks Done.
With audiences created, Linda is ready for her next task—creating a lead capture campaign in Facebook.
Resources