Capture Leads in Marketing Cloud Advertising
Learning Objectives
After completing this unit, you’ll be able to:
- Understand how and when to use lead capture.
- Create a lead capture form and integrate it with Marketing Cloud Engagement.
Lead Capture: A Win-Win
Finding new customers is challenging and can be costly. Wouldn’t it be magical if you didn’t have to work that hard to find new leads? Abracadabra... introducing... lead capture! Lead capture helps you easily connect Facebook leads with your Salesforce accounts.
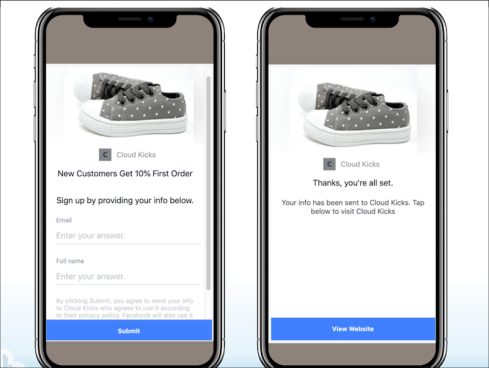
Let’s peek behind the curtain to see how this happens. Your company has a beautiful ad on Facebook that engages a new prospect with an attractive offer for a discount. That ad contains a prompt for that customer to opt in to receive your newsletter by confirming their name and email, prefilled from their profile. No leaving Facebook. No extensive forms to fill out. It’s super easy for the consumer and a great way for you to save on cost-per lead.

So they fill out their information, then what? Like magic, the user’s contact info is saved and passed back either by API to a Marketing Cloud Engagement data extension or added to Sales Cloud as a lead object.
Capture This
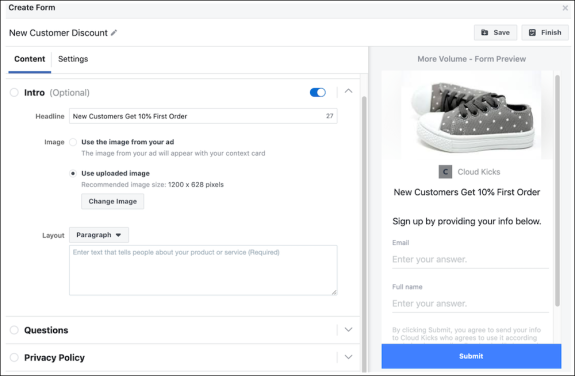
Cloud Kicks has decided to use this feature to promote a discounted offer to new customers. A designer created a beautiful ad that offers 10% off a pair of shoes for new customers. Advertising Manager, Elliott Jones, is excited to start promoting it on Facebook but first he needs to create a lead form. He logs in to Facebook and on his business page navigates to Publishing Tools and then on the left navigation, Lead Ads Forms. Once there, he clicks on +Create from the Forms Library.

He can choose to create a New Form or Duplicate an Existing Form. He fills out the required information and uploads a photo for the new form New Customer Discount.

Once completed, Elliott logs in to Marketing Cloud Engagement and navigates to the Lead Capture page under Marketing Cloud Advertising. He clicks Create Lead Capture Task and then he logs in to his Facebook account to follow on-screen prompts and confirm permissions. Next he selects the Facebook page within Marketing Cloud Engagement.

Elliot then chooses the lead form New Customer Discount and clicks Next. He is asked to configure the sendable fields to create a brand-new data extension. He sets the Send Relationship to Email as the Subscriber Key and presses Next to confirm and complete the configuration.

Now that lead capture is Active, leads are automatically imported from Facebook. It’s recommended to complete this step before activating your ad, as historical leads are not automatically updated. Be sure to suppress existing customers, as lead ads should be aimed at new contacts.
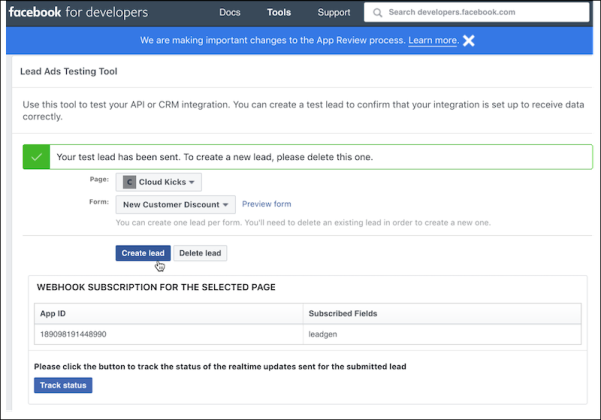
Elliott decides to test the lead capture before setting the ad to live. He goes to the Developer Page of Facebook and selects the Facebook page and then the lead advertising form he wants to test. He clicks Preview Form to customize the lead form inputs (if not customized, Facebook generates fake inputs for each field in the form). Once reviewed and entered, he clicks Create Lead.

He then logs in to Marketing Cloud Engagement to check that the lead was entered into the data extension correctly.

Alternatively, he can log in to Sales Cloud to confirm the lead object has been added. Once satisfied with the test, Elliott makes the ad live and Cloud Kicks starts receiving new leads that the team can contact.
See? It is like magic!
Resources
- External Site: Facebook Lead Generation Form: How-To Guide
- Salesforce Help: Lead Capture
- Salesforce AppExchange: Lead Capture for Marketing Cloud Engagement
