Handle Exceptions and Rollback on Errors
Learning Objectives
After completing this unit, you’ll be able to:
- Explain how to use a Try Catch Block to identify the error if a step fails.
- Describe when to use Rollback On Error.
- Explain how to use custom permissions to give data access to a certain team.
Introduction
Robert's gone the extra mile to make ClearLight happy with their new member portal capabilities, and he’s beefed up the solution for the sales team to work with large transactions. 
He's even updated all the long-running Integration Procedures to make sure they run like well-oiled machines.
The last stage of the ClearLight project is to build an app for the Sales team so they can create new customer accounts and opportunities from their mobile devices. Two important project requirements are exception handling and rollback on error. Guess who takes on the task? Enter Robert, our super dev.
Robert wants a low-code API builder to build the REST APIs and host them on Salesforce.
He also needs to make sure that:
- If opportunity creation fails, the transaction rolls back the Account-record creation.
- If an error occurs, the REST API returns the company-defined error code and message.
- Only a certain group in the sales team can access the REST APIs.
Robert explores how to configure an Integration Procedure and a DataRaptor Load to meet the requirements.
Rollback on Error Configuration
DataRaptor Loads accept data in JSON, XML, or custom input formats and write the data to Salesforce objects. When invoked, the DataRaptor Load applies mappings and formulas to the input data to create the output data. It then loads the output data into Salesforce objects according to the mappings.
Here’s Robert’s first use case: When opportunity creation fails, the transaction rolls back the Account-record creation. To build this capability, he needs to:
- Create a DataRaptor Load that supports saving a parent-child relationship.
- Configure an AccountOpportunityCreation DataRaptor Load.
- Implement the Rollback On Error option.
To configure Rollback On Error:
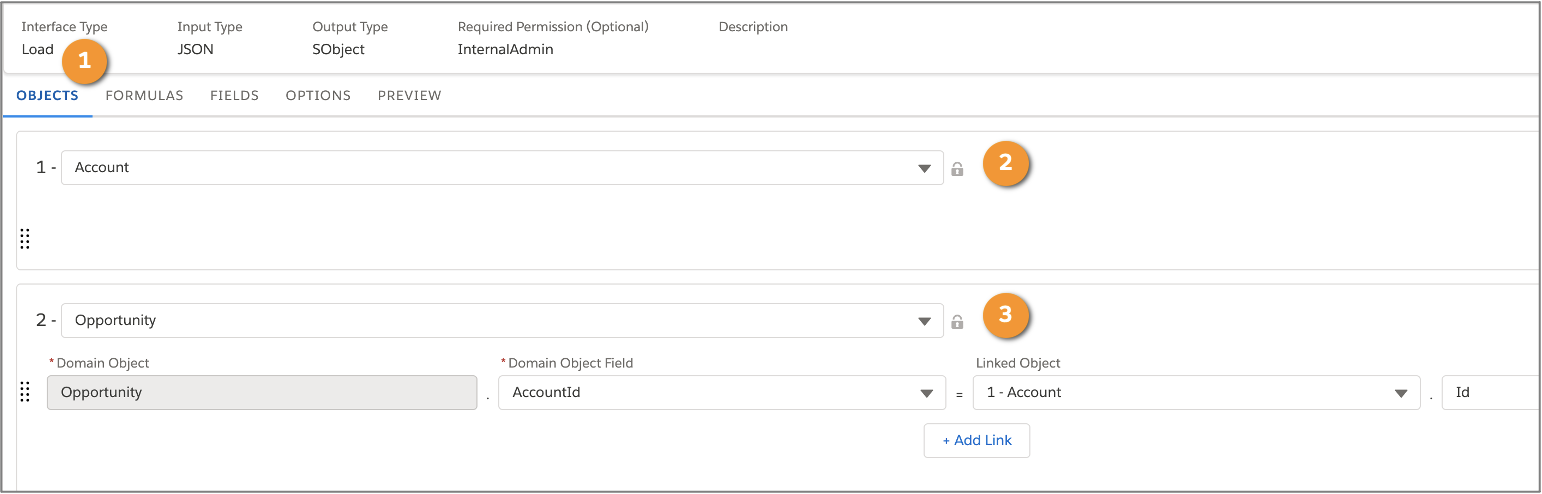
1. In a DataRaptor Load, select the Objects (1) tab.
2. Specify the Salesforce Objects to update. In this case, you need to create the Account (2) and Opportunity (3) records.

3. Select the Options tab (1), and explore the settings.
- Ignore Errors (2): Continue running the DataRaptor even if an error occurs at a step. For example, if the Account step encounters an error on Account-record creation, the DataRaptor process still moves to the next step to create an Opportunity record.
- Rollback On Error (3): When an error occurs, the DataRaptor rolls back all updates.
- Use Assignment Rules (4): When a case is assigned, the DataRaptor sends email notifications to users based on the configured rules.
- Overwrite Target For All Null Inputs (5): By default, if a value is null, the DataRaptor does not create a node for the field in the output JSON.
4. Select Rollback On Error.
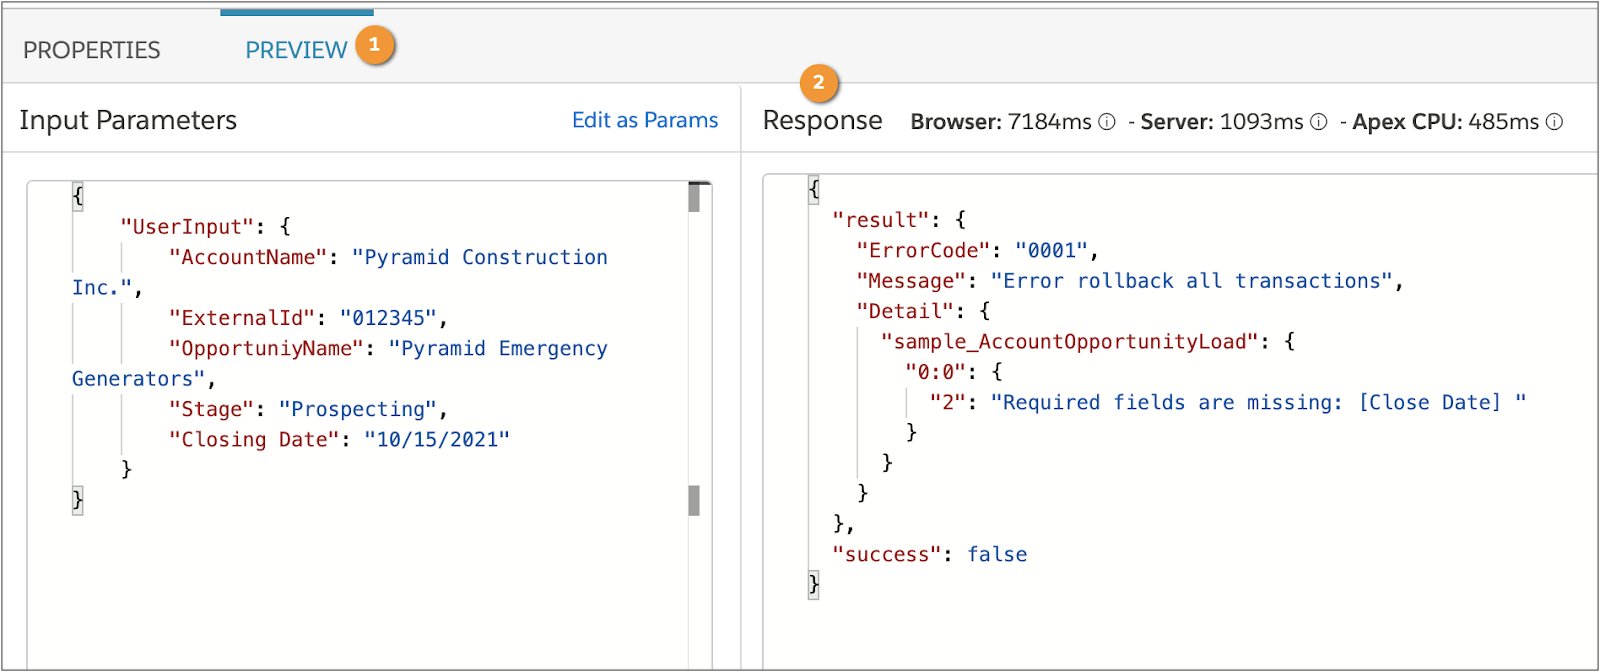
Now let’s preview what happens.

- Go to the Preview (1) tab, and execute the DataRaptor Load. You can see the Objects Created (2) section doesn’t show the Opportunity record.
- Expand the Errors (3) section to check the error message. In this example, the error indicates the closing date is missing.
Because an error occurred while saving the Opportunity, the transaction rolled back the Account record.
Try Catch Block Configuration
Robert feels good about setting up Rollback On Error, so it’s on to the next requirement. When an error occurs, the API must return the client-defined error code and message. A Try Catch Block lets you "try" running the steps in the block and then "catch" the error if a step fails. Robert decides to give it a go.
Let’s see how to set the Error Code and the message in a Try Catch Block.

To configure a Try Catch Block:
- Drag a Try Catch Block (1) into the Structure Panel.
- For Failure Response (2), specify the values to return in the response if the Try Catch Block fails.
- Click Add Key/Value Pair.
- Set the Key to ErrorCode and the Value to 001.
- Add another key/value pair to specify the error message. Set the Key to Message and the Value to Error rollback all transactions.
- Add one more key/value pair, and set the Key to Detail and the Value to %CreateAccountAndOpportunity:errors%.
- In the Custom Failure Response section, ensure that Fail On Block Error (3) is selected.
Let’s see what happens.
8. Go to the Preview (1) tab, and notice the ErrorCode, Message, and Detail are returned in the Response (2) section.
Rollback on Error Activation
The operations that occur inside the transaction boundary represent a single unit of operations. All changes are committed to the database only after all operations in the transaction finish running without errors. If an error occurs in any of the intermediate steps with the Rollback On Error option enabled, all database changes are rolled back, and the transaction isn’t committed.
Simply put, when there’s a request from an OmniScript to change, update, or create data in the SObjects, all changes are committed to the database only if the entire request completes successfully.
Now let’s turn our attention back to the Rollback On Error option.

In the Procedure Configuration (1) in the Structure Panel, enable Rollback On Error (2).

In this example, you see the Integration Procedure with two transactions. The first transaction (1) creates and updates the Account, and the second one (2) creates and updates the Opportunity. If both the transactions are created and updated, the Integration Procedure runs with success. Even if just one transaction fails, the other transaction that is created also gets rolled back.
Here, Try Catch Block Account creation is created and updated successfully. If an error occurs in the Try Catch Block Opportunity creation, the transactions roll back the Account creation.
Integration Procedure REST API
The creation of a DataRaptor and activation of an Integration Procedure create REST API endpoints that support HTTP methods, like GET and POST.
The endpoint URLs to enter in the Workbench follow:
- DataRaptor’s REST API can be consumed by calling the endpoint:
/services/apexrest/{namespace}/v2/DataRaptor/{DataRaptorName}/- For example, a DataRaptor with the Name AccountOpportunityLoad has this endpoint URL:
/services/apexrest/vlocity_ins/v2/DataRaptor/AccountOpportunityLoad/
- For example, a DataRaptor with the Name AccountOpportunityLoad has this endpoint URL:
- An Integration Procedure with Type = sample and SubType = CreateOpportunity this endpoint URL:
/services/apexrest/vlocity_ins/v1/integrationprocedure/sample_CreateOpportunity/- For the Integration Procedure, the endpoint is:
/services/apexrest/{namespace}/v1/integrationprocedure/{Type}_{SubType}/
- For the Integration Procedure, the endpoint is:
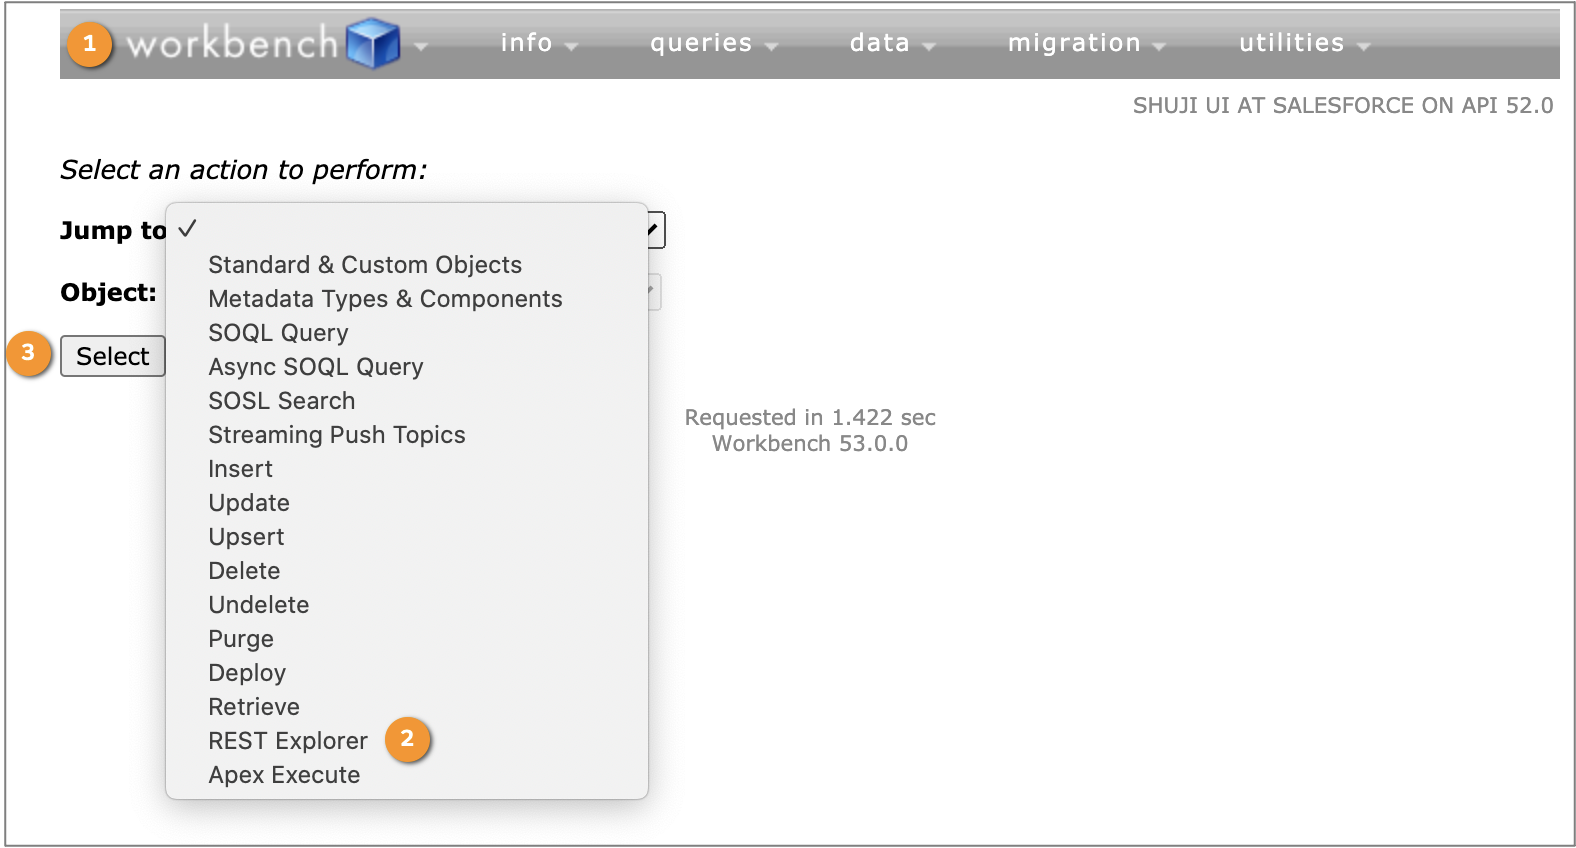
Let’s run the Integration Procedure in the Workbench (1). Open the Workbench, and select REST Explorer (2). Click Select (3) to continue.

Choose an HTTP method (1) to perform on the REST API. Enter the endpoint URL in the input field (2), and click Execute (3) to show the response.
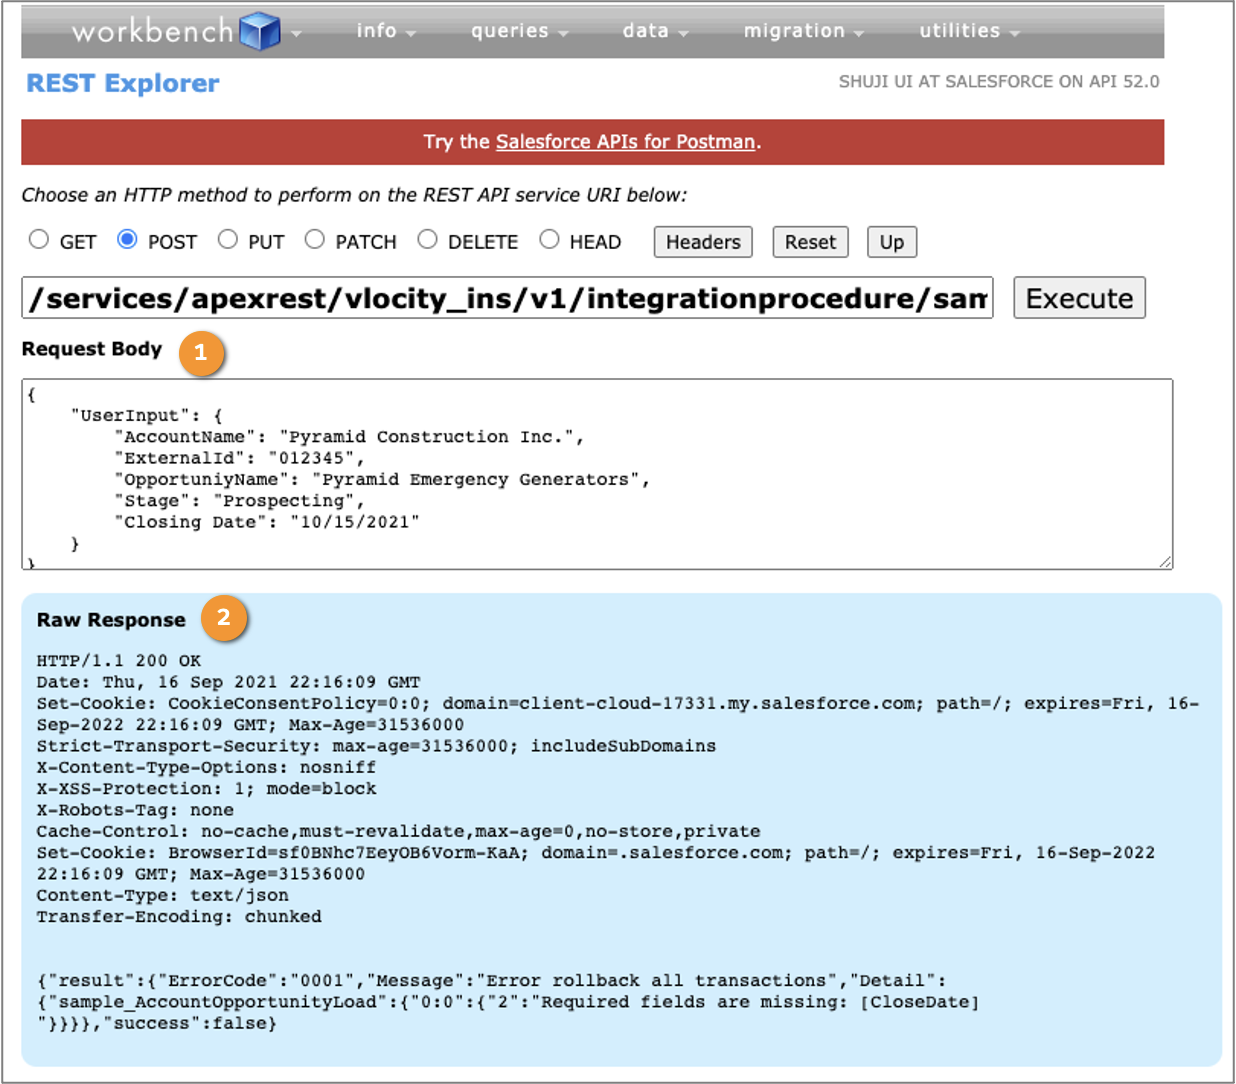
Once you enter input in the Request Body (1) section, you can view the result in the Raw Response (2) section.
Custom Permissions Configuration
Finally, it’s time for Robert to start working on the last project requirement. He needs to make sure that the REST APIs are only accessible by a certain group. In this example, we explore custom permissions to lock down the AccountOpportunityLoad DataRaptor and OpportunityCreation Integration Procedure.

The Sales team should only have access to the CreateOpportunity Integration Procedure REST API, and the Internal Admin team should only have access to the AccountOpportunityLoad DataRaptorLoad REST API.

Let's learn how to use custom permissions to give record access to a certain team.
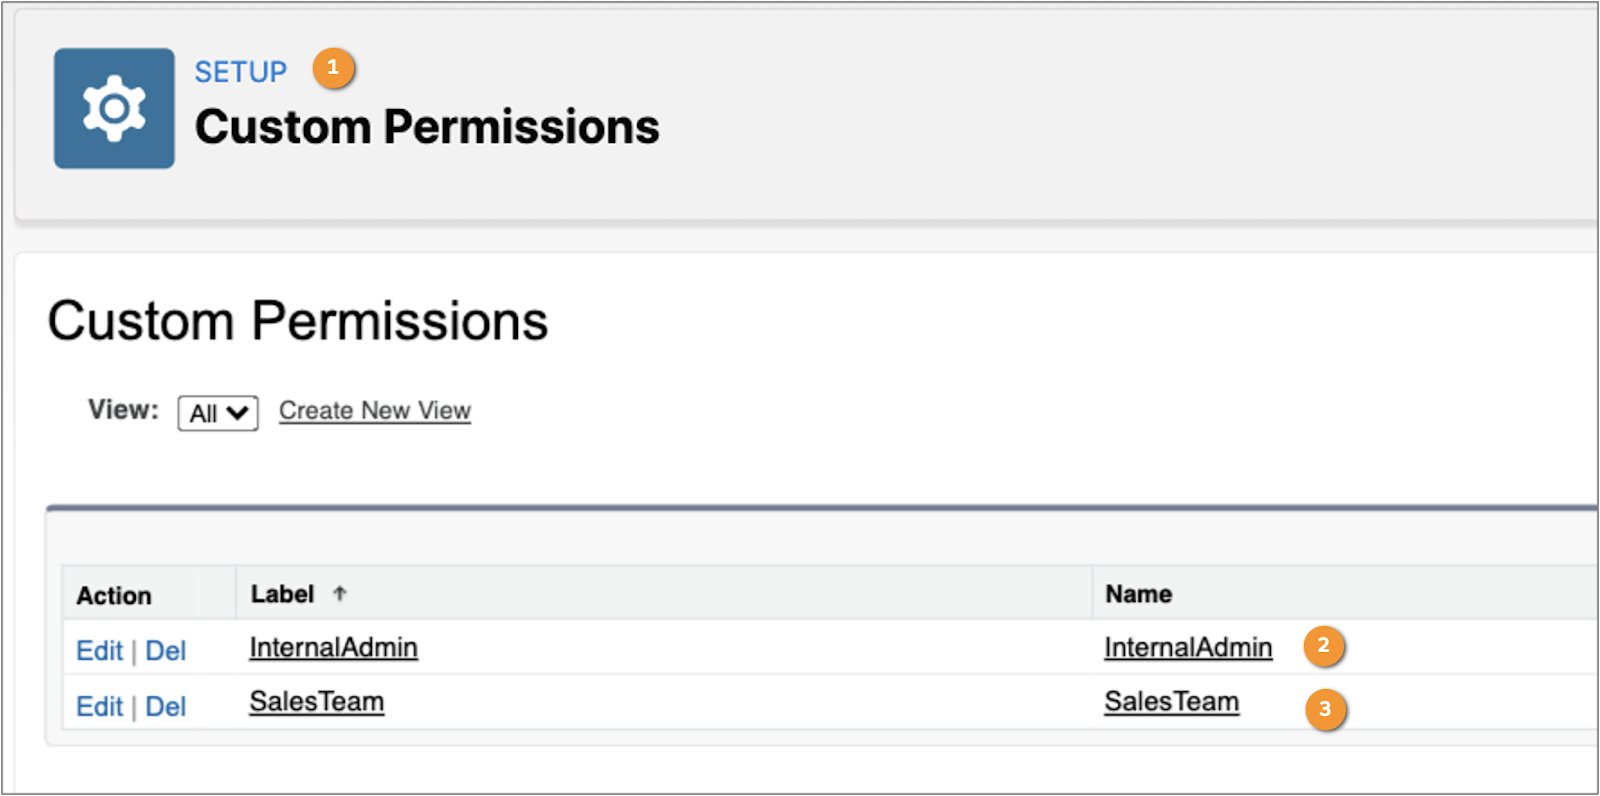
- Go to Setup | Custom Permissions (1).
- Create a new custom permission for InternalAdmin (2) and SalesTeam (3).
- Assign the Custom Permission to the DataRaptor.

- Create a new DataRaptor (1).
- Enter Internal Admin in the Required Permission (2) field.
Now it’s time to configure a Custom Permission for the Sales team. Then assign the permission to the CreateOpportunity Integration Procedure.
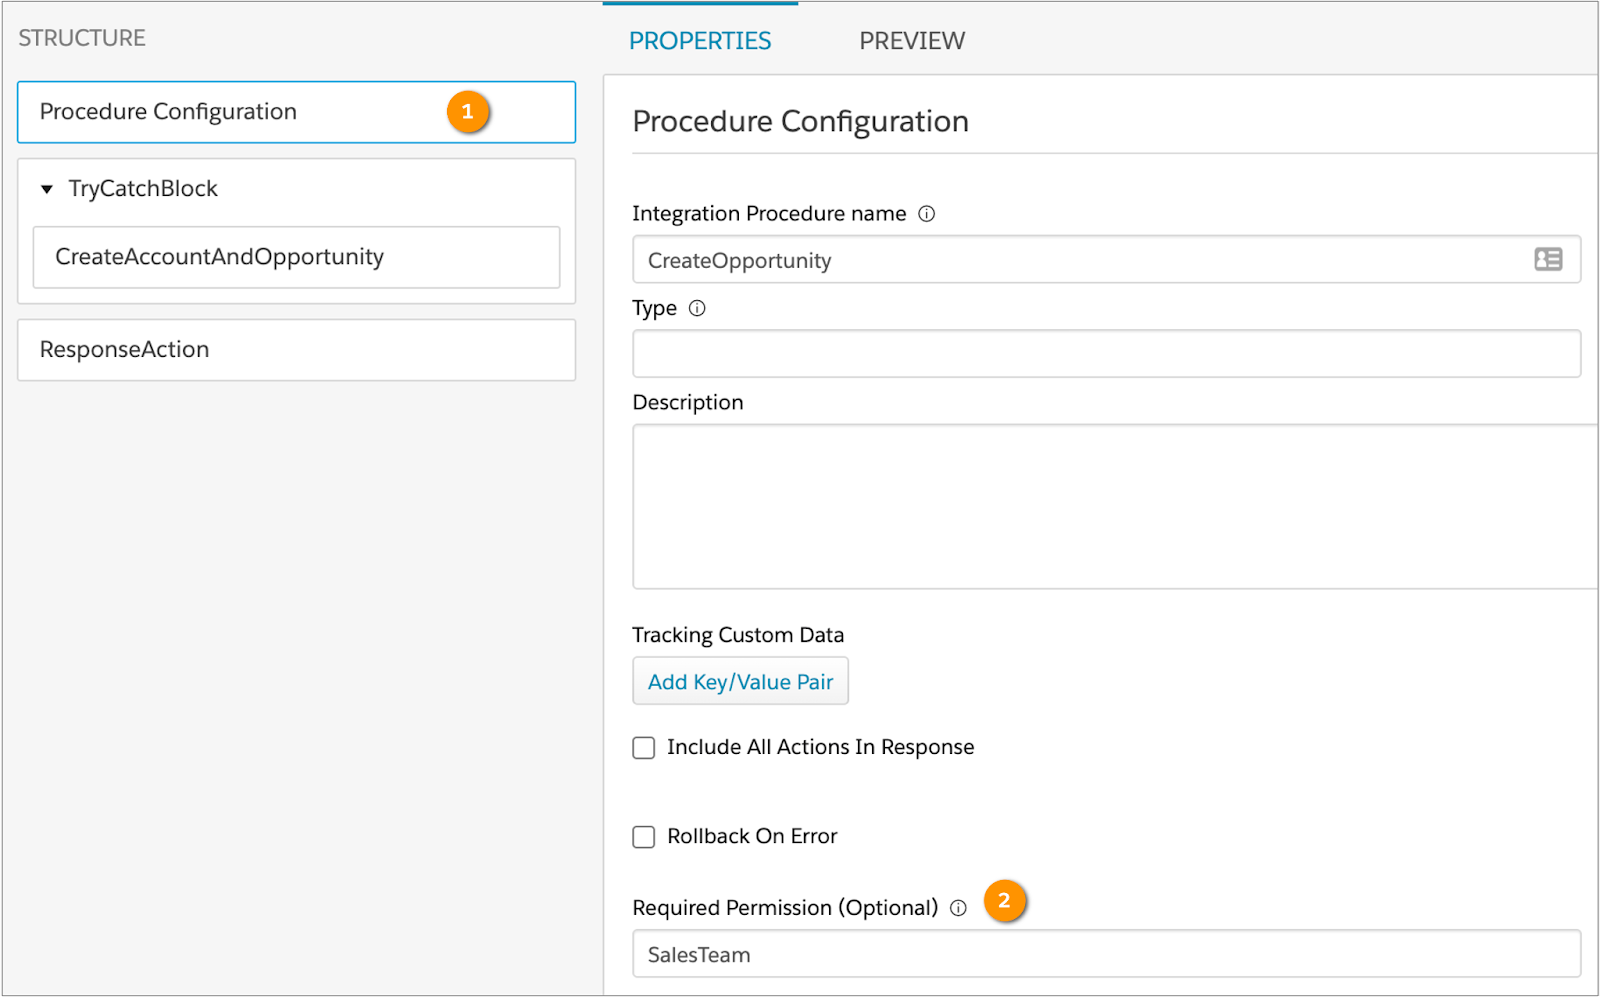
- Create a new Integration Procedure (1).
- Enter SalesTeam in the Required Permission (2) field.
Robert has become an expert in handling errors and exceptions. He is pretty confident about building all the requirements for his project. Time for happy hour!