Set Up Dimensions and Period Groups
Learning Objectives
After completing this unit, you’ll be able to:
- Create forecast dimensions.
- Define period groups for multiple forecast sets.
- Create and activate the forecast sets.
- Define field mappings, Data Processing Engine definitions, and forecast frequencies.
Data from All Dimensions
Cindy is ready to create the forecast sets for the two business units. Her first job is to define all the forecast dimensions for the forecast sets.
With Account Forecasting, you can view forecasts for each product. But with Advanced Account Forecasting, you can aggregate forecast data by product, product category, region, location, and any other custom dimension. Cindy has already created the dimensions as fields in the Advanced Account Forecast Fact object. Each forecast set can contain up to six dimensions, including Period which is a default dimension for any forecast.
Here’s what she does:
- Click
 , and select Setup.
- In the Quick Find box, enter
Manufacturing.
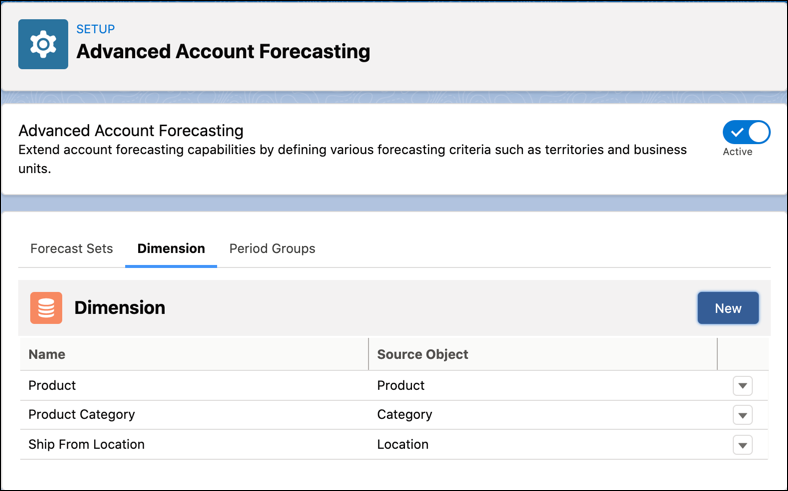
- Under Feature Settings, click Advanced Account Forecasting, and navigate to the Dimension tab.
- Click New and provide the following details:
- Name:
Product Category - Source Object: Category
- Click Save.
- Repeat steps 4 and 5 to create two more dimensions:
Name
Source Object
Product
Product2
Ship From Location
Location
As specified in the list of requirements for the sales team, the dimensions for the two business units are as follows:
- Industrial business unit: Product, Ship-From Location
- Consumer business unit: Product Category, Ship From Location
Cindy shifts her focus to the next requirement.
Period Groups
Cindy next creates the period groups that determine how often forecasts are calculated for business units. She can also define the number of forecast periods that must be displayed at any given time. Here’s what she does.
- Click
 , and select Setup.
- In the Quick Find box, enter
Manufacturing, select Manufacturing.
- Under Feature Settings, click Advanced Account Forecasting, and navigate to the Period Groups tab.
- Click New and provide the following details:
- Name:
Industrial_Business_Unit - Status: Active
- Start Period:
0(Forecasts are generated from the current period.)
- Display Duration:
18
- Type: Month
- Click Save.
- Repeat steps 4 and 5 to add another period group:
- Name:
Consumer_Business_Unit - Status: Active
- Start Period:
0(Forecasts are generated from the current period.)
- Display Duration:
12
- Type: Month

Let’s take an example to understand the configuration better. The forecast grid for any account in the Industrial business unit at any point would show forecasts for 18 months, with the first period being the current month. At the end of each month, the forecast display rolls over and adds another period to the display. For example, if the current month is January 2021, the forecast is displayed for January 2021 to June 2022. At the start of February 2021, the forecast is displayed for February 2021 to July 2022.
Start Building the Forecast Sets
Cindy decides to create the two forecast sets in parallel to help her keep track of the requirements. A forecast set is made up of the following components. We address one component at a time and show the parameters that Cindy creates for each forecast set.
- Building Blocks
- Forecast Periods and Fact Object
- Forecast Fact Field Mappings
- Forecast Frequencies
- Data Processing Engine Definitions
- Forecast Periods and Fact Object
- Forecast Dimensions
- Forecast Measures
- Forecast Adjustment Periods
- Forecast Formulas
Cindy first creates two Forecast Set records.
- Click
 , and select Setup.
- In the Quick Find box, enter
Manufacturing, select Manufacturing.
- Under Feature Settings, click Advanced Account Forecasting, and navigate to the Forecast Sets tab.
- Click New Forecast Setand provide the following details:
- Name:
Industrial_Set - Period Group: Industrial_Business_Unit
- Forecasts Facts Object: Advanced Account Forecast Fact
- Click Save.
- Repeat steps 4 and 5 to add another forecast set with the following details.
- Name:
Consumer_Set - Period Group: Consumer_Business_Unit
- Forecasts Facts Object: Advanced Account Forecast Fact


Arrange Your Building Blocks
Cindy now defines the parameters for Field Mappings and Frequencies for both the forecast sets. She’s keeping a close eye on the sales team’s requirements.
Cindy starts with the industrial forecast set.
- Click Edit on Industrial_Set record.
- Expand the Building Blocks section.
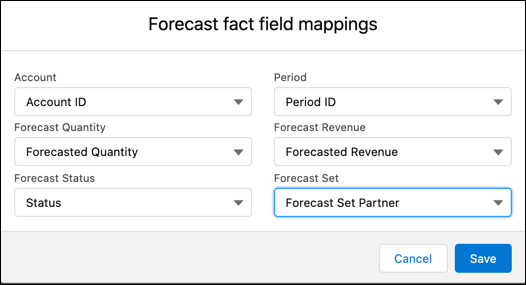
- Click Edit on the Field Mappings tab.
- Select the following:
- Forecast Context: Account ID
- Period: Period ID
- Forecast Quantity: Forecasted Quantity
- Forecast Revenue: Forecasted Revenue
- Forecast Status: Status
- Forecast Set: Forecast Set Partner
- Click Save.
- Click Edit on the Frequencies tab.
- Select the following:
- Calculation Frequency: Monthly
- Rollover Frequency: Quarterly
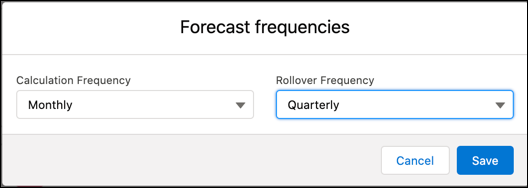
- Click Save.
Cindy repeats the configurations for the consumer forecast set.
- Click Edit on Consumer_Set record.
- Expand the Building Blocks section.
- Click Edit on the Field Mappings tab.
- Select the following:
- Account: Channel Name
- Period: Period ID
- Forecast Quantity: Forecasted Quantity
- Forecast Revenue: Forecasted Revenue
- Forecast Status: Status
- Forecast Set: Forecast Set Partner
- Click Save.
- Click Edit on the Frequencies tab.
- Select the following:
- Calculation Frequency: Monthly
- Rollover Frequency: Quarterly
- Click Save.
Cindy has taken care of yet another request from the sales team. Forecasts for both business units now will be calculated monthly and rolled over quarterly. Also, the accounts for the Consumer business unit are modeled by Channel, which she added as a forecasting metric. Forecast field mappings are the structural pillars of a forecast. The required fields to create a forecast are Account, Period, Status, Forecast Quantity, Forecast Revenue, and Forecast Set.
Next, she selects Data Processing Engine definitions for forecast processes. Cindy has already cloned and customized the predefined Data Processing Engine templates that came with the feature.

The four Data Processing Engine templates serve specific purposes for forecast calculations. Cindy reviews them quickly.
Name |
Purpose |
|---|---|
Generate Account Forecast |
Aggregates data from sales agreements, opportunities, orders, and other custom measures to create forecasts for the first time, and for new accounts added to a business unit. |
Regenerate Account Forecast |
Aggregates data from sales agreements, opportunities, orders, and other custom measures to expire current forecast records for one or more accounts and replace those with new forecast records. |
Rollover Account Forecast |
Aggregates data from sales agreements, opportunities, orders, and other custom measures to create forecast records for the new periods that get added to the forecast display at the end of each month. |
Recalculate Account Forecast |
Aggregates data from sales agreements, opportunities, orders, and other custom measures to update forecast records for all periods each month. |
She’s created two copies of each predefined definition, one for each forecast set. She’s also customized multiple nodes in each definition to create granular and nuanced calculation logic.
- Click Edit on the Industrial_Set record.
- In the Building Blocks section, click Edit on the DPE Definitions tab.
- Select the following:
- Generation Definition: Generate Forecasts_Industrial
- Rollover Definition: Rollover Forecasts Monthly
- Regeneration Definition: Regenerate Forecast for Change in Forecast Parameters
- Recalculation Definition: Recalculate All Forecast_Industrial
- Click Save.

- Repeat steps 3 and 4 for the Consumer_Set record with the following details:
- Generation Definition: Generate Forecasts_Consumer
- Rollover Definition: Rollover Forecasts Monthly
- Regeneration Definition: Regenerate Forecast for Change in Forecast Parameters
- Recalculation Definition: Recalculate Forecast By Channel_Consumer
Cindy has made good progress. She can see the forecast sets taking shape. It’s time to complete the configurations.