Configure Forecast Sets
Learning Objectives
After completing this unit, you’ll be able to:
- Add dimensions and measures to a forecast set.
- Define adjustment periods for different user profiles.
- Create forecast formulas.
- Use Salesforce Flow to orchestrate the forecast process.
Dimensions and Measures
Cindy has created the dimensions for all the forecast sets. It’s now time to allocate the dimensions to each set. She’ll also go ahead and add the custom measures to each forecast set. The custom measures are already available as fields that she created in the Advanced Account Forecast Fact object.
Here’s how Cindy adds forecast dimensions to both the sets.
- Click
 , and select Setup.
 - In the Quick Find box, enter
Manufacturing, select Manufacturing. - Under Feature Settings, click Advanced Account Forecasting, and navigate to the Forecast Sets tab.
- Click Edit on the Industrial_Set record.
- Expand the Dimensions section.
- Click Add Dimension and provide the following details:
Name Dimension Forecast Fact Dimension Field Display Order Product Product Product ID 1 Ship-From Location Ship From Location Ship-From Location 2
- Click Save.

- Repeat steps 3 and 4 for the Consumer_Set with the following details:
Name Dimension Forecast Fact Dimension Field Display Order Product Category Category Category ID 1 Ship-From Location Ship From Location Ship-From Location 2
The display order determines the sequence in which the dimension columns are arranged in an advanced forecast view. For example, when an account manager views the forecast for an account that falls in the industrial unit, the first column is Product, and the second column is Ship-From Location.

Next up, Cindy adds the forecast measures from the forecast facts table to each forecast set. The measures in a forecast set are nothing but the fields from a forecast facts table that aren’t dimensions. To create a forecast, Cindy must decide how the values for each of these fields are calculated. So, while forecasted quantity and revenue are calculated using formulas, the underlying metrics such as opportunity and sales agreement quantity or revenue are calculated by batch processes of Data Processing Engine definitions. Other fields such as the adjusted revenue are edited by the stakeholders.

Here’s what Cindy does for the industrial business unit.
- Click Edit on the Industrial_Set record.
- In the Forecast Measures section, click Edit.
- Provide the following details and click Save:
Name Forecast Fact Measure Field Measure Type Aggregation Type Calculation Method Track Adjustments Final Forecasted Quantity Forecasted Quantity Quantity Sum Forecast Formula No Final Forecasted Revenue Forecasted Revenue Revenue Sum Forecast Formula No Opportunity Quantity Opportunity Quantity Quantity Sum Batch Process No Opportunity Revenue Opportunity Revenue Revenue Average Batch Process No Sales Agreement Quantity Sales Agreement Quantity Quantity Sum Batch Process No Sales Agreement Revenue Sales Agreement Revenue Revenue Sum Batch Process No Order Quantity Last Year Order Quantity Quantity Maximum Batch Process No Order Revenue Last Year Order Revenue Revenue Sum Batch Process No Total Discounts Total Discounts Offered Revenue Sum Batch Process No Account Manager Adjustments Account Manager Adjusted Forecast Revenue Revenue Sum User-Editable Yes Regional Manager Adjustments Regional Manager Adjusted Forecast Revenue Revenue Sum User-Editable Yes

She follows the same steps and adds all the same measures to the Consumer_Set. Additionally, she adds the Partner Adjustments to this set with the following details:
- Name:
Partner Adjustments - Data Metric Name: Partner Adjusted Revenue
- Metric Type: Partner Adjusted Forecast Revenue
- Aggregation Type: Sum
- Calculation Method: User-Editable
- Track Adjustments: Yes
In the consumer business unit, partners, account managers, and regional managers can make forecast adjustments, and these changes are tracked. In the industrial unit, the partners can’t adjust forecasts. Total Discount Offered is an important metric to track for both units. The other measures remain similar across forecast sets.
People Adjust Differently!
Cindy can see there are just a couple more configurations left to make to the forecast sets. She proceeds with the first one.
When an account manager first looks at the forecast, they may modify forecast revenue and quantity values based on their assumptions of how the products have performed historically, or what the general trends suggest. The modified values are captured as forecast adjustments. This forecast is then submitted for review to other stakeholders such as partners, regional managers, and finance executives. They review the underlying assumptions and examine the validity of the reasons.
The stakeholders in turn can modify the numbers based on their insights into market conditions, growth in the specific industry segment, and other trends they observe. After a few days, the forecast numbers are locked for an account. Rayler Parts uses the final forecast to plan inventory and get accurate revenue projections. Advanced Account Forecasting is the perfect forecasting tool because it makes the assumptions review process transparent.
The sales team wants to have staggered forecast reviews by role, locking edits for each role at a certain period. Cindy has already set up the following user profiles and added the relevant users:
- Account Manager
- Regional Manager
- Partner
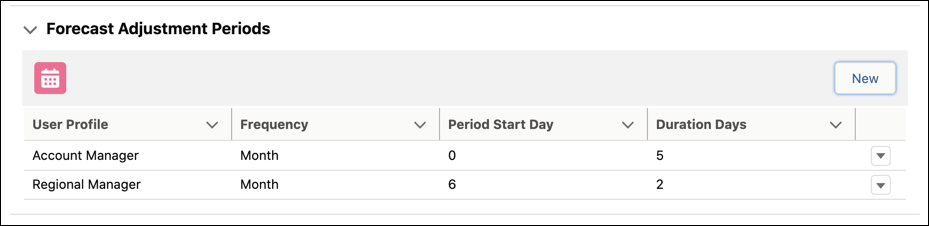
Here’s how Cindy adds adjustment periods to the Industrial forecast set.
- Click Edit on the Industrial_Set record.
- In the Adjustment Periods section, click Edit.
- Provide the following details.
- User Profile: Account Manager
- Frequency: Month
- Period Start Day:
0 - Duration Days:
5
- Click Save.
- Add another adjustment period with the following details:
- User Profile: Regional Manager
- Frequency: Month
- Period Start Day:
6 - Duration Days:
2
- Click Save.
Let’s see how a review plays out in January. Between January 1 and January 5, account managers can adjust forecast revenue. Remember how Cindy added the Account Manager Adjustments field to the forecast set while defining the forecast measures? That’s where the account managers add their numbers plus a reason for their adjustment. On Jan 6, account managers are locked out of forecast editing. Between January 6 and 7, regional managers come and add their numbers to the Regional Manager Adjustments field. On Jan 8, the adjustment window closes for everybody. The cycle is repeated each month.
Cindy creates three adjustment periods for the Consumer_Set record. The first 2 days are reserved for partners, the next 5 days for account managers, and finally the next two days for regional managers.
Concoct Formulas
Cindy can configure time-phased formulas for forecast quantity and revenue. For example, she might want to use one formula for the first 6 months and a different one for the next 6 to account for seasonality. An additional bonus is that forecasts are computed based on dependent metric changes. Cindy has already defined how quantity and revenue values from orders, opportunities, and sales agreements must be derived using the Data Processing Engine definitions. The formulas are applied after the definitions are run.
For now, Cindy creates one formula each, for quantity and revenue, across all periods.
- Click Edit on the Industrial_Set record.
- In the Forecast Formulas section, click Edit.
- Provide the following details in the Forecast Formula Builder and click Save:
- Start Period:
1 - End Period:
6 - Calculation Basis: Quantity
- Formula:
0.8*Opportunity Quantity + Order Quantity + Sales Agreement Planned Quantity
- Start Period:
- Add another formula with the following details:
- Start Period:
7 - End Period:
18 - Calculation Basis: Quantity
- Formula:
Opportunity Quantity + Sales Agreement Planned Quantity
- Start Period:
- Add another formula with the following details:
- Start Period:
1 - End Period:
12 - Calculation Basis: Revenue
- Formula:
0.8*Opportunity Revenue + Order Revenue + Sales Agreement Planned Revenue + max(Account_Manager_Adjustments, Regional_Manager_Adjustments)
- Start Period:

Orchestrate with a Flow
With the forecast sets ready, Cindy can activate these and the related DPE definitions. To bring it all together, she can use Flow Builder to create flow definitions. A flow helps automate the end-to-end process of running calculations for the custom forecast fact measures, evaluating the forecast formulas, and finally generating or recalculating the forecasts for sets of accounts for a given period.
Cindy can automate the process of calculating forecast measures and forecast calculations by adding all the required Data Processing Engine (DPE) definitions sequentially to a flow. Cindy creates flows separately for each forecast set to keep the two business units independent of each other. Cindy schedules the flows to run weekly so that all changes in the underlying metrics get updated with Data Processing Engine runs, and the forecast records are recalculated accordingly. For monthly rollover of forecasts, she can schedule separate flows that run at the start of each month. She can really orchestrate the entire forecast calculation process with flows.
Here’s what happens behind the scenes:
- The Data Processing Engine definitions that help aggregate and calculate the quantity and revenue metrics for opportunities, sales agreements, and orders are triggered with each scheduled flow run.
- The calculated values are written back to the Advanced Account Forecast Fact object. One record is created for each account and period combination.
- The Calculate Advanced Account Forecasts invocable action uses the calculated values of the forecast measures and runs the forecast formula.
- The Data Processing Engine definitions for rollover, recalculation, generation, and regeneration in a forecast set are triggered with the flow.
- During calculation of forecasts for each period, the Update Advanced Account Forecast Set Partner invocable action creates new Advanced Account Forecast Set Partner records.
- While the calculation is in progress, the status of these records is set to Calculation in Progress.
- After the forecast evaluation is complete, the invocable action updates the status of the records to Complete.
Account managers can create list views on the Advanced Account Forecast Set Partner object to view the forecast data for a given combination of Account and Forecast Set. The status indicates to them if the latest forecasts are available or not.
In the last unit, we take a look at some additional configurations that Cindy can set up to enhance the account manager experience. We then shift our focus to Elliott’s team and see how they make the most of Advanced Account Forecasting.