Create a Validation Rule
Follow Along with Trail Together
Want to follow along with an expert as you work through this step? Take a look at this video, part of the Trail Together series.

Introduction
Dirty data: It could be incomplete, inconsistent, outdated, duplicated, or full of spelling errors. No matter what, it leads to confusion, time waste, budget waste, and internal and external mistrust. And no one wants that. You’ve probably spent more time than you like cleaning up messy data in your org. But how do you keep data from getting dirty in the first place? The answer doesn’t involve bleach or hand sanitizer, just setting up a few rules, formulas, filters, and a flow.
Setting Limits with Validation Rules
Let’s start with validation rules, which allow you to set up business-specific criteria to prevent users from saving invalid data in one or more fields. A validation rule evaluates a formula upon record save. If a rule's criteria aren't met, the record saves. If a rule's criteria are met, users see a custom error message and the record doesn't save. Use validation rules to improve data quality by applying conditions, ensuring proper formatting, and enforcing consistency.
As the admin for AW Computing, your first keep-it-clean task is at the request of Allison Wheeler, the VP of Global Sales. She’s aiming to ensure deliveries for opportunities be scheduled within two weeks after an opportunity stage changes to closed won. Use a validation rule to set the time frame.
Before you set up the validation rule, it’s necessary to create a custom field, Delivery Schedule Date.
- Click the gear icon
 and select Setup.
 - Click the Object Manager tab.
- Click Opportunity.
- Click Fields & Relationships, then click New.
- Select Date, then click Next.
- For Field Label, enter
Delivery Schedule Date. - Click Next, then complete Step 3.
- In the Read-Only column header, select the checkbox.
- In the Read-Only column, deselect the Standard User and System Administrator checkboxes.
- Click Next, then click Save.
Now create a validation rule on the Opportunity object.
- From the Opportunity Object Manager, scroll down and click Validation Rules.
- Click New, then create a validation rule with these details.
Field Value Rule Name Delivery_Schedule_14_Days_Or_LessActive Select Description Sets end date for initial delivery
Now, enter the error condition formula.
- From the Functions list, select ISPICKVAL, then click Insert Selected Function.
- In the formula, highlight picklist_field.
- Click Insert Field, select Stage from the second list, and then click Insert. Note that Stage will convert to StageName in the formula.
- In the formula, highlight text_literal, and enter
"Closed Won"(including the quotation marks). - Click at the end of the formula to position the cursor.
- Click Insert Operator, then select && And.
- Click Insert Operator, then select ( Open Parenthesis.
- Click Insert Field, select Delivery Schedule Date from the second list, then click Insert.
- Click Insert Operator, then select - Subtract
- Click Insert Field, select Close Date from the second list, then click Insert.
- Click Insert Operator, then select ) Close Parenthesis.
- Click Insert Operator, then select > Greater Than and enter
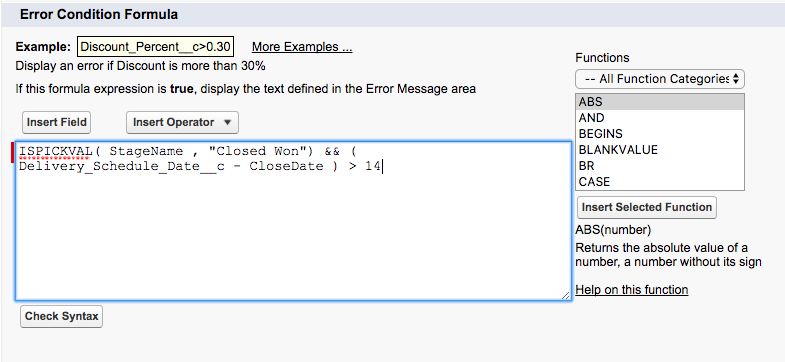
14at the end of the formula. - Verify that the formula looks like this:
- ISPICKVAL( StageName , "Closed Won") && ( Delivery_Schedule_Date__c - CloseDate ) > 14
- Click Check Syntax.
- Next, enter the error message information.
Field Value Error Message Dates of type delivery must be no later than 14 days after close dateError Location Field: Delivery Schedule Date - Click Save.
You’ve gotten off to a good start in the AW Computing dirty data prevention plan by creating a validation rule. Now move on to the next step, and have some good, clean fun with formula fields.