Create Calculated Fields and Metrics
Learning Objectives
After completing this unit, you’ll be able to:
- Describe what calculated fields are.
- Create a calculated dimension.
- Create a calculated measure.
Explore Calculated Fields
You can add calculated fields to your semantic model when you need additional fields that don’t exist in your data. Think of calculated fields as on-the-fly fields that can contain complicated logic and exist on top of your data. There are two types of calculated fields:
-
Calculated dimensions: Custom calculations to create new dimensions. Dimension fields are used to categorize or group your data, such as product category or car manufacturer.
-
Calculated measures: Custom calculations that create new measures. Measures are fields that are aggregated and that you can do math with, such as test score or price.
There are two ways to create calculated fields. You can either use Semantics AI to draft them for you or create them manually.

To use Semantics AI, enter a description of the calculated field you’re creating and click Draft with Einstein. A draft is created for you with all the properties and the formula.
Always review the drafted content carefully for accuracy before saving the calculated field. 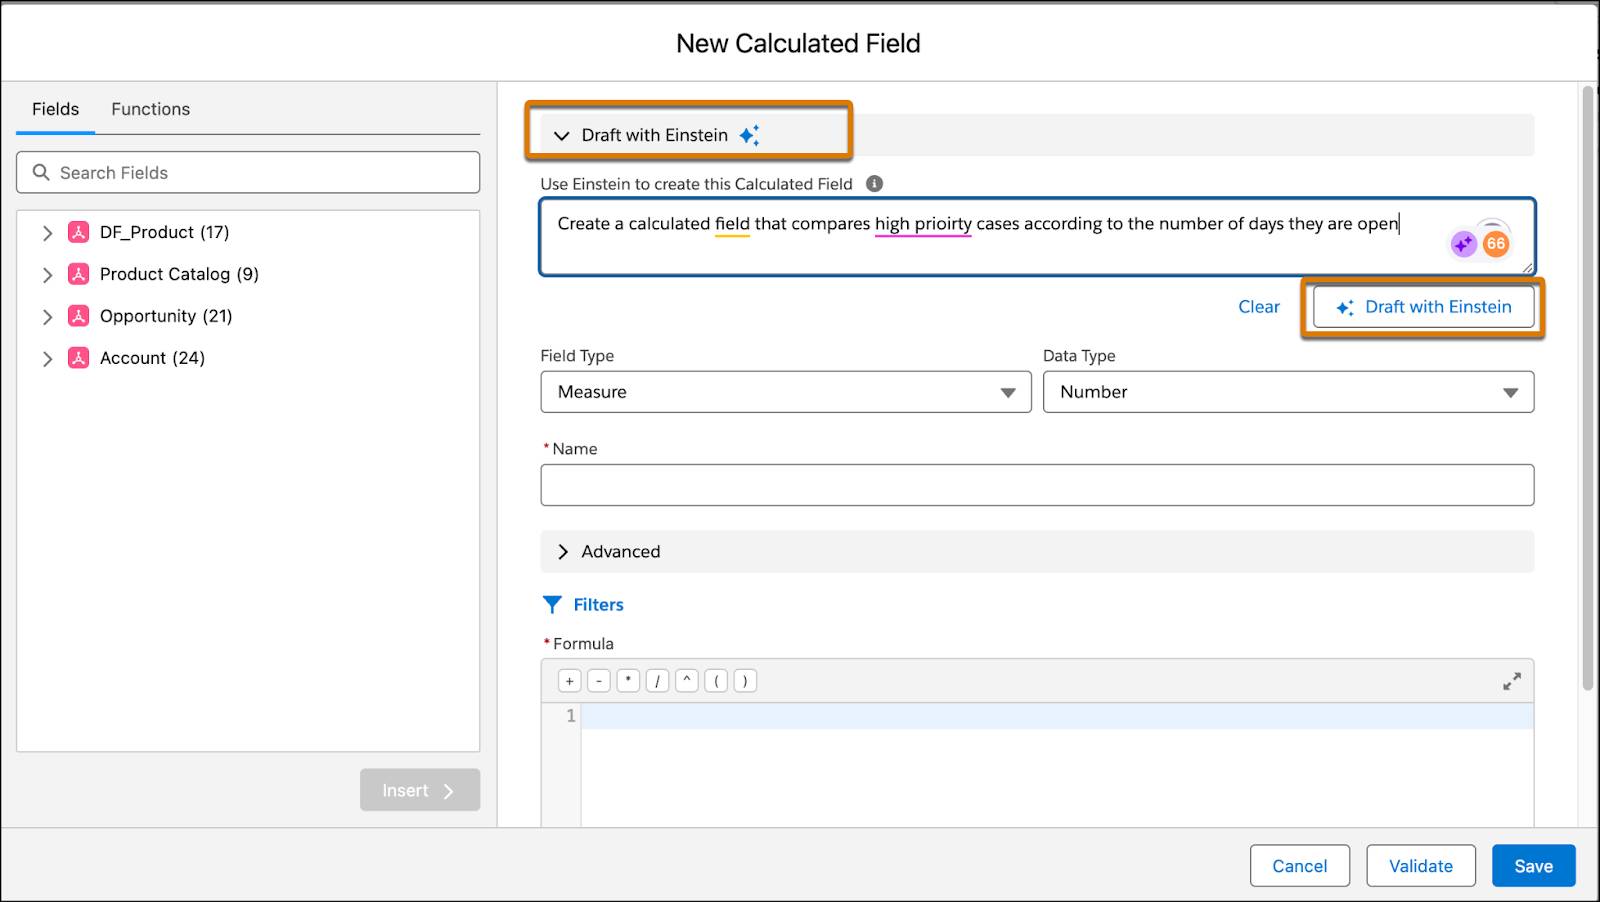
Create a Calculated Dimension
Calculated dimensions don’t physically exist in the database and can be used to do data manipulations such as concatenating fields, grouping values, or performing logical tests.
-
Consolidate dimensions: If you have dimensions containing different pieces of information that are often used together you can concatenate them. For example, if there's a dimension for first name and a dimension for last name, you can combine them into a dimension for full name:
-
[First Name] + " " + [Last Name]to combine first and last name (don't forget the space between them.)
-
[Last Name] + ", " + [First Name]to combine them as last name comma first name (with a space after the comma)
-
-
Group dimensions: If you have detailed values that you want to combine into categories, you can evaluate values and group them. For example, the following calculation takes five different types of book formats and casts them into two simple categories, paperback or hardcover.
CASE [Book Format]
WHEN "Mass market paperback" THEN "Paperback"
WHEN "Trade paperback" THEN "Paperback"
WHEN "Paperback graphic" THEN "Paperback"
WHEN "Hardcover" THEN "Hardcover"
WHEN "Hardcover graphic" THEN "Hardcover"
END
Imagine you want to create a calculated dimension to flag orders with same day shipping that weren't shipped on the same day.
- In the Semantic Model Builder, from the New dropdown menu, select Calculated Field.
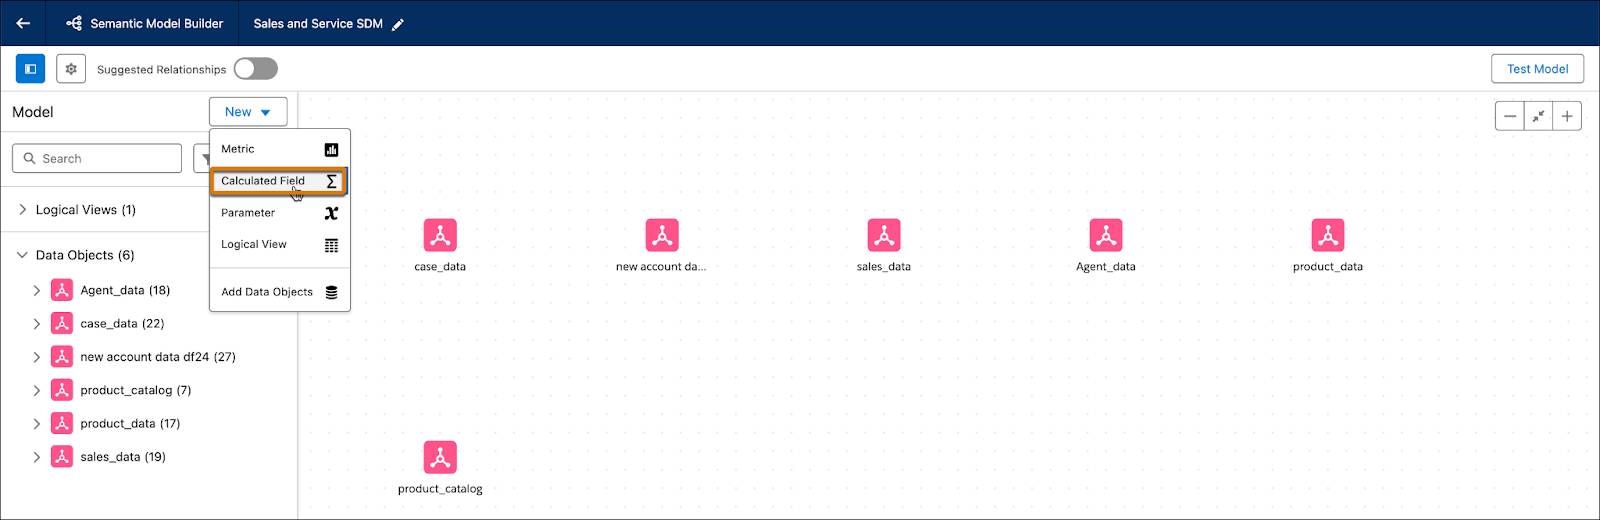
- In the New Calculated Field dialog, under Field Type, select Dimension.
- From the Data Type dropdown menu, select the type of data you want to store in the calculated dimension. In this case, Text.
- In the Name field, enter a descriptive and unique name such as
At Risk Cases.
- To define advanced settings, expand Advanced. Here you can
- Add a Description
- Customize the API Name (which can't be edited after the field is created)
- Set the Data Role as discrete or continuous, if applicable
- Toggle field visibility.
- Add a Description
- To add filters to the semantic calculated dimension, click Filters.
- In the Formula area, enter the formula using the correct syntax. This is the heart of the calculated field.
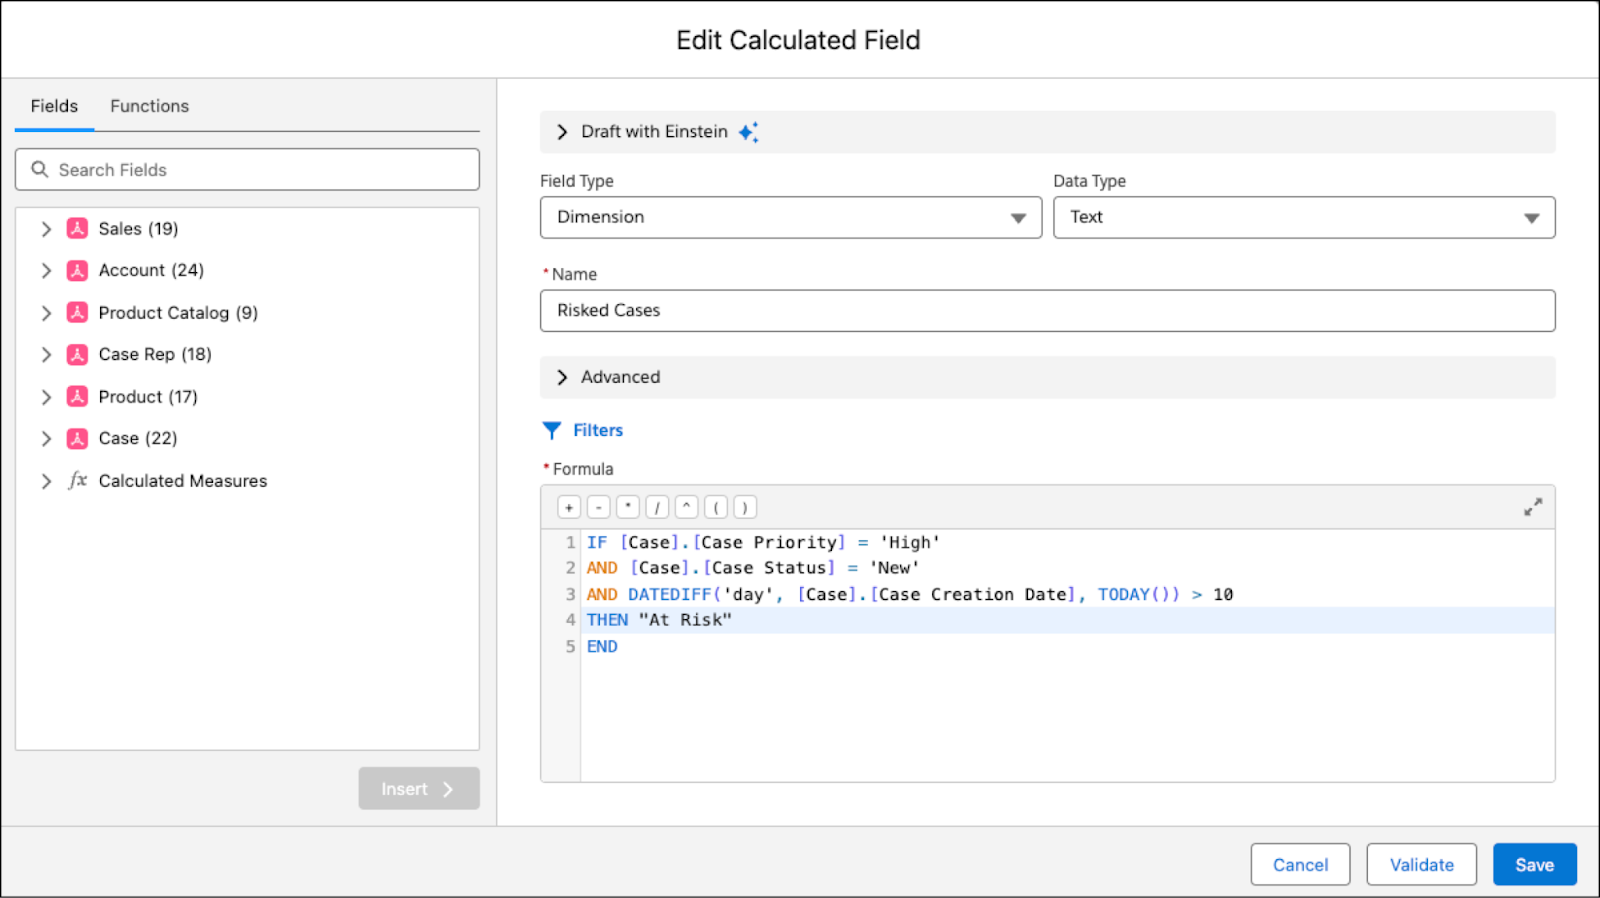
IF [Ship Mode] = "Same Day" AND ISNULL([Ship Date]) = true AND DATEDIFF('day', [Order Date], TODAY()) > 1 THEN "Late shipping" END- This calculation looks at each record and checks to see if the case priority is High, the case status is New, and the case was created more than ten days ago. If so, the record is flagged as "At Risk"
- Click Save.Here’s what the calculated dimension looks like when it’s done:
You can now use this new calculated dimension when viewing a dashboard of case health so you can compare the number of high-risk cases, and the number of low-risk cases.
Create a Calculated Measure
Calculated measures don’t physically exist in the database and can be used to do numerical operations such as calculating ratios or percentiles.
Like other measures, a calculated measure has additional metadata like default aggregation, data type (number, percentage), data role (discrete or continuous).
Imagine your data has a field for Price and a field for Discount. To calculate Sale Amount, you'd need to create a calculated measure.
- In the Semantic Model Builder, from the New dropdown menu, select Calculated Field.

- In the New Calculated Field dialog, under Field Type, select Measure.
- From the Data Type dropdown menu, select data type. In this case, choose Number.
- In the Name field, enter a descriptive and unique name such as
Sales Amount.
- To define advanced settings, expand Advanced. Here you can:
- Add a Description.
- Enter a unique API Name. You can’t edit the API name after creation.
- Set the Aggregation Type, such as Sum, Average, Count, etc
- Choose a setting for Decimal Place. The default is two.
- Set the Data Role to continuous or discrete
- Define the Sentiment by setting if an upward trend is good, bad, or neutral.
- Select Treat Nulls as Zeros if you want nulls to be replaced with zeros in calculated measures.
- Toggle field visibility.
- Add a Description.
- To apply filters on the source fields for this calculated dimension to the semantic calculated dimension, select Filters.
- In the Formula area, enter the formula using the correct syntax. This is the heart of the calculated field.
-
[Price]*(1-[Discount])
-
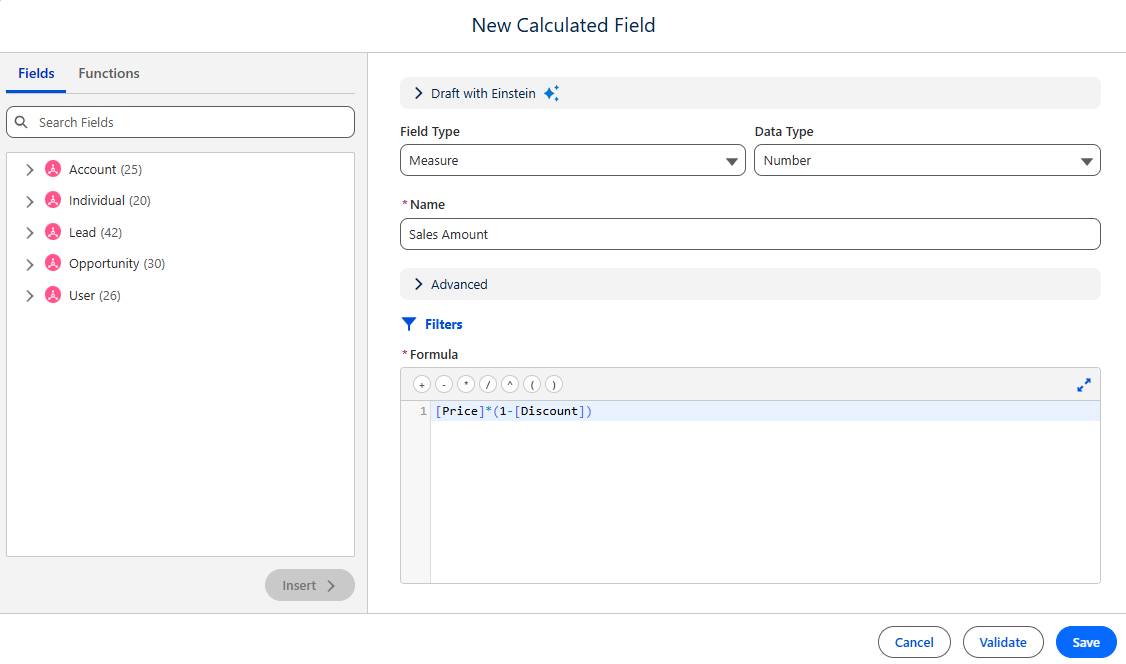
- Click Save.
You can now query this field and see the number of escalated cases and then act accordingly.
Create a Metric
A metric is a KPI tracked over time, such as revenue over the past year. The core components of a metric are a measure representing the KPI and a time dimension that tracks its development over time.
For example, you can create a sales performance metric to track weekly sales, helping you assess whether your business is meeting its targets over a set period.
You can also create metrics in Tableau Next. For more information, see Add a Metric to a Semantic Model in Salesforce Help.
- From the Semantic Layer tab, click to the Metrics tab then click New Metric. Select the Semantic Model to build your metric on.
- To create a metric from a specific model, navigate to the Semantic Model Builder, open the New dropdown, and select Metric.
- To create a metric from a specific model, navigate to the Semantic Model Builder, open the New dropdown, and select Metric.
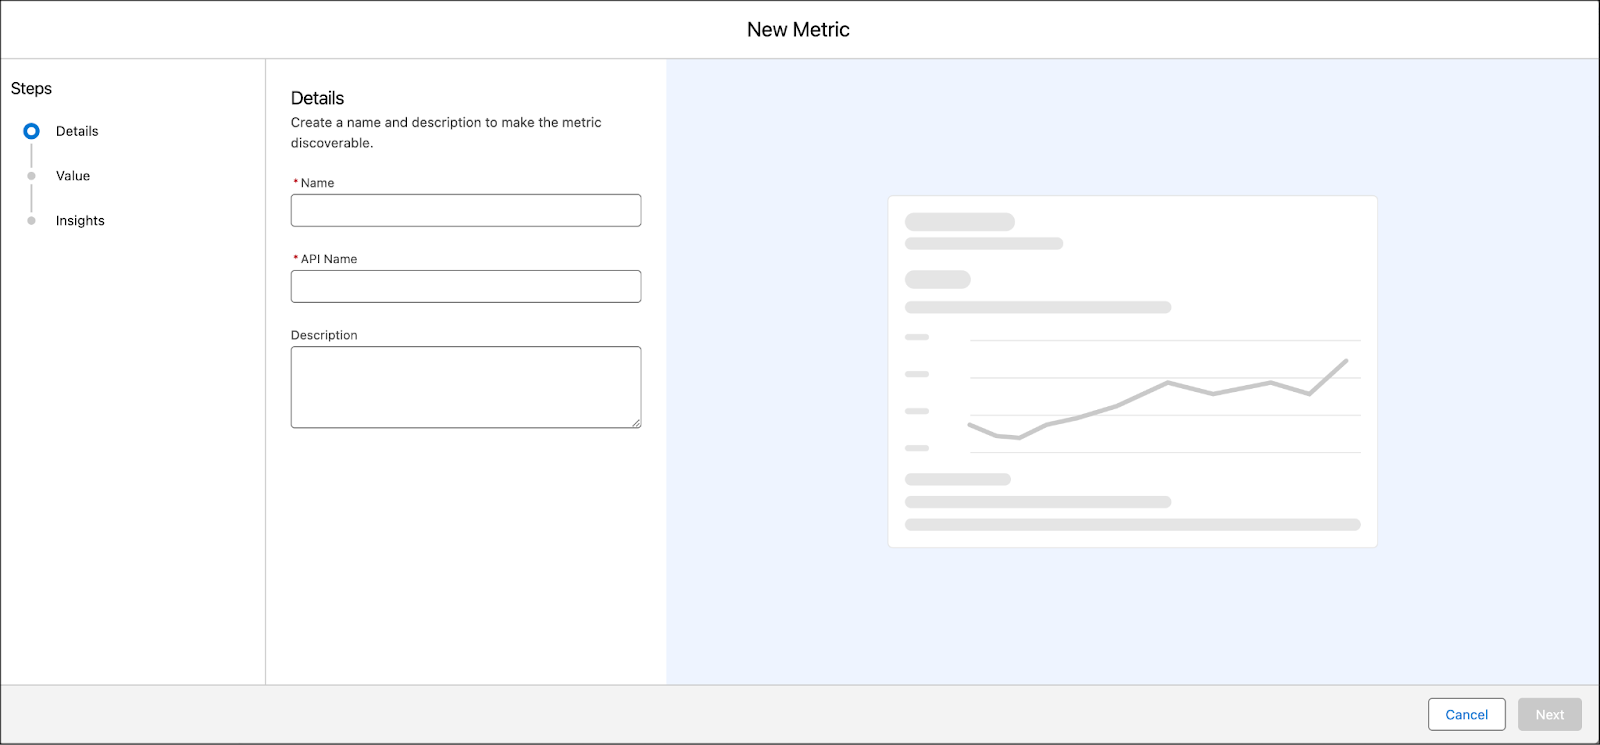
- Add a name and optional description to make the metric discoverable and easy to understand, and then click Next.
- For Measure, select the field that represents your KPI.
- (Optional) To add a filter, use the search box to Add Filter.
- (Optional) Configure additional settings under Measure Advanced Setup.
- Define the Sentiment for an increase in the measure.
- Choose a default aggregation.
- Choose if the aggregation is cumulative or not.
- Define the Sentiment for an increase in the measure.
- For Time Dimension, choose a date field from your data source.
- Click Next
- (Optional) To add context and granularity, you can select Additional Dimensions.
You can add up to 20 dimensions. These dimensions act as are displayed on the metric card detail page. Insights that are toggled on will be calculated based on these dimensions.
- Select Next.
- (Optional) Adjust the insights as desired, including turning them on or off, and configuring details such as the singular and plural units for the insights.
Here’s what the metric looks like when it's done.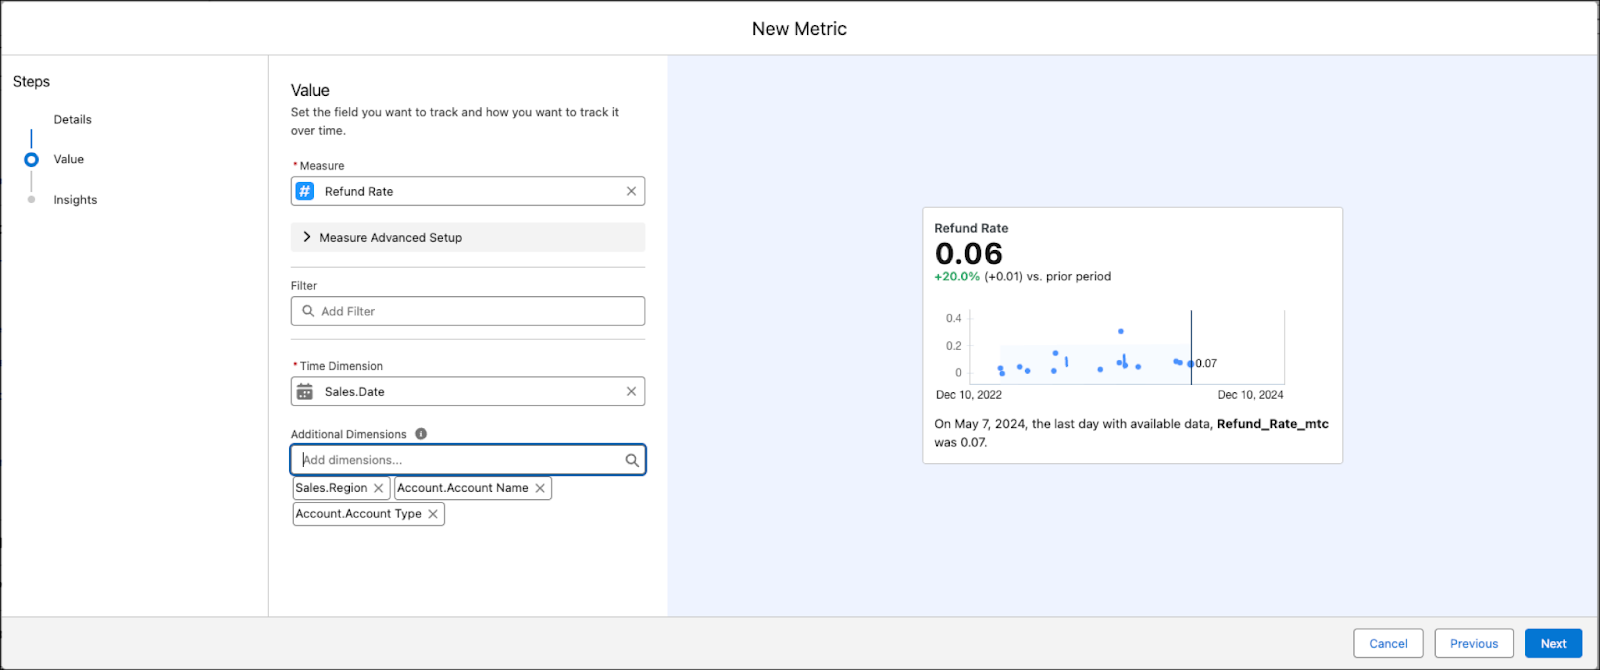
- Click Save.
In this unit, you learned about calculated fields and how to create metrics in your semantic model. Head over to the next unit to learn how to test your semantic model, and how you can use the semantic model in other applications.