Set Up Users and Install the App
Learning Objectives
After completing this unit, you’ll be able to:
- Give Salesforce Backup users the permissions they need.
- Install Salesforce Backup.
- List best practices and key considerations for using the application.
This content relates to Salesforce Backup. For information about Backup and Recover visit the Own from Salesforce Knowledge Base. Stay tuned for Trailhead content about Salesforce Backup & Recover.
Assign User Permissions
In this module, we assume you are an administrator with the proper permissions to set up Salesforce Backup. If you’re not an administrator, that’s OK. Read along to learn how your administrator would take the steps in a production org. Don't try to follow these steps in your Trailhead Playground. Salesforce Backup isn't available in the Trailhead Playground.
The Salesforce Backup app is a managed package that you can install in your Salesforce org and set up in as little as 10 minutes!
The first step is assigning the necessary licenses and permissions to the users who will manage the app. Each Salesforce Backup user needs:
- The Backup and Restore User Permission Set License
- The BackupRestore Permission Set
- Object permissions
Step 1: Assign the Backup and Restore Permission Set License
The Backup and Restore Permission Set License gives users the permissions they need to use the Backup managed package.
- From Setup, in the Quick Find Box, enter
Users, and then select Users. Select the user that you want to grant access to Salesforce Backup.
- From Permission Set License Assignments, click Edit Assignments, and select Backup and Restore User Permission Set License.
- Save your work.
Step 2: Assign Backup and Restore Permissions
Next, assign users permission to access the Salesforce Backup application.
- From Setup, in the Quick Find Box, enter
Users, and then select Users. Select the users that you want to grant access to Salesforce Backup.
- From Permission Set Assignments, click Edit Assignments.
- Under Available Permission Sets, select BackupRestore Permission Set, click Add.
- Save your work.
Step 3: Assign Object Permissions to Users
Users who manage backup policy or initiate restore jobs also need object permissions to ensure that they have the correct access to data. (We dive deeper into how Backup respects object rules next.)
- From Setup, in the Quick Find Box, enter
Permission Sets, and then select Permission Sets.
- Click BackupRestore.
- Click Object Settings.
- Click an object name, and then click Edit.
- Under the Object Permissions section, enable the permissions the user requires to back up and restore object data (see the table below).
- Save your work.
- Repeat step 5 for all objects that the user manages in the Backup app.
Use this table as a reference when assigning object-level permissions and access. Assign these permissions before you create policies or assign backup and restore tasks to team members to ensure that they have proper access.
ACTION |
OBJECT PERMISSION |
|---|---|
Backup |
Read |
Restore |
Read, create, and edit |
Restore only existing records |
Edit |
Restore only deleted records |
Create |
Give Authorized Users Access to Objects
Calvin had to identify the objects he wanted to include in his backup policy, and then make sure that he had the necessary object permissions.
The Salesforce Backup application respects object access rules and only acts on objects that you have access to. Without full object access, backups don’t complete or aren’t available for restoration later. Most backup and restore issues stem from incorrect object access settings.
For objects you wish to include in your backup policy: Make sure that you’ve enabled Oauth for the app to have access to them, and assign read access to all objects you plan to back up.
Also ensure that you meet all special access rules. For example, some objects are only available in specific products or when features within those products are enabled. Review the Special Access Rules section of the Object Reference documentation for the licenses, permissions, and preferences that each object requires.
- Custom objects, including custom objects in managed packages, must be available site-wide.
- Users must have all levels of access before an object can be backed up. See the Special Access section on each object’s entry in the Object Reference guide.
- To confirm and modify object access, use the Object Manager and Profile pages in Setup along with the User Licenses related list on the Company Information page.
Key Considerations
Salesforce Backup Doesn’t Support Certain Objects
Here is a list of objects and items that are not currently supported by the Backup app:
- Objects that aren’t supported by the Bulk API
- Records stored in Big Objects
- Standard objects that don’t contain the system fields CreatedDate, LastModifiedDate, and SystemModstamp, plus the LoginDate field
- If you have all required permissions and access levels enabled for an object, but the object shows a warning icon in the Backup Policy page or the backup log status shows NOT_VISIBLE, the object is likely missing one or more of these required fields
- History objects aren’t backed up because they can’t be restored.
- History tables are read-only, so they can’t be updated by the restore job
- Light Application objects
- Feed objects
Other key considerations:
- When a record is updated, the original record ID is maintained. Only the fields that were changed get restored.
- When a record is deleted, a new record ID is created to restore that record.
- If a custom object is part of a managed package that’s not site-wide, integration users must have a license for the object.
- Adding all objects for an initial Day 0 backup will take longer than an incremental backup.
Install and Set Up the Salesforce Backup Managed Package
You've set up your users with everything they need to use Salesforce Backup. Your last step is installing the managed package.
- Find the order form that your organization received when you purchased Salesforce Backup. It contains the installation URL.
- Click the URL, and then download the Salesforce Backup managed package.
- From the Managed Package page, select Install for Admins Only.
- If you’re prompted to approve third-party access, select Yes, grant access to these third-party web sites, and then click Continue. Although dev2.sf.k8phoenix.com isn’t a third-party URL, Salesforce uses this domain to support the backup and restore process. You receive an email notification that the package is installed.
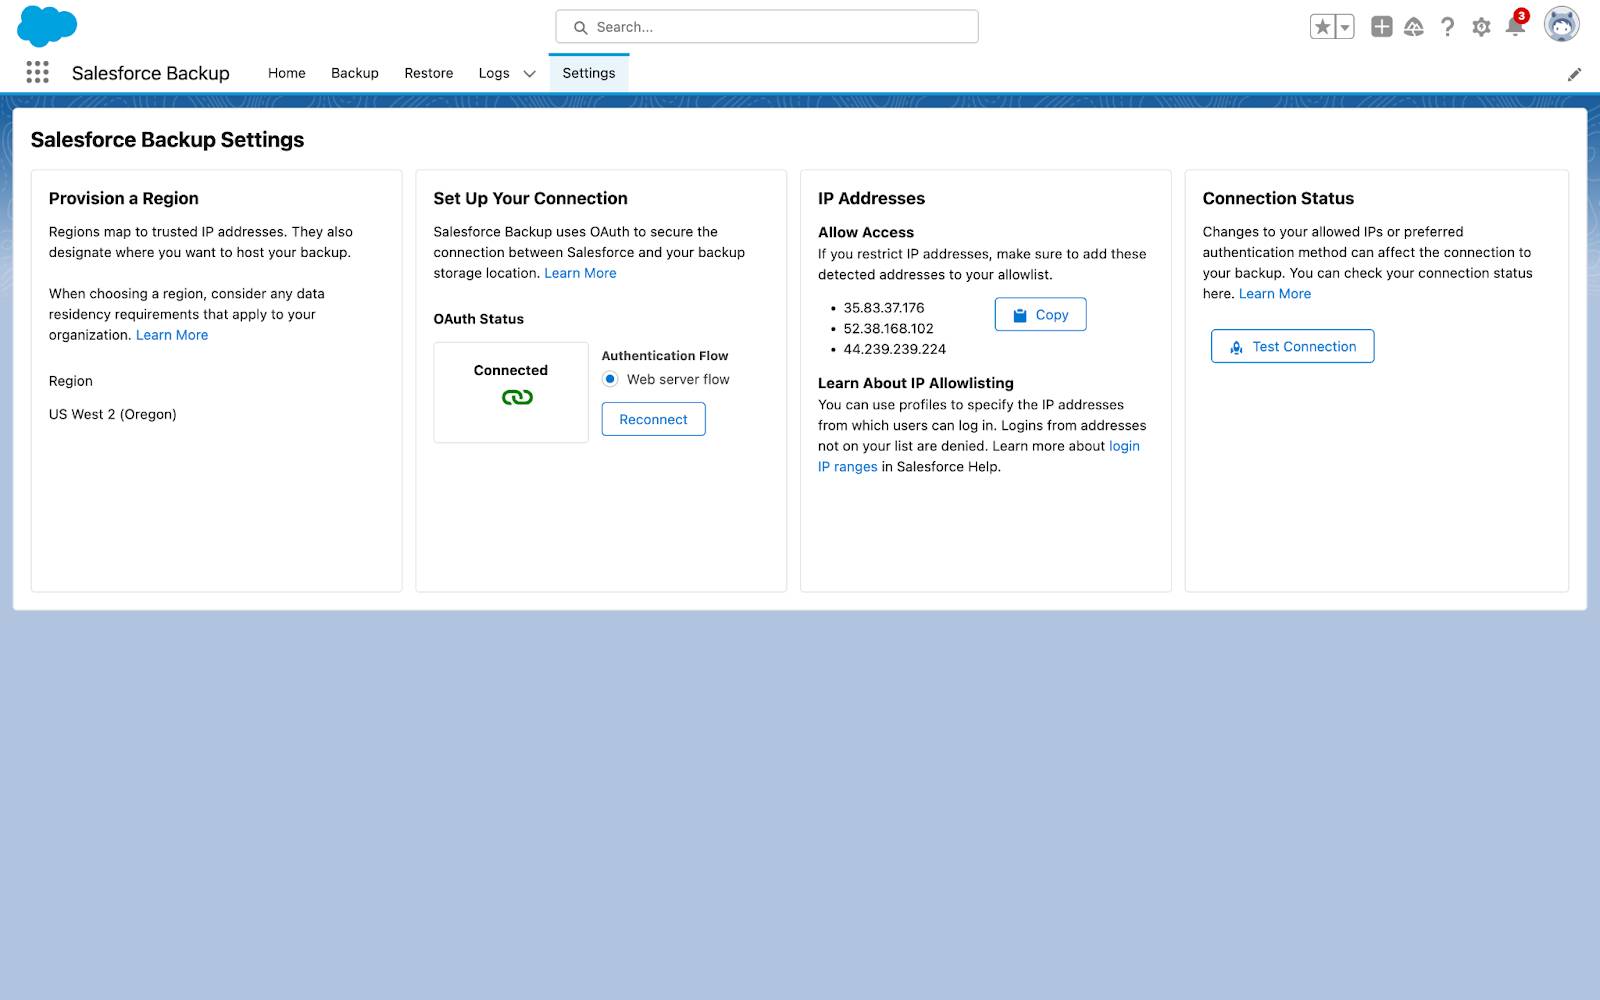
- In the Salesforce Backup app, click the Settings tab.
- In the Provision a Region section, from the dropdown menu, select the AWS region where you want to store your backups. When choosing a region, keep in mind any data residency requirements that apply to your organization.
- If you have no IP restrictions, click Start.
8. In the Set Up Your Connection section, click Connect. This action creates a secure connection using OAuth 2.0 Web Server Flow between Salesforce and the data storage location in AWS.
9. Click Test Connection.
When the test is successful, you’re ready to create a backup policy.
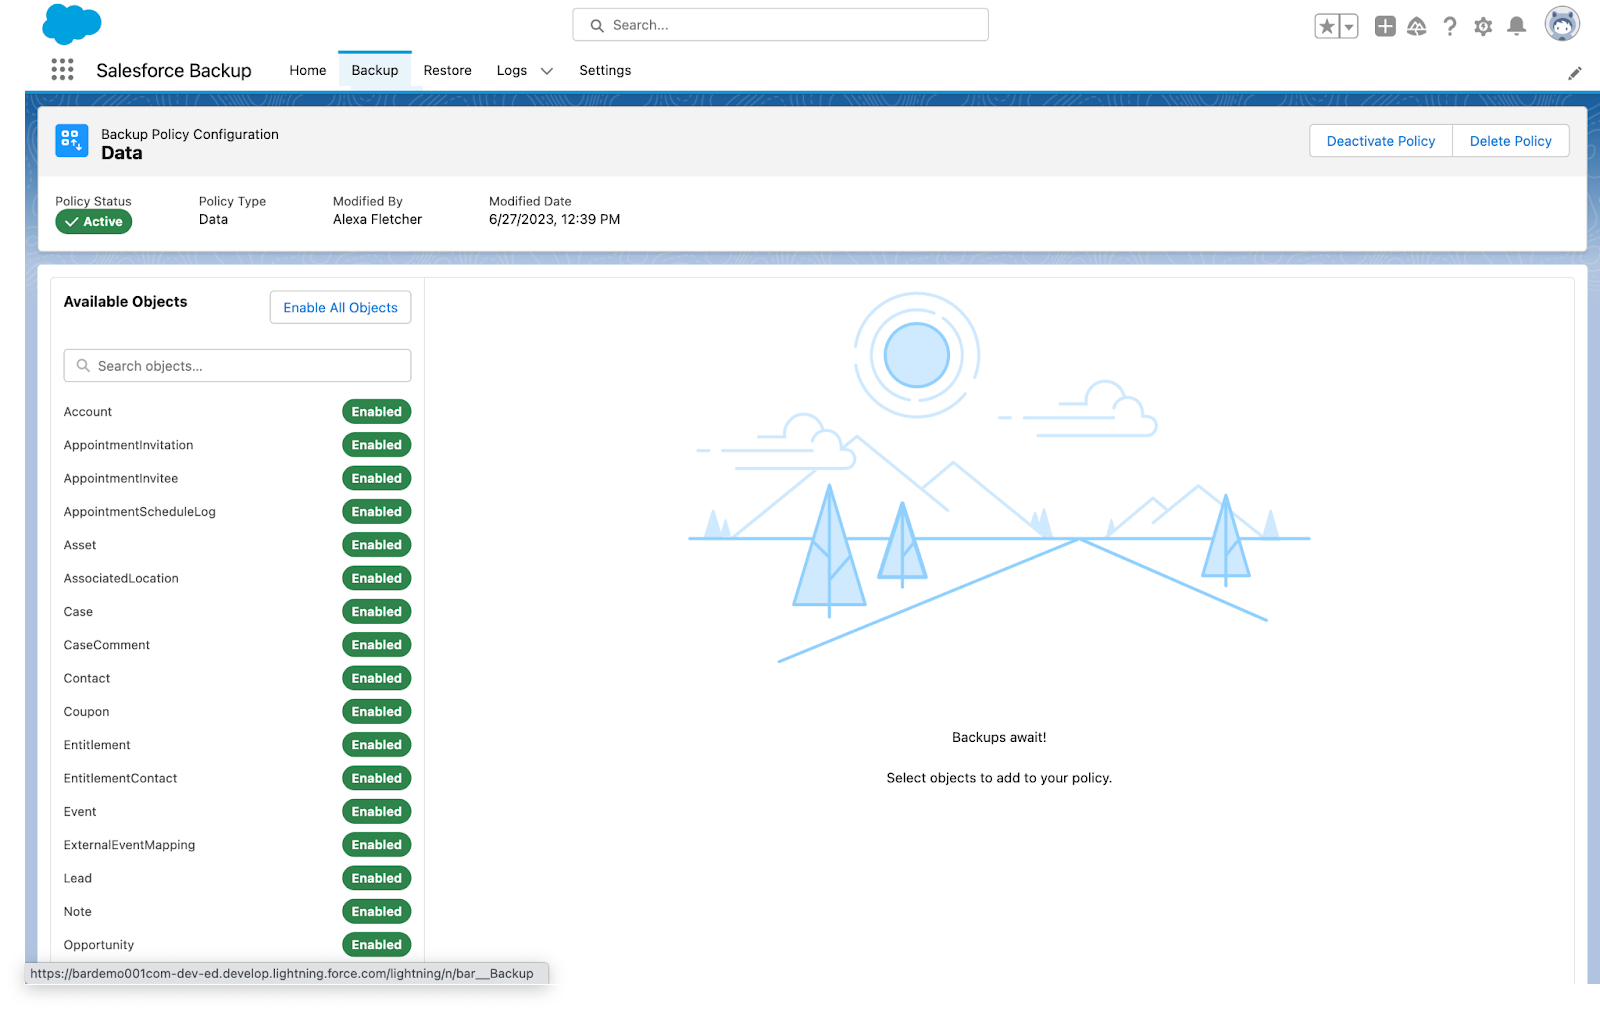
This is the application's backup tab, which includes a list of available objects.

This is the application's setting tab, which includes settings relating to trusted IP addresses and connection status.

Congratulations! You’ve successfully installed the app and your users are ready to start protecting the organization’s data with Salesforce Backup.
Resources
- Salesforce Help: Create a Backup Policy
- Salesforce Help: Restore Data from a Backup
- Salesforce Help: View and Interpret Backup and Restore Logs
