Create a Quick Cadence
Learning Objectives
After completing this unit, you’ll be able to:
- Explain how to access the quick cadence user interface.
- Describe how to create a quick cadence in Sales Cloud.
How to Use Quick Cadences
To create a quick cadence, open the New Cadence window, which you can access in one of two ways.
- If you’re using Sales Cloud without the Sales Engagement package, make sure that your Salesforce admin has enabled quick cadences. Then click the Cadences tab in the Sales app.
- If you have the Sales Engagement app installed, from the Home screen, access Cadences from the dropdown menu.
For a short video overview, see How Quick Cadences Help Sellers Automate the Mundane.
Quick cadences are short, repeatable actions. Select your outreach from this predefined list.
- Make a Call
- Manual Email
- Custom Task
Options for LinkedIn and Automated Emails will not appear in the New Cadence window unless those permissions are enabled by your Salesforce admin.

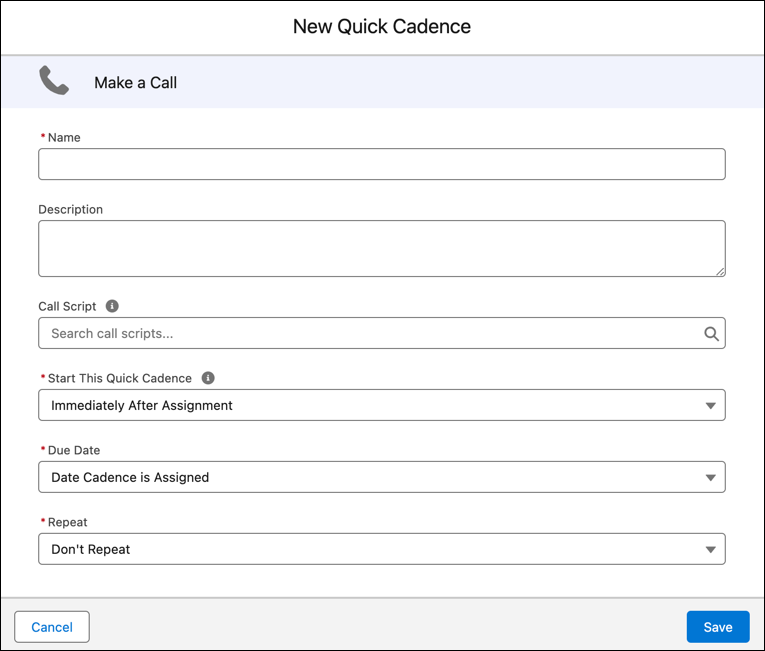
Selecting the button opens a configuration window for that specific action type. Here’s the window that opens for Make a Call.

You’re guided through the decisions to set up a repeatable action.
- Give your quick cadence a Name, then add a Description that helps you distinguish this particular outreach call from any other.
- For Make a Call, you have the option of attaching a Call Script. (For email, you may attach an email template.)
- Decide when to start your quick cadence. The options are immediately or within a set number of days or hours after the cadence is assigned to the target.
- You can also set a Due Date.
- Choose whether to repeat the quick cadence for assigned targets. Options include:
- Repeat the action a set number of times.
- Repeat until a specific result is achieved.
- Repeat the action a set number of times.
- Click Save.
Your quick cadence is saved in your My Private Cadences folder, accessed from the Cadences tab.
Assign targets to a cadence by selecting Add to Cadence from the Action menu on a lead, contact, or person account. In Unit 3, you learn additional ways to add targets to a quick cadence. You can add targets using list views and reports.
Once you add a target to your quick cadence, the cadence step appears in your To Do List or Work Queue automatically based on the start time and due date you selected.
Ready to Get Hands-on with a Quick Cadence?
To complete this module, you need a special Developer Edition org that contains Quick Cadences and our sample data. Get the free Developer Edition and connect it to Trailhead now so you can complete the steps below and the challenges in this module.
Note that this Developer Edition is designed to work with the challenges in this badge, and may not work for other badges.
- Sign up for a free Developer Edition org with Quick Cadences.
- Fill out the form:
- For Email, enter an active email address.
- For Username, enter a username that looks like an email address and is unique, but it doesn't need to be a valid email account (for example, yourname@example.com).
- For Email, enter an active email address.
- After you fill out the form, click Sign me up. A confirmation message appears.
- When you receive the activation email (this might take a few minutes), open it and click Verify Account.
- Complete your registration by setting your password and challenge question. Tip: Store your username, password, and login URL for easy access later.
- You are logged in to your Developer Edition.
Now connect your new Developer Edition org to Trailhead.
- Make sure you’re logged in to your Trailhead account.
- In the Challenge section at the bottom of this page, click Connect Org.
- On the login screen, enter the username and password for the Developer Edition you just set up.
- On the Allow Access? screen, click Allow.
- On the Want to connect this org for hands-on challenges? screen, click Yes! Save it. You are redirected back to the challenge page and ready to use your new Developer Edition to earn this badge.
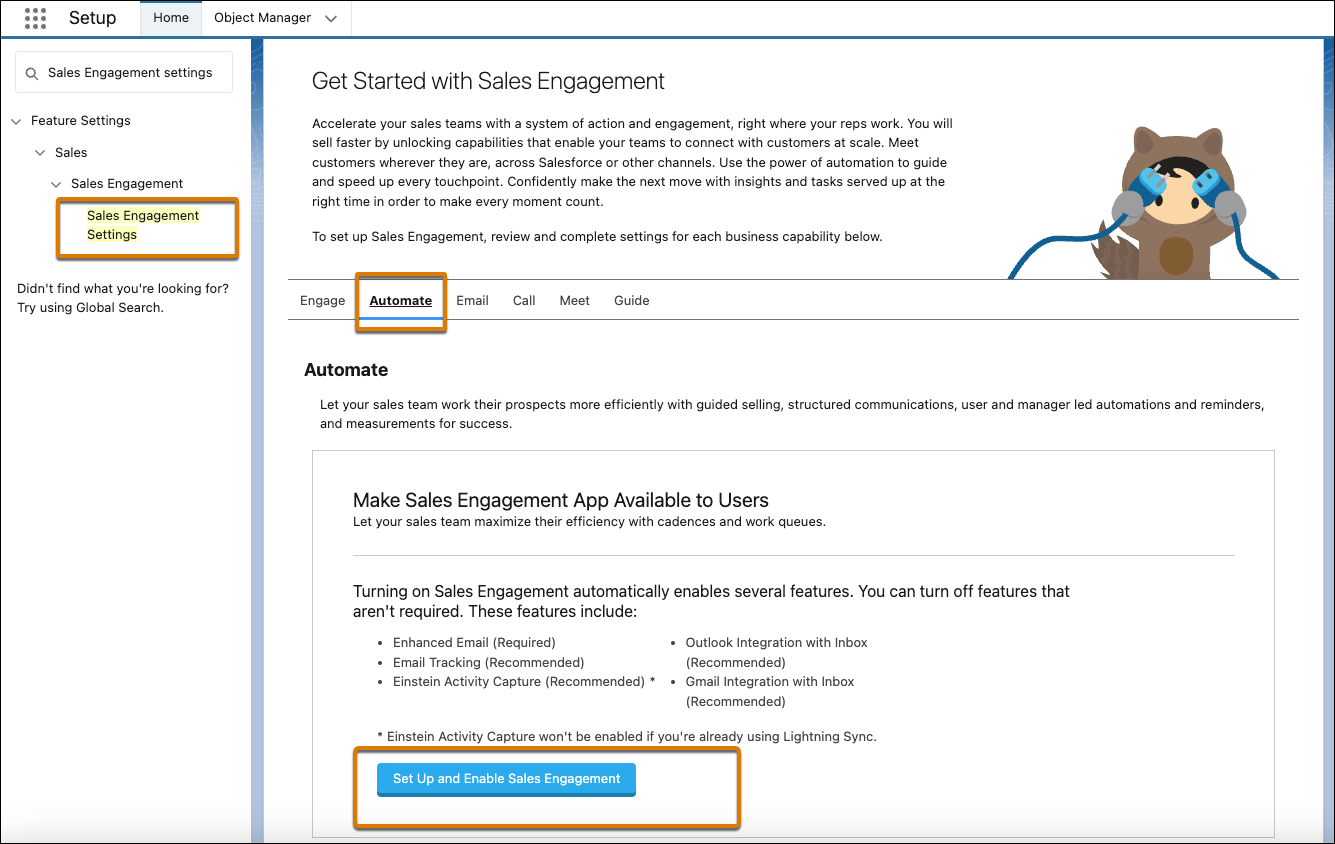
Once you’re in your new org, you’ll need to have the Sales Engagement feature turned on. Typically, an admin would enable this for you but let’s take care of it so we can follow along with the steps in this unit.
- In the Quick Find Search box, enter
Sales Engagement Settings.
- Click Sales Engagement Settings.
- Click the Automate tab.
- Click Set Up and Enable Sales Engagement.

With the Sales Engagement Setting turned on, let’s walk through the process of creating a quick cadence for a Welcome Email to new members of the Super Buyer Club. The club is open to customers whose sales reach $1 million with your company. You can repeat this process to create other types of quick cadences.
- Click the App Launcher, enter
cadencesin the Search field. Select the Cadences item to open the cadence tab.
- Click New Cadence.
- Click Manual Email.
- For the Name, enter
Welcome Super Buyer.
- For the Description, enter
Welcome new member to the Super Buyer Club.
- For Email Template, enter
welcomein the search box.
- Click the Welcome Super Buyer template.
- For Start This Quick Cadence, select Immediately After Assignment.
- For Due Date, select Date Cadence is Assigned.
- For Repeat, select Don’t Repeat.
- Click Save.
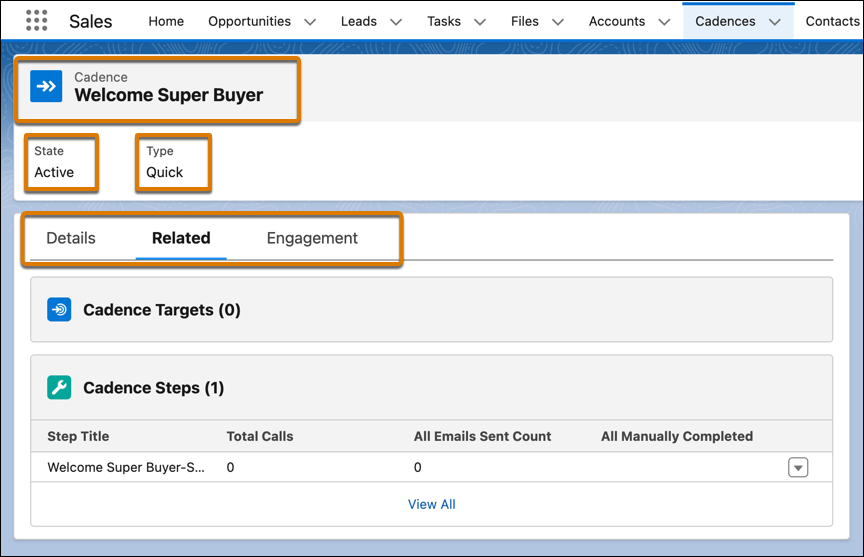
Excellent work! Your new quick cadence record appears. The record contains the Name (Welcome Super Buyer), its State (which is Active), and its Type (which is Quick). Immediately following is a section with the tabs: Details, Related, and Engagement. The Related tab is already selected, displaying Cadence Targets and Cadence Steps.

Your Cadence Targets show zero (0) because you haven’t added any yet. Your Cadence Steps show one (1). If you hover on the Step Title, you see the system automatically combines your cadence name with the action type to name this step Welcome Super Buyer-SendAnEmail.
In Unit 3, you learn multiple ways to add targets to a quick cadence. Once a cadence exists, you can easily add targets to it as you develop new leads or contacts. The cadence is already set up with details, templates, or call scripts so you don’t have to repeat those steps for every new target.
Now that you know how to create a quick cadence, you can create many more customized outreach steps to accelerate your sales processes.