Make a Dynamic Bundle with Filter Rules
Learning Objectives
After completing this unit, you’ll be able to:
- Describe the advantages and disadvantages of using dynamic bundles.
- Distinguish which products should be included in a dynamic bundle.
- Create a Product Option field to enable filtering based on product data.
- Create a bundle feature that allows for product selection in a dynamic bundle.
- Create a filter-type rule to limit which products appear in a dynamic bundle.
- Explain when it would be appropriate to use an optional filter versus a default filter.
The Case for Dynamic Bundles
Bundles are really useful because they combine many products that can be sold together as a set. As you learn in the Configurable Bundles in Salesforce CPQ badge, to create a bundle is to create option records. Options are the glue that holds together the lead product with all of the followers, like the laser printer and its accessories.

To change the makeup of a bundle you have to create new options or delete existing ones. If your bundles don’t change often, you won’t need to spend much energy maintaining them. But if you regularly cycle new products in and out of your bundles, the work may become a little tedious.
What if there was a way for your bundle to automatically pick up new, relevant products, and drop those that are no longer needed? Dynamic bundles can make that dream happen.
Dynamic bundles have a special feature that appears just like any other, but instead of showing a list of options, it shows a link to add options.
When you click the link, you’re brought to a page that shows a short, filtered list of products to choose from. It’s like a mini Product Selection page unique to the bundle.
Sales reps can check the products they’re interested in, then click the Add button. They’re returned to the main configuration page, with the products now listed in the feature.

The big advantage of a dynamic bundle is that you don’t create product options records for the products listed in the mini Product Selection page. It’s so much easier to maintain these “virtual options” when the bundle evolves. That said, there’s one important limitation. Since you are not creating option records, you lose the ability to control how the virtual options behave. For example, with a regular option you can set a maximum quantity, but with a virtual option you can’t. So dynamic bundles are best suited for products that don’t require strict enforcement of business logic.
Such Distinguished Products!
The Telecommuter Workstation bundle is a great candidate for dynamic behavior. It’s meant to be a simple bundle, but that doesn’t mean you can’t upsell. Imagine that you wanted a short list of common addons that go well with the workstation. Things like a USB-C to USB adapter and a headphone extension cable.
So how do you identify the products that should be in your dynamic bundle? You can’t use the product code or product family because there’s no common denominator to filter upon. Instead, you need to create a custom field on the product, and update it for only the products that matter. And guess what? Team Trailhead has already done that for you in your special org.
In your CPQ-enabled org there’s a checkbox field on the product named “Extras__c.” Some products, like the USB-C to USB Adapter, already have it checked.
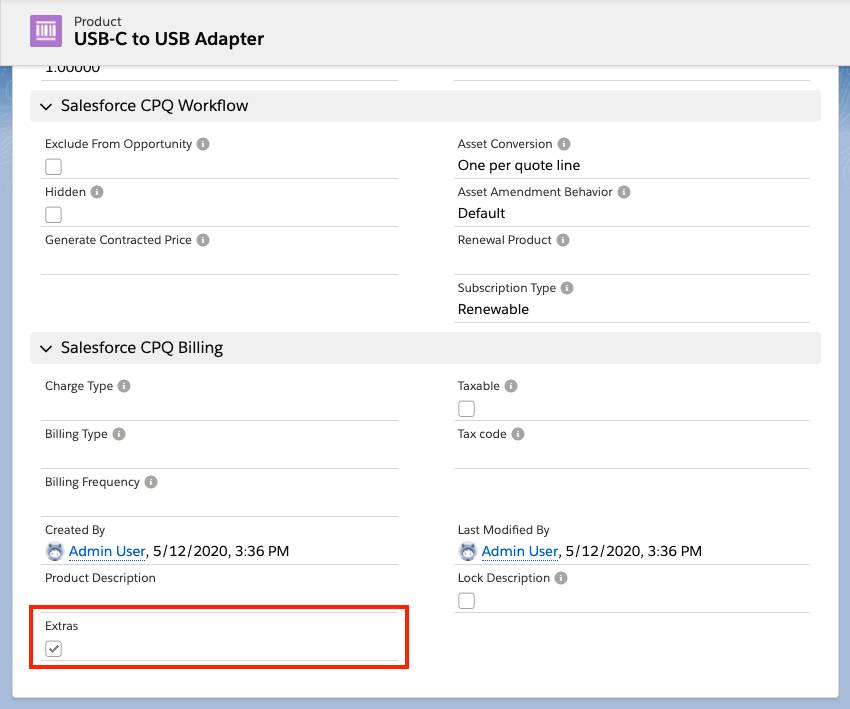
In the real world you would create your own custom field and name it whatever you want, and it doesn’t even need to be a checkbox. For example, a picklist would do nicely since it’s easy to filter upon.
Set Up a Back Channel
So you have Extras__c on the product records, which is a good first step. The next step may seem odd, but it’s absolutely necessary. You’re going to create an Extras__c field to the Product Option object. Here’s why. When CPQ makes the list of virtual options for the mini Product Selection page, it copies data from product records into the list. You want CPQ to copy the Extras__c data too, but the data needs a place to go. By creating a field on the Product Option object, you reserve a spot on the list for Extras__c data. Only then can you filter the list like we need to.
Let’s create the Extras__c field on the Product Option object.
- Click
 and click Setup. The Setup page opens in a new tab.
 - Click Object Manager.
- Click Product Option.
- Click Fields & Relationships.
- Click New.
- Click Checkbox.
- Click Next.
- For both Field Label and Field Name, enter
Extras.
The name must match the field from the product object. That’s how CPQ knows what data needs to be copied into the virtual options list. - Click Next.
- Click Next to keep field-level security as is.
- Click Save.
Close the browser tab to return to the Salesforce CPQ app.
Great. Now Extras__c data is part of the virtual options list, and you can use it as a filter.
Set Up the Dynamic Duo
Dynamic bundles are made possible through the teamwork of a special feature and a special product rule. You still need to set up both, so let’s start by creating a new feature on the Telecommuter Workstation bundle.
- Back in CPQ, in the navigation bar, click Products, then choose the All Products view.
- Click Telecommuter Workstation.
- Click the Related tab.
- From the Features related list, click New.
- For Feature Name, enter
Upsells. - For Min Options, enter
0. - For Number, enter
50. - For Option Selection Method, choose Dynamic.
This choice is the key to making your bundle dynamic. - Click Save.
Now if you were to configure the Telecommuter Workstation, you’d see the new feature at the bottom of the page.
Unfortunately, if you were to click Add Options, you’d see a list of every single available product. You need to filter it down to just products where Extras is checked. Time to make a filter product rule.
- In the navigation bar, click Product Rules.
- Click New.
- For Product Rule Name, enter
Extras filter. - For Type, choose Filter.
- For Scope, choose Product.
- For Evaluation Event, choose Load.
Filter rules only update the list of virtual options once when the configuration page first loads. It’s not possible to have the list update based on changes made during configuration. - Check Active.
- For Conditions Met, choose All.
- Click Save.
Next you create an action that does the actual work of filtering.
- In the Actions related list, click New.
- For Type, choose Default Filter.
We talk about how Default Filter compares to Optional Filter later. - For Filter Field, choose Extras__c.
Like before, to save time we’ve already added Extras__c into the picklist. You have to add your own custom fields there when you create your own filter rules. - For Operator, choose equals.
- For Filter Value, enter
true. - Click Save.
Lastly, you need to create the configuration rule so that CPQ knows to filter virtual options in the Upsells feature of the Telecommuter Workstation bundle.
- In the Configuration Rules related list, click New.
- Check Active.
- For Product, look up and choose Telecommuter Workstation.
- For Product Feature, look up and choose Upsells.
This step connects your rule to the special feature that you set up for dynamic selection. - Click Save.
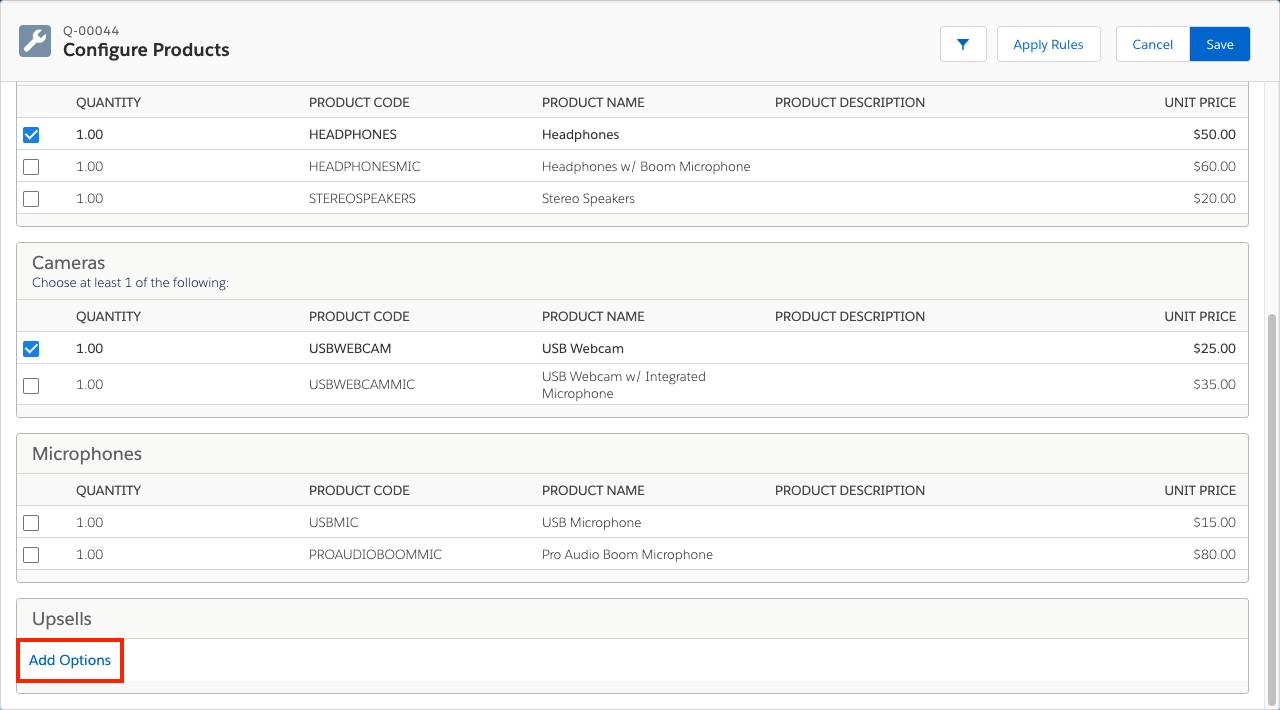
And with that, you have a dynamic bundle! It’s a bit of work, but the result is well worth it. Let’s test it out on a premade quote.
- In the navigation bar, click Quotes, then choose the All list view.
- Click Q-00044.
- Click Edit Lines.
- Click Add Products.
- Check Telecommuter Workstation.
- Click Select.
- Click Add Options.
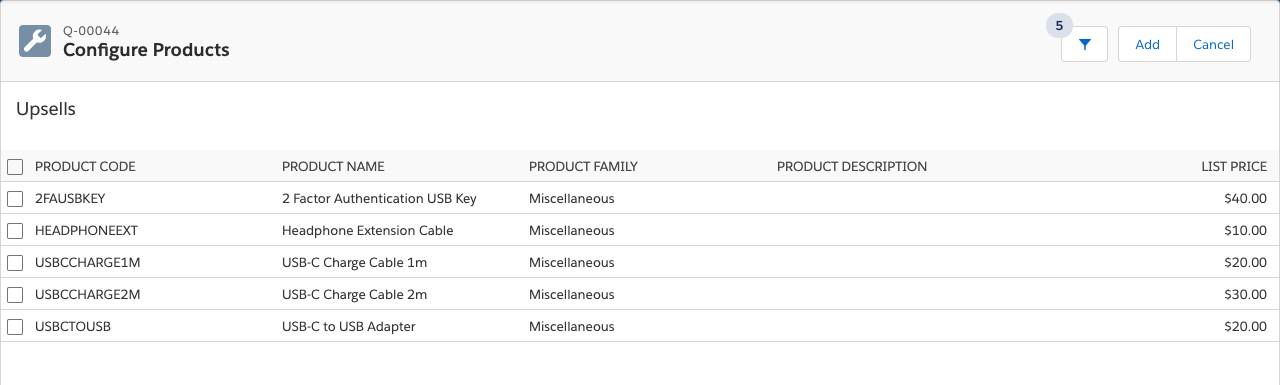
Here you should see a short list of only five products that Team Trailhead has flagged as extras. Excellent work!
If you updated a product not on the list by checking the Extras checkbox, you’d see it appear in the mini Product Selection page next time you configured the bundle. Changing a single checkbox is way easier than creating a new product option record on the bundle.
Default Filter Versus Optional Filter
You may have noticed that the mini Product Selection page has a button to open the filter pane so sales reps can filter the list even further.
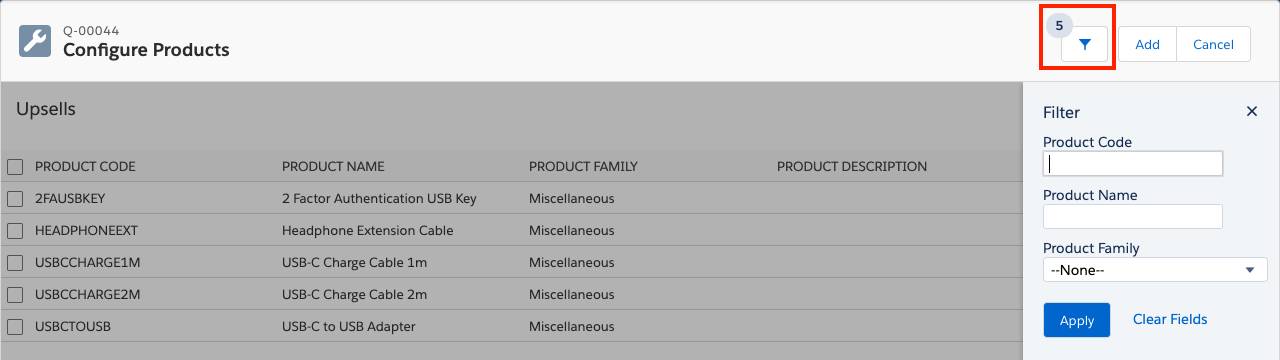
You set up your product rule to use Default Filter for the Action’s Type field. So, if sales reps click the Clear Fields link in the filter pane, the Extras__c filter will remain active, limiting the list to just the five products they start with. But if you had chosen Optional Filter for the Type field, the Clear Fields link would clear the Extras__c filter too, revealing every product in your catalog! So, choose wisely when setting type for filter rules you create on your own.
Product rules that use filter actions make quick work of getting virtual options into a bundle, and quicker work of maintaining them over time. With filter rules, along with alert, validation, and selection rules, you’ll have sales reps creating accurate quotes with ease.