Control Options with Selection Rules
Learning Objectives
After completing this unit, you’ll be able to:
- Describe how product rules can affect options in a configurable bundle.
- Create a selection-type product rule.
- Create product action records to affect options.
- Clone a product rule and alter it for a new purpose.
The Helping Hand of Selection Rules
So far we’ve spent a lot of time talking about product rules that prevent sales reps from making mistakes by alerting them of potential problems. But what if there was a kind of rule that took action to automatically make necessary changes to a configuration to avoid issues in the first place? Well that’s exactly what selection-type product rules aim to do.
For simplicity, we just call them selection rules from this point forward. There are a number of ways selection rules take action to affect how bundles are configured.
Action |
Result |
|---|---|
Add |
Checks an option |
Remove |
Unchecks an option |
Disable |
Makes an option’s checkbox grayed out and uncheckable |
Enable |
Makes an option’s checkbox normal and checkable |
Disable & Remove |
Unchecks an option, and makes the option’s checkbox grayed out and uncheckable |
Enable & Add |
Makes an option’s checkbox normal and checkable, and checks it |
Hide |
Completely removes an option from the page layout |
Show |
Brings a hidden option back into the page layout |
Hide & Remove |
Completely removes an option from the page layout and unchecks it |
Show & Add |
Brings a hidden option back into the page layout, and checks it |
With the right combination of actions, a single product rule can quickly get a sales rep to a properly configured bundle, or at least give them a head start down the right path.
Create Two Opposing Selection Rules
Selection rules have a lot of similarities to the rules you’ve created so far, except this time you won’t set up a message to pop up when there’s an issue. Instead, you create an action for CPQ to take.
Let’s look at a scenario that benefits from selection rules. Imagine that you have a bundle for a home automation kit that includes things like smart light bulbs, outlets, and power strips.
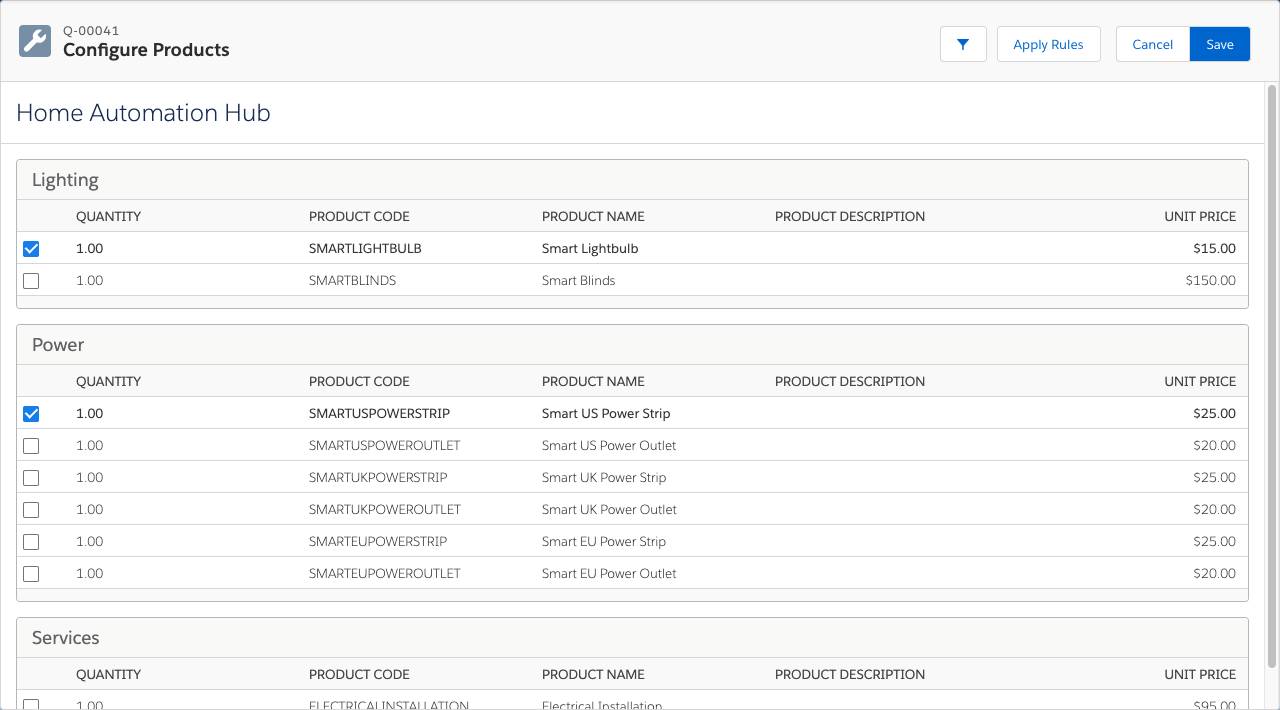
At the bottom of the page there is an option for electrical installation, which is highly recommended if an outlet is selected. But it should never be selected if outlets are not part of the bundle. To meet these business requirements, you have to make a number of things, including:
- A summary variable to see how many outlets are selected
- A rule that disables and removes electrical installation if zero outlets are selected
- A rule that enables and adds electrical installation if an outlet is selected
To get started, you create the summary variable.
- From the navigation bar, click Summary Variables.
- Click New.
- For Variable Name, enter
Outlet Sum.
- For Target Object, choose Product Option.
- For Aggregate Function, choose Sum.
- For Filter Field, choose Product Code.
- For Operator, choose ends with.
- For Filter Value, enter
OUTLET.
- Click Save.
Good, you now have a summary variable that can be used in both rules, isn’t that helpful? Now let’s create the first rule, which is meant to disable the Electrical Installation option. You start by creating the Product Rule record.
- From the navigation bar, click Product Rules.
- Click New.
- For Product Rule Name, enter
Disable and remove electrical installation.
- For Type, choose Selection.
- For Scope, choose Product.
- For Evaluation Event, choose Always.
You’re choosing Always because you want the rule to run at two times: when the configuration page first loads, and whenever an edit occurs. Note, selection rules for bundles don’t run on Save, so that isn’t part of the Always choice.
- Check Active.
- For Conditions Met, choose All.
- Click Save.
OK, now you create the error condition. You want the rule to fire when our summary variable is zero, meaning no outlets are selected.
- In the Error Conditions related list, click New.
- For Tested Variable, look up and choose Outlet Sum.
- For Filter Operator, choose equals.
- For Filter Type, choose Value.
- For Filter Value, enter
0.
- Click Save.
Now that you’re becoming a pro at making error conditions, it’s time for something new. Let’s create the action record, which is where you put instructions for what CPQ should do when the rule fires.
- In the Actions related list, click New.
- For Type, choose Disable & Remove.
This is a combo action that makes the option uncheckable and removes the check if it’s there.
- For Product, look up and choose Electrical Installation.
For this example you’re acting on just one product, so you use the lookup field. In the next unit you investigate how to act on multiple products.
- Click Save.
That’s it, your action is done. The final step is to make this product rule apply to the Home Automation Hub bundle.
- In the Configuration Rules related list, click New.
- Check Active.
- For Product, look up and choose Home Automation Hub.
- Click Save.
Excellent, your first selection rule is done. But wait, you need to make another. As it stands, even if you were to configure the bundle to include a smart outlet, the Electrical Installation option would remain disabled. That’s because selection rules only do what they’re told, and they don’t undo what they’ve done once they stop running. So you need a rule to enable electrical installation if outlets are selected.
You can make another rule from scratch, but let’s save some time and clone our first rule, then make a few tweaks to reverse its behavior.
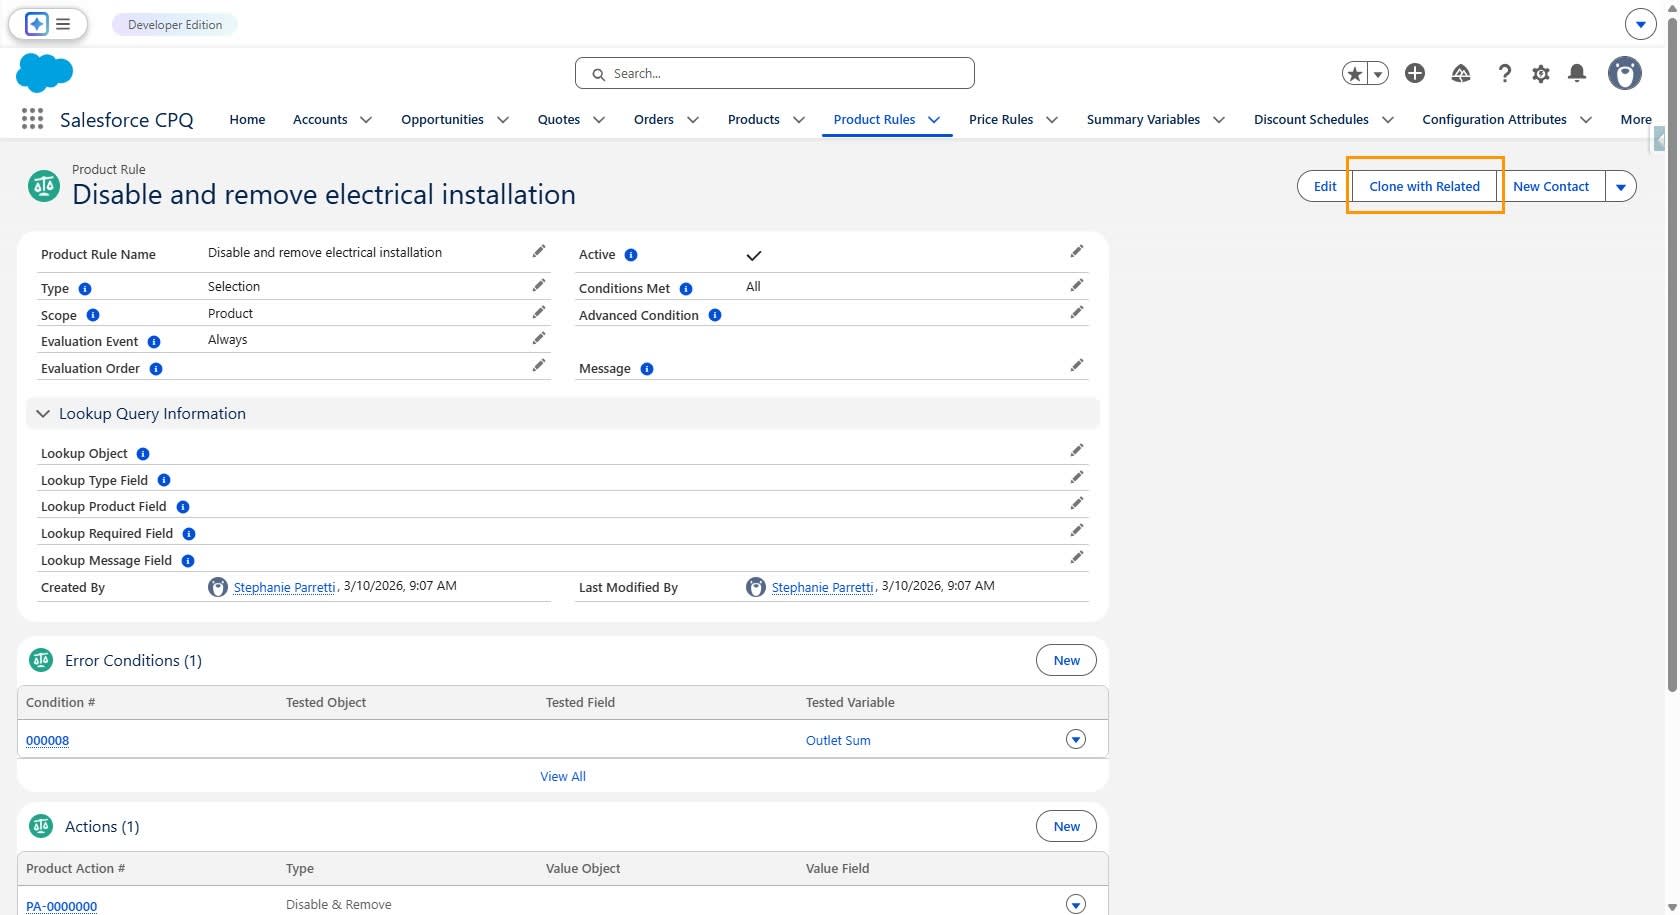
- Click Clone with Related.
At this point the rule isn’t cloned. You’re given a chance to preview what CPQ will create if you do clone the rule. You can expand each section using the arrows to the right.
- Click Clone.
Now to make some tweaks.
- Click Edit.
- For Product Rule Name, replace with
Enable and add electrical installation.
- For Evaluation Event, choose Edit.
If you left this as Always, then the installation would be selected upon saving the bundle even if it's not wanted.
- Click Save.
- In the Error Conditions related list, click Edit from the dropdown menu of the condition record.
- For Operator, choose greater than.
This makes the rule fire if any outlets are selected.
- Click Save.
Finally, let’s tell CPQ to enable the option and check it, since we strongly recommend adding electrical installation.
- In the Actions related list, click Edit from the dropdown menu of the action record.
- For Type, choose Enable & Add.
- Click Save.
The “clone and reverse” method is done, so our rules are ready. There’s one last thing to do to make sure your rules run when you want them to. Remember, rules shouldn’t evaluate on every little change to a bundle, that would be taxing to both the system and the sales rep’s patience. You need to make sure CPQ evaluates your rules the moment a sales rep makes an edit to the Smart Outlet options. You do that by setting Apply Immediately to true for all three options.
- From the navigation bar, click Products, then choose the All Products list view.
- Click Home Automation Hub.
- Click the Related tab.
- In the Options related list, click View All.
- Click Edit from the dropdown menu of the Smart US Power Outlet option.
- Check Apply Immediately.
- Click Save.
- Repeat steps 5 to 7 for the Smart UK Power Outlet and Smart EU Power Outlet options.
You’ve invested a lot of effort into these rules, so let’s make sure they work as expected.
- From the navigation bar, click Quotes, then choose the All list view.
- Click Q-00041.
- Click Edit Lines.
- Click Add Products.
- Check Home Automation Hub.
- Click Select.
Immediately you should see that the Electrical Installation option can’t be checked. Great, now let’s see if you can get it enabled.
- Check Smart US Power Outlet.
The screen dims for a second, which indicates that your rules are running. Soon you should see that the Electrical Installation option is checked and the box is no longer gray. Sales reps can uncheck installation if they want to, but now it’s less likely that they forget to offer the service.
- Uncheck Smart US Power Outlet.
The Electrical Installation option should go back to gray and unchecked.
Well done! Before you celebrate, there are a few important considerations when using selection rules to add products. First, sales reps may not always realize when options are automatically added. Second, if a sales rep unchecks electrical installation, then does something unrelated that causes rules to run again, the option gets checked again (because the rule ran again). In both instances, sales reps can accidentally sell something they didn’t intend to. For that reason it’s a good idea to train users in what to expect when configuring bundles that use selection rules.
Resources