Build a Package.xml Manifest
Learning Objectives
After completing this unit, you'll be able to:
- Build a package.xml file.
- Pull specific metadata from your org using package.xml.
Create a New Project
To keep the unmanaged package and the project organized, it's a good idea to create a workspace (or simply a directory folder) to store the metadata you are working with. Let's create a new project to catch the metadata on your machine.
- In the terminal window in VS Code, navigate to the Documents directory (or wherever you want the project to be) with this command.
cd Documents
- Create a new project by running the following command. This creates our new project named: PackageXMLProject.
sf project generate -n PackageXMLProject
This step builds a collection of folders and files that make it easier for you to use the Salesforce CLI to manage metadata and packages.
- Navigate to the new project folder by copying and pasting the following command, then pressing Enter.
cd PackageXMLProject
Build a Package.xml Manifest
The time has come for the first big step in our adventure. We've talked a lot about package.xml files, and now it's time to build one yourself. As you write this file, keep in mind the names of the metadata components identified in this XML. Each component declared in package.xml will be pulled into the project you just created when you retrieve metadata from your playground. Be sure that you have all the components you want to grab properly listed and named in the package.xml file.
- In the VS Code app, click File > Open (macOS) or File > Open Folder (Windows).
- Select Documents (or the directory you chose above) and then select PackageXMLProject.
- Click Open.
- Click Explorer (
 ).
).
- Open PACKAGEXMLPROJECT and click the new file icon

- Name the new file
package.xml.
- Next, identify the metadata to be pulled by copying and pasting the following XML into package.xml.
<?xml version="1.0" encoding="UTF-8"?>
<Package xmlns="http://soap.sforce.com/2006/04/metadata">
    <types>
        <members>CUSTOM OBJECT API NAME HERE</members>
        <name>CustomObject</name>
    </types>
    <types>
        <members>CUSTOM TAB API NAME HERE</members>
        <name>CustomTab</name>
    </types>
    <version>64.0</version>
</Package>
- Replace both the CUSTOM OBJECT API NAME HERE and the CUSTOM TAB API NAME HERE with
Sticker__c.
- Click File > Save.
Once the XML file is ready, it should look something like this: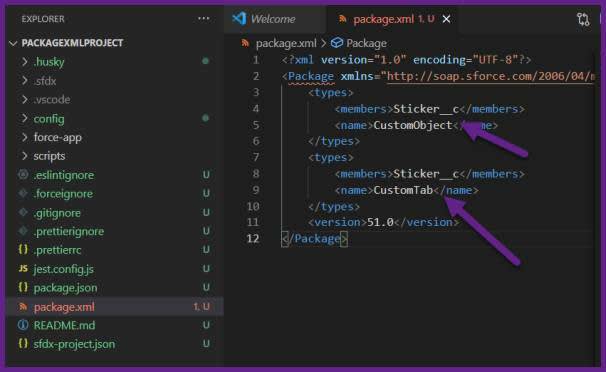
Pull Metadata Package from Playground
The next step is to pull the existing metadata out of the org and into the project by using the package.xml file created in the previous step and a Salesforce CLI command.
- In the terminal window in VS Code, run the following command to retrieve the metadata identified in the package.xml file:
sf project retrieve start -o DevHub -x ./package.xml
This command retrieves the metadata referenced in the XML file (-x) from the org, and adds the metadata files to the force-app folder.

Once the command is finished running, it's a good idea to visually confirm the assets identified in the package.xml are in their correct folders.
- In the VS Code folder tree, confirm that the
Sticker__cobject and tab are in the force-app/main/default folder.
For example, the package.xml file specifies that we grabbed only a custom object named Sticker__c. When you click into the force-app/main/default/objects folder, you should see a folder namedSticker__c, containing a file namedSticker__c.object-meta.xml.

Now that you've pulled the metadata from your playground into your project, the next step is to create a scratch org and use it to create more components for the application.
Create a Scratch Org
Next, create the scratch org that you'll use to make changes to the metadata files and build more components for the sticker app.
- In the terminal window in VS Code, run the following command to create a scratch org. You should also set this scratch org as your default, so be sure to use the -d flag.
sf org create scratch -f config/project-scratch-def.json -d
Typically, the command completes in less than a minute.
You get two items in the output: the org ID and the username. Be sure to copy those down for later.
Now that you have a safe place to do some development, let's create some components and add them to the sticker project.
Resources
- Salesforce DX Developer Guide: Create Scratch Orgs
- Salesforce DX Developer Guide: Salesforce DX Project Structure
- Salesforce Metadata API Developer Guide: Sample Package.xml Manifest Files