Walk Through a Migration
Learning Objectives
After completing this unit, you’ll be able to:
- Outline the steps required to migrate from legacy Chat to enhanced Chat.
- Identify prerequisites for setting up enhanced Chat.
- Explain how to update your website and Salesforce automation after creating an enhanced Chat deployment.
Prepare for Migration
Migrating from legacy Chat to enhanced Chat is a multistep process, but following a structured approach can help ensure a smooth transition. The complexity and time required depends on the size of your business and the level of customization in your current legacy Chat implementation.
For web chat, you can migrate some settings, such as custom labels and branding, with our migration tool. But overall, you’re implementing a powerful new chat solution.
Before you begin, it’s important to know that legacy Chat and enhanced Chat can be active in your Salesforce org at the same time. This allows for a staged rollout, minimizing disruption to your customer service operations.
Steps to Migrate
While every implementation is unique, here are the basic steps to migrate to enhanced Chat.
Step 1: Move to Lightning Experience
You can’t set up and configure enhanced Chat in Salesforce Classic. If you’re still using Salesforce Classic, it’s time to transition to Lightning Experience.
Step 2: Plan
Take time to assess what is and isn’t working in your legacy Chat implementation. In particular:
- What problems would you like to solve for your customers? For your service reps?
- What messages or types of content do your service reps send most frequently?
- What are the main tasks that service reps must perform with web or mobile app chat?
- What obstacles does your team run into when chatting with customers?
Then, make a list of the current customizations and automations that intersect with your legacy Chat implementation. Determine whether to retire, replace, or update each customization for enhanced Chat. For example:
- Apex triggers and classes
- Omni-Channel flows
- Sensitive data rules
- Reports
- Direct-to-Button routing
- Automation relying on standard and custom chat events
- Other types of automation
The Chat Transition Readiness Report analyzes your Legacy Chat implementation and highlights active deployments, configurations, and customizations, helping you assess the scale and complexity of your chat environment as you prepare for the transition.
Finally, decide which enhanced Chat tools address the needs you identified earlier, and build them into your migration plan. For ideas, see Enhanced Chat Optimization..
Step 3: Prepare Your Salesforce Org
Complete these prereqs to get your Salesforce org ready for enhanced Chat. For click-by-click steps, see Salesforce Help.
- Turn on and configure Omni-Channel.
- Create a service channel and a queue.
- Create an Omni-Channel flow if you plan to use one.
- Add messaging tools to the Service Console.
Step 4: Create an Enhanced Chat Channel and Deployment
Now it’s time to set up the core of your new chat experience. We recommend that you perform these tasks in a sandbox org first.

- Run the migration tool or use the quick start flow.
- To run the migration tool, click Migrate on the Migrate Chat Deployments page in Setup.
- To run the quick start flow, click New Channel on the Messaging Settings page in Setup.
- To run the migration tool, click Migrate on the Migrate Chat Deployments page in Setup.
- Set up pre-chat.
- Create a pre-chat form to collect info from customers at the beginning of a chat. For example, collect the customer’s name, email, and a brief description of their issue.
- Optionally, add hidden fields to your pre-chat form to collect information without the customer knowing.
- Update your Omni-Channel flow to map pre-chat field values to fields in Salesforce records.
- Create a pre-chat form to collect info from customers at the beginning of a chat. For example, collect the customer’s name, email, and a brief description of their issue.
- Set up branding and custom labels.
- If you used the migration tool, your legacy Chat branding and custom labels are preserved. Otherwise, configure these to match your business’s branding.
- If you used the migration tool, your legacy Chat branding and custom labels are preserved. Otherwise, configure these to match your business’s branding.
After you take these steps, publish your changes to the embedded service deployment associated with your new channel.
Step 5: Update Your Website (Web Chat Only)
- If you’re updating the chat on an external website that’s added as a Salesforce site, follow these steps.
- Insert the new enhanced Chat code snippet into your website.
- Remove the legacy Chat snippet.
- Insert the new enhanced Chat code snippet into your website.
- If you’re updating the chat on an Experience Cloud site, drag the Embedded Messaging component into the template footer.
For detailed steps, see Salesforce Help.
Step 6: Update Automation
- Review and update any automation related to your legacy Chat implementation, such as Apex triggers and flows, to work with enhanced Chat.
- This is a good time to set up features unique to the shared platform. Here are some ideas.
-
Messaging components: Implement interactive components like questions with predefined options, rich links, or forms to streamline interactions.
-
Sensitive data rules: Configure rules to automatically detect and mask sensitive information in conversations. If you were using sensitive data rules with legacy Chat, you must recreate the rules to keep using them in enhanced Chat.
-
Enhanced Omni-Channel and Omni-Channel flows: Get familiar with the ways that Omni-Channel can help your service reps and supervisors, and how you can use a routing flow (starting with a template) to route incoming messages according to criteria that you set.
-
Agentforce: Add an agent to your routing flow to provide AI-powered assistance to customers.
Step 7: Set Up Reporting Tools
Update your reporting to use the new data model.
- Customize the tabs in Omni Supervisor and customize the Supervisor Wallboard to give supervisors a bird’s-eye view of the team. This is an enhanced Omni-Channel feature.
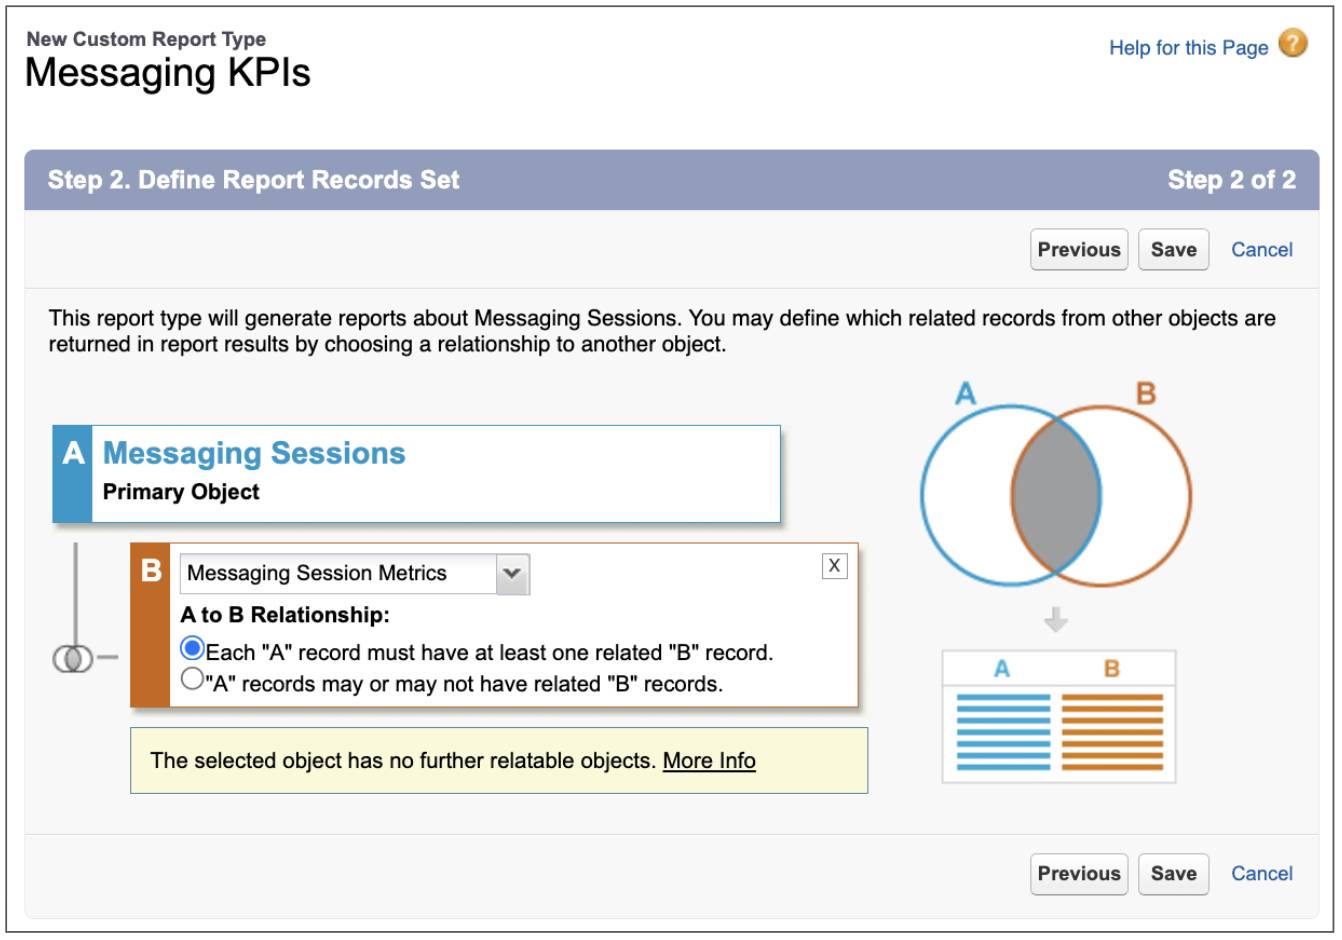
- To track response time and message count, start with a custom report on the Messaging Session object with Messaging Session Metrics as a secondary object.
- Remove any reports that were based on legacy Chat objects.
Step 8: Test, Test, Test
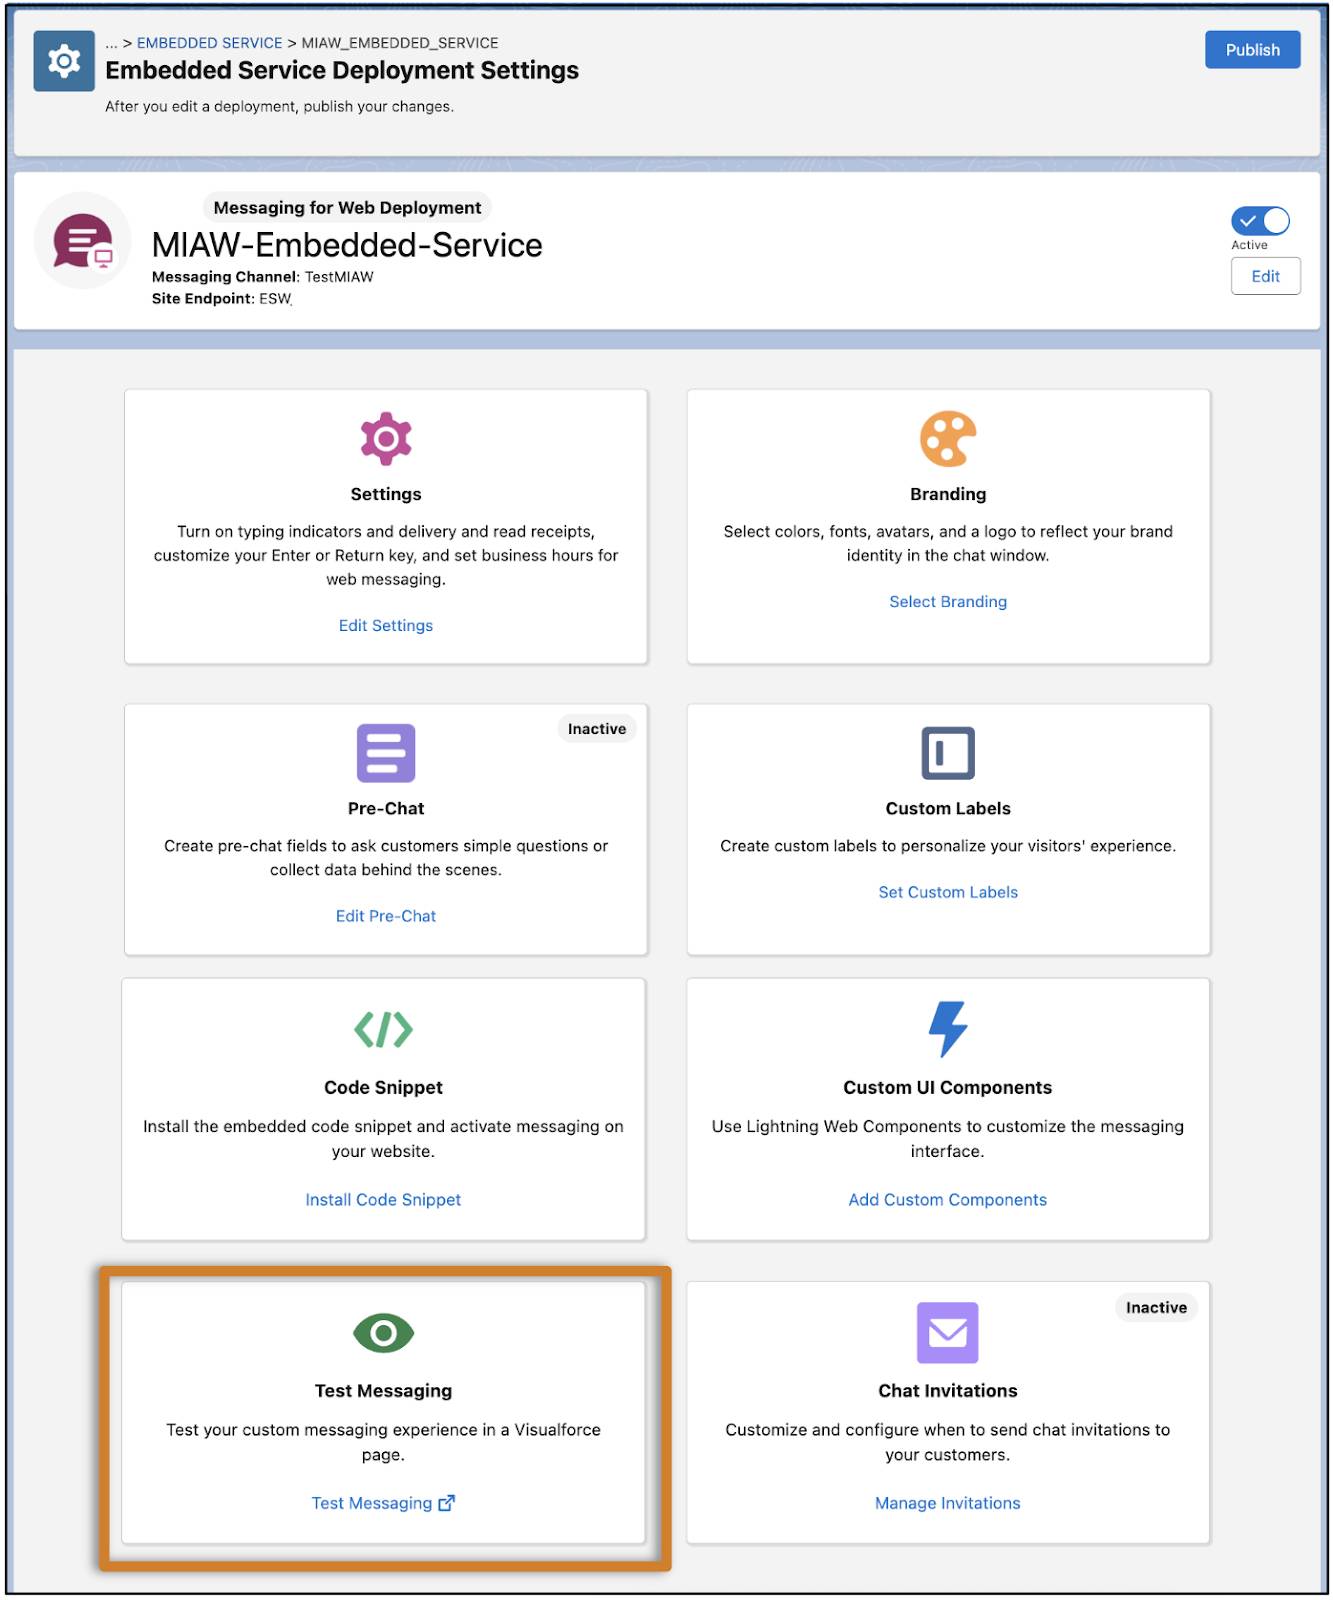
Throughout the migration process, continue to test the user experience for customers, service reps, and supervisors. To test a web deployment, click the Test Messaging option on your Embedded Service deployment.
Now that you’ve walked through the high-level migration steps, next review rollout strategies and best practices.