Work with Interaction Summaries
Learning Objectives
After completing this unit, you’ll be able to:
- Create an interaction summary.
- Add attendees to an interaction.
- Share an interaction summary.
- Search for an interaction summary.
Matt tells Rob that the Interaction Summaries feature is set up and ready to use. The timing is perfect. Rob and Charlie just returned from their meeting with the NTO CEO, Carmen Daniel. Rob is excited and logs in to the org immediately. Follow along as he explores Interaction Summaries.
Create an Interaction Summary
First, Rob creates an interaction summary on NTO’s account record page. The summary contains details of his discussion with Carmen.
- Open the NTO account record.
- On the Interaction Summaries component, click New. The New Interaction Summary window opens.
- In the Title field, enter
Discuss Dorjeling Kitchen Acquisition.
- In the Interaction field, select an existing interaction or create one. As this is Rob’s first time, he adds a new interaction. Click +New Interaction.
- On the New Interaction window, provide the following information:
- In the Name field, enter
Meeting with NTO CEO.
- In the Account field, select Northern Trail Outfitters (NTO).
- Provide other information like start and end times, interaction type, and location.
- Click Save.

- Back on the New Interaction Summary window, provide other details like account, interaction purpose, confidentiality type, and next steps.

- Click Save.
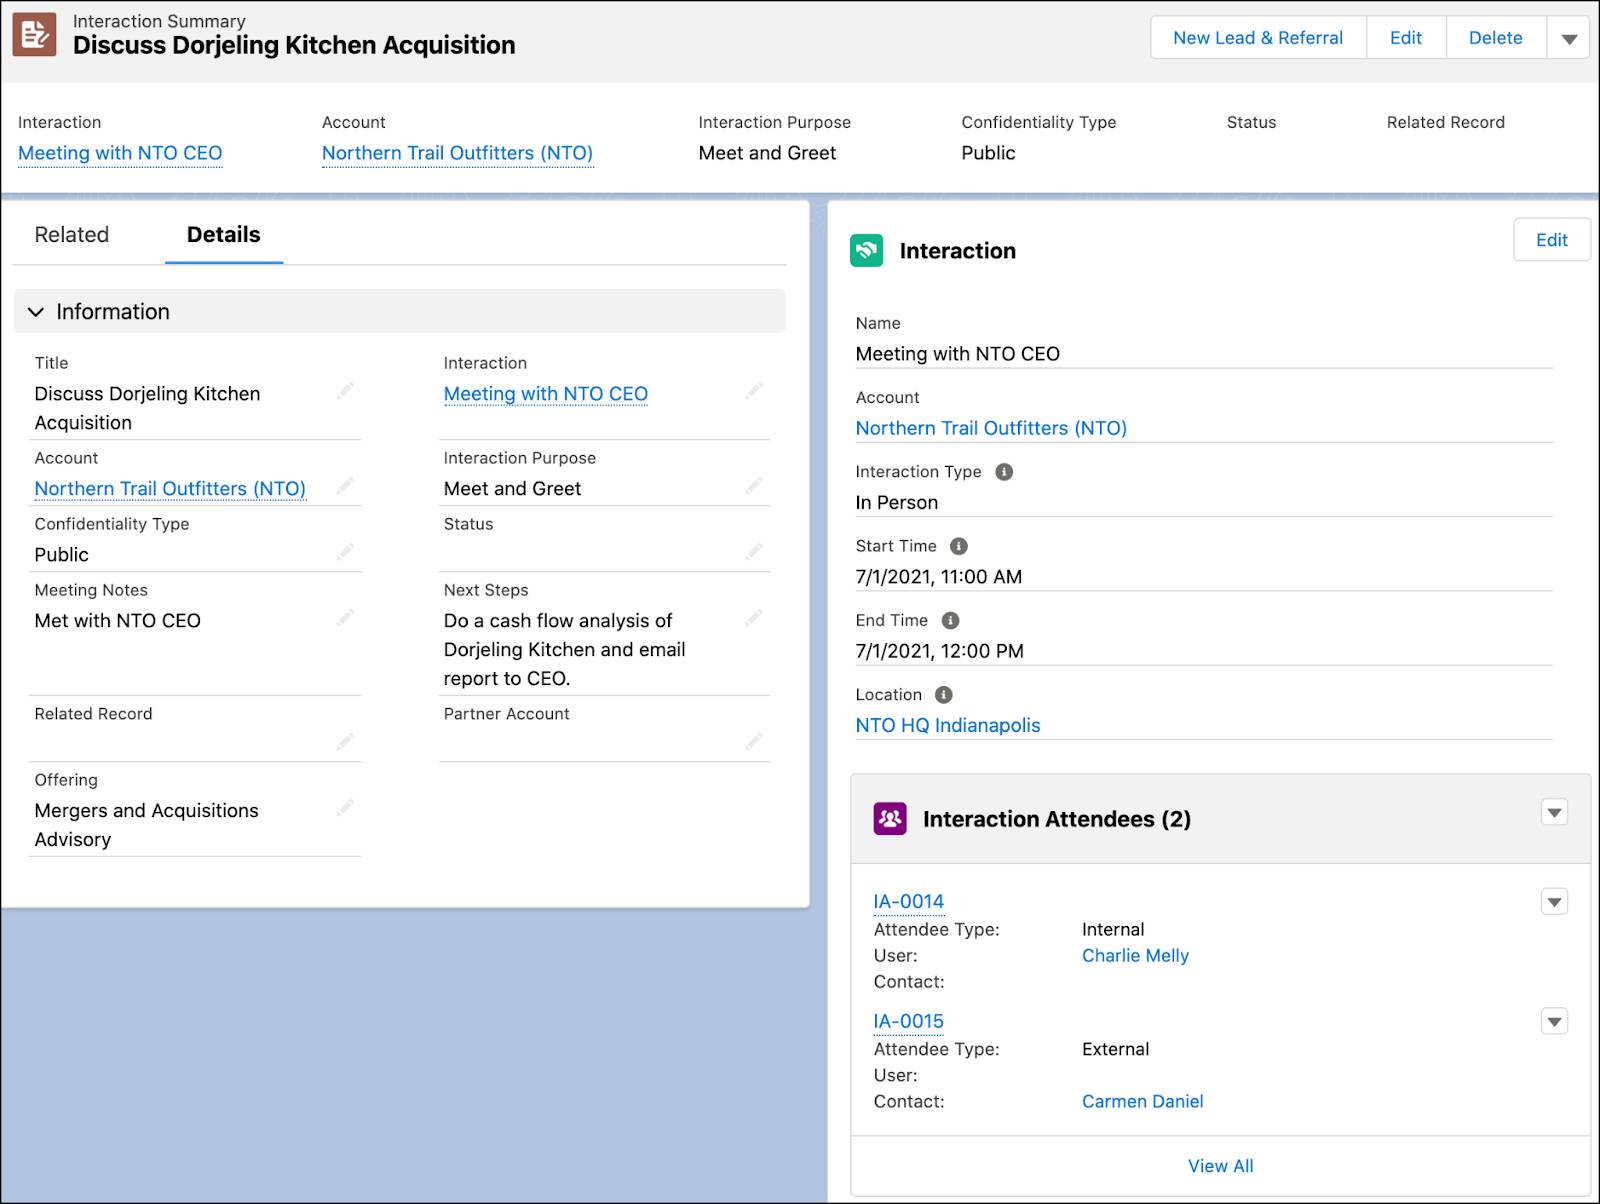
The newly created interaction summary appears in the Interaction Summaries component. Rob clicks it and is taken to the interaction summary record page that displays all the relevant details. Seeing such granular details about the meeting laid out in an organized manner causes a single tear of happiness to roll down Rob’s smiling face.

Add Attendees to an Interaction
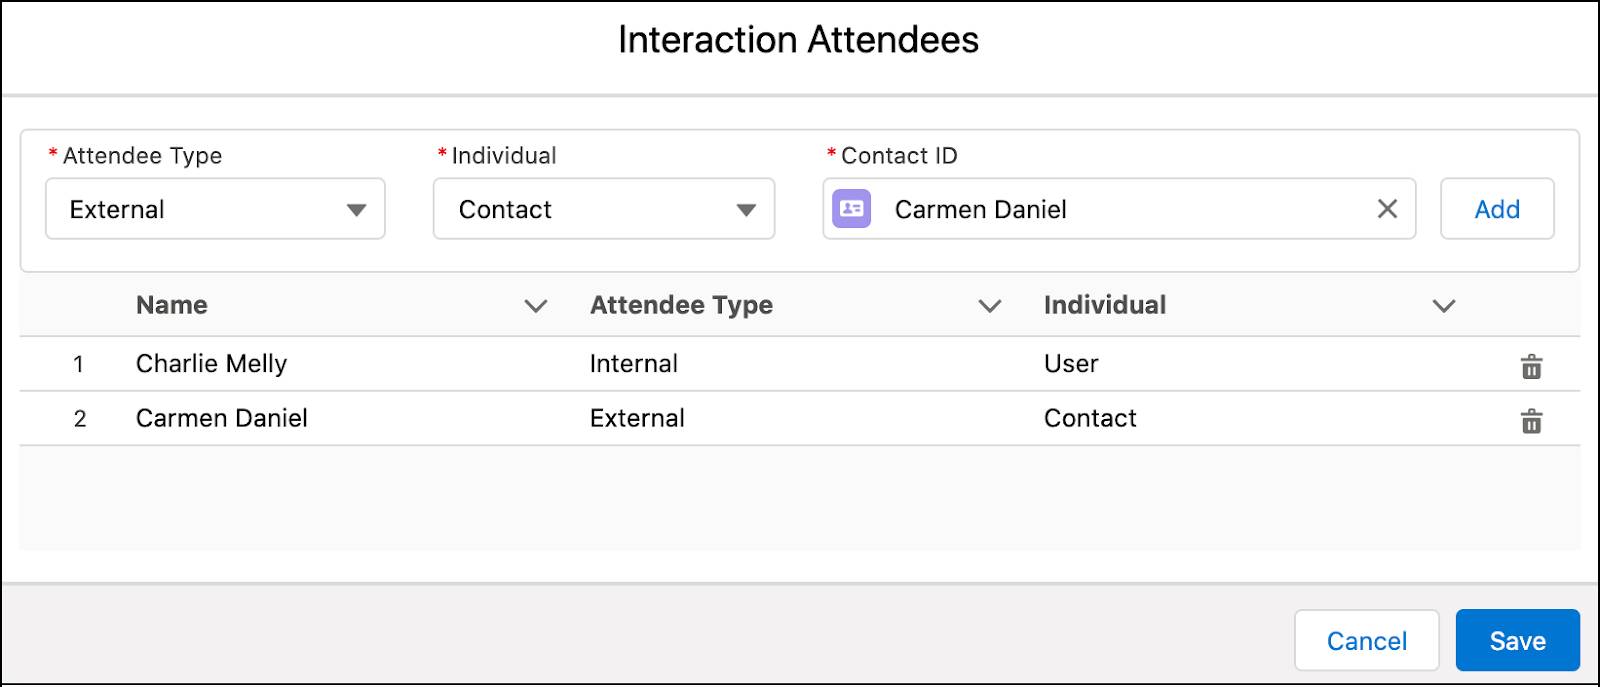
Next, Rob adds the meeting attendees using the Interaction Attendees component. He can add both external as well as internal attendees. Internal attendees are other org users like Charlie. External attendees are contacts like Carmen.
Here’s how Rob adds Charlie and Carmen as interaction attendees.
- Open the Meeting with NTO CEO interaction record.
- On the Interaction component, click Add Interaction Attendees.
- First, Rob adds Charlie as an internal attendee. On the Interaction Attendees window, provide the following information.
- In the Attendee Type picklist, select Internal.
- In the Individual picklist, select User.
- In the User ID field, search for and select Charlie Melly.
- Click Add.
- Next, Rob adds Carmen as an external attendee. On the Interaction Attendees window, provide the following information.
- In the Attendee Type picklist, select External.
- In the Individual picklist, select Contact.
- In the Contact ID field, search for and select Carmen Daniel.
- Click Add.

The Interaction Attendees component now shows both Charlie and Carmen as the attendees for the meeting.

Something else has happened in the background when Rob added the attendees to the interaction. He opens the Discuss Dorjeling Kitchen Acquisition interaction summary record. What does he see? The Interaction Attendees component is also populated with Charlie and Carmen’s names. Two tasks completed in one go! 
Share an Interaction Summary
During the meet and greet, Carmen requested a cash flow analysis of Dorjeling Kitchen. Rob noted that on the interaction summary so he doesn’t miss anything. Now he wants to share the interaction summary with Charlie so that Charlie keeps those points in mind while he works on the report.
Rob must also share the summary with the retail coverage team. Members of the team want to know how the deal is progressing and about the final deal pricing.
Here’s how Rob shares the interaction summary with Charlie and the retail coverage team.
- Open the Discuss Dorjeling Kitchen Acquisition interaction summary.
- On the Share Interaction Summary component, click Add.
- In the Add Interaction Summary Participants window, provide the following information.
- In the Users or Groups picklist, select User.
- Search for and select Charlie Melly. You can also select from the suggested list of users and groups.
- In the User or Groups picklist, select Group.
- Search for and select Retail Coverage Team.

- Click Next.
- For Charlie, select the Analyst role. For the Retail Coverage team, select Retail Coverage.
- Select Active for both Charlie and the Retail Coverage team.
- Click Finish.

Charlie automatically gets access to the interaction summary. After he’s done creating the cash flow analysis report, he can attach it to the summary.
Share an interaction with participants the same way. Remember that sharing an interaction with participants doesn’t automatically share the related summaries with them. Similarly, sharing a summary doesn’t automatically share the interaction it belongs to.
Search for an Interaction Summary
Rob has an important meeting coming up. He’s scheduled to meet the MD and update him on the final pricing of the acquisition. To prepare for the meeting, he decides to go through old summaries. But a quick look at the list and the problem is evident. There were several client interactions regarding pricing and his team members ended up creating summaries with different spellings: Dorjeling, Dorjiling, and Dorjilling. Oh boy! Sifting through all these typo-laden summaries, he’s bound to miss the important ones.
Smart search to the rescue! Interaction Summaries’ search functionality makes looking for old summaries simple. Search using the summary’s title, notes, next steps, or pretty much any text field. Not sure what you’re looking for? Use advanced search with wildcards like asterisk (*) and question mark (?) to optimize your search. Too many results? Refine them using quick filters to zero in on the exact summary you need.
Here’s what Rob does to find the interaction summary with pricing details for the Dorjeling Kitchen acquisition deal.
- From the navigation bar, open the Home page.
- In the search box of the Interaction Summaries component, enter
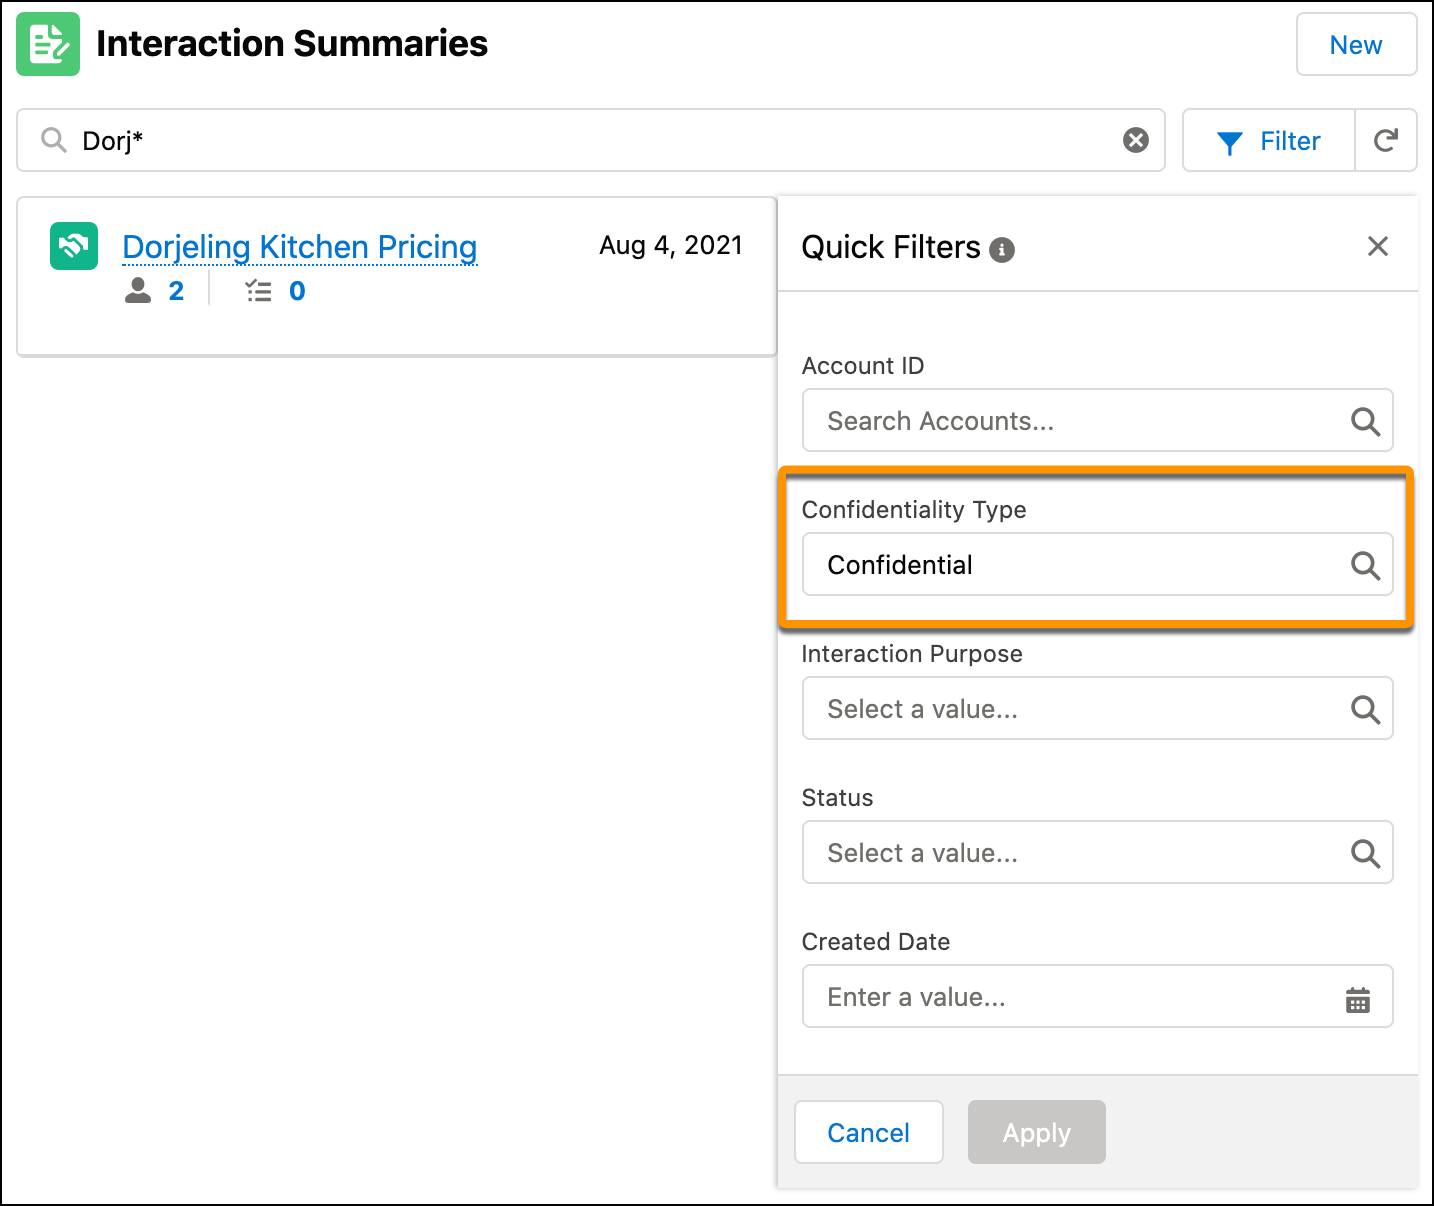
Dorj*and press Enter. The search results show all the summaries that contain the characters “Dorj”.
- There are three summaries of interest to Rob, the ones with “pricing” in the title. Rob knows that the summary that contains the final pricing has its confidentiality type set to confidential. With this information, he uses quick filters to refine the search results. Click Filter.
- In the Quick Filters box, select Confidentiality Type as Confidential and click Apply.

The results narrow down to one summary. Rob clicks the summary title, studies the details, and presto! He finds the summary he was looking for. He goes through the pricing details mentioned in the meeting notes and starts preparing for the upcoming meeting.
So Long, Nice Meeting You
Since Rob and his team have started using Interaction Summaries, their productivity has soared and customer relationships have improved. Rob no longer misses important details when he’s talking to clients. He uses the intelligent search for the full context of all past interactions like when he met them, what was discussed, and who attended the meeting. Clients are impressed at how well Rob remembers the smallest follow-up tasks from past meetings.
Compliance and accidental data leaks were always worrying points for Rob when sharing summaries containing MNPI, but not anymore. Thanks to CDS’s precision-based sharing, he has complete control over who has access to summaries and to what level. And CDS ensures that interactions and summaries are shared per Cumulus’s compliance and corporate regulations.
Interaction Summaries is also available on mobile devices, so Rob can create and search for summaries on the move. Sweet!
Once again Matt saves the day. With Interaction Summaries all set up and running smoothly, he retains his title as the super admin at Cumulus Capital.
Resources
- Salesforce Developers: Create an Interaction Summary
- Salesforce Developers: Add Attendees to an Interaction
- Salesforce Developers: Share an Interaction Summary
- Salesforce Developers: Search Interaction Summaries
