Assign Prices to Products
Learning Objectives
After completing this unit, you’ll be able to:
- Discuss best practices for planning product prices.
- Define pricing variables and pricing elements.
- Explain how to assign one-time and recurring prices.
- Describe how to reduce the price of a product over time.
Price Assignment
Infiwave pricing manager Ada has a pretty firm understanding of where to view prices in Shared Catalog. She’s now ready to start checking things off her to-do list. In this unit, follow her as she assigns prices to a few Infiwave products. But first, she needs to do a little prep work.
Ask the Right Questions
Before launching into any pricing endeavor, it’s important to understand your business goal and the components to use to get the best result. To do this, focus on the three W’s: who, what, and when.
Once you determine the three W’s, use specific components and settings to launch your price. Click the flashcards to learn which tools to use for defining your solution.
Earlier in this module, you explored price lists and how they control the prices customers see in the Cart. Now let’s learn about the other tools and settings.
Pricing Variable and Pricing Element
To establish the “what” portion of the price, you have two primary behind-the-scenes pricing components in EPC: pricing variables and pricing elements.
Pricing Variables
A pricing variable contains metadata that defines the type of pricing. When creating a pricing variable, you decide whether:
- The price is a regular charge or a penalty
- The price is a one-time charge or recurs on an ongoing basis, such as monthly
- The amount is charged to the customer or is a cost to your company
- The allowable payment type is currency or loyalty points
Pricing Element
A pricing element sets the actual amount and currency of the price. Pricing elements can be charges, adjustments, or overrides.
- Charges assign a base price or override a base price.
- Adjustments modify a base price by a percentage or an amount.
- Overrides replace the base price with a new amount.
Display Text |
Pricing Variable |
Pricing Element |
|---|---|---|
$9.99 |
Recurring, monthly |
Charge, $9.99 USD |
Effectivity Dates
Shared Catalog has a few different mechanisms to control the “when” of a product’s price. Use effectivity dates to define the duration when a price is active. You can configure multiple prices with staggered effectivity dates so the price automatically changes over time. Prices without an effective end date don’t expire.
For example, you might use effectivity dates to reduce the pricing of a product by 10% each month:
Base Price |
Effective From |
Effective Until |
|---|---|---|
$1300.00 |
May 1 |
May 31 |
$1170.00 |
June 1 |
June 30 |
$1053.00 |
July 1 |
July 31 |
Products with gaps between effectivity date ranges won’t appear in the Cart.
You can also control the timing of a price at the product level with time plans and time policies. You explore these components later in this module.
Product Price Assignment Workflow
Ada needs to add a one-time price for the new Infiwave Phone Accessory Pack product. First, she jots down a few quick notes to answer the three W’s.
Who? Business-to-consumer (B2C) customers
What? $9.99, one-time
When? Start date: Today; End date: Indefinite
She’s got all the information in hand and is ready to apply the price to the product.
Remember that for a product to appear in the product list in the Cart, it must:
- Have an active price
- Be set to Active
- Be set to Orderable
- Have valid selling period dates
Assign a One-Time Price
To begin assigning prices to products, launch Product Designer.

In the Products workspace (1), search for the Infiwave Phone Accessory Pack (2) and click its name to open it (3).

Select the product’s Pricing tab (1) and notice there are no existing price entries. Then click New Price (2). In the Add Price pane, add these details:
Property |
Description |
|---|---|
Active |
Check the Active slider |
Price List |
B2C Price List |
Display Name |
$9.99 |
Virtual Price |
Leave this unchecked |
Amount |
9.99 |
Currency |
USD |
Recurring Frequency |
One-time |
Start Date |
Today’s date |
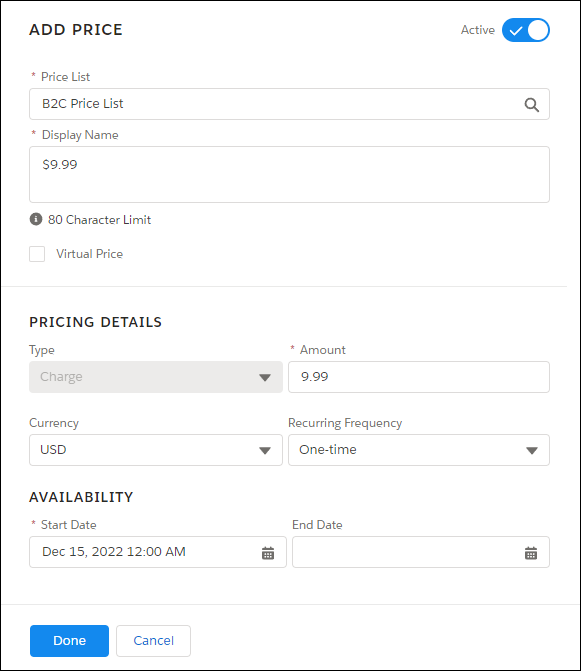
Click Done to save your changes.

The new, one-time price of $9.99 appears under the Prices section.
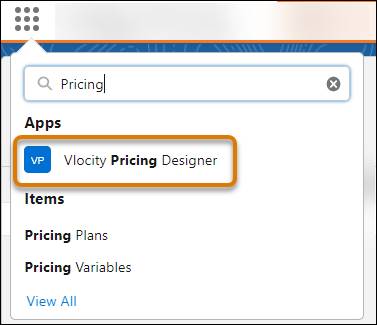
Assign a Recurring Price
Next up, you need to apply a recurring price to a new data plan product. This time, let’s add the price through Pricing Designer.
Using the App Launcher, locate and open Vlocity Pricing Designer.
As you want to make the product available to individual customers, select the B2C Price List in the PriceList workspace.

Before you create a new price, check whether there’s an existing pricing list entry for the product in the B2C Price List.

In the Charges tab, deselect the Show Active Only checkbox (1), and use the search bar to search for the No Limits Data Plan (2). As there’s no exact match, click New Charge (3) to create one.
Notice that this price configuration panel is very similar to the one in the product Pricing tab.

The difference is that here you must define the product that the charge will apply to. In the New Charge pane, enter No Limits Data Plan for the product name. Then set the price as 54.99, Recurring, and Monthly.
Decrease the Price of a Product Over Time
With another task out of the way, Ada checks her email and sees a message from the marketing team. They’re asking if she could reduce the price of the Infiwave Phone 10 starting next week. Ada smiles to herself because she knows this price decrease can happen automatically with effectivity dates.
Return to the Charges tab in the B2C Price List and search for and select the Infiwave Phone 10 product.

Click the charge in the list to open the Edit Charge pane. Change the date in the Effective Date: To field to six days from today.

Now, you need to define the new price and its effective dates. Click New Charge and fill in the necessary properties.

As you don’t know when the new pricing should end, leave the Effective Date: To field blank to keep the price active indefinitely. Notice there are now two price list entries for Infiwave Phone 10. In the Availability column, you can see the effective dates for each price.
Finally, check your work by launching a B2C order and adding the three products with the new prices.

Ada gleefully heads off to lunch, knowing that her pricing work just got so much easier with the help of Enterprise Product Catalog (EPC).
Next Up
In this unit, you learned how to plan product prices, apply prices in both Product Designer and Pricing Designer, and change a price amount over time. Next, you explore the many options for pricing product bundles in EPC.