Create Attribute Categories and Attributes
Learning Objectives
After completing this unit, you’ll be able to:
- Create product attribute categories in Product Designer.
- Create product attributes in Product Designer.
Attribute Category and Attribute Creation Overview
Devi, the product designer at Infiwave, has put together a list of attributes he wants to include for the company’s smartwatch products, such as band color, size, and capacity. He stores these attributes on a Smartwatch object type.

For some attributes, such as band color and band type, Devi wants to allow his customers to choose their preferences from a list of options, so he connects picklists to them. He plans to set the values of other attributes like the operating system at design-time because there’s only one available option.
To create attributes in Product Designer, Devi follows these steps.
- Create an attribute category.
- Create a product attribute and connect a picklist.
Create an Attribute Category
First things first: Devi creates an attribute category to contain the new smartwatch attributes.
- From the App Launcher
 , find and select Vlocity Product Designer.
 - In the Vlocity Product Designer navigation menu, select Vlocity Attribute Categories.

3. In the Vlocity Attribute Categories workspace, notice the list of existing categories. Click New to create a category.

4. On the New Vlocity Attribute Category configuration screen, define a Wearables attribute category.

This table explains the properties that you define when creating an attribute category.
| Property | Description |
|---|---|
|
Name |
Provide a short name for the attribute category. Attribute category names display as headings at runtime in the Cart’s product configuration windows. |
|
Code |
Provide a unique code for the attribute category. The code is only visible during design-time. |
|
Description |
Provide an explanation of the attribute category’s purpose. This is only shown at design-time. |
|
Applicable Types |
Select an object from the list to which the new attribute category applies. When creating product attribute categories, enter Product2. This is the base object that you use to create object types for products. |
|
Applicable Sub Type |
Select a record type to which the new attribute category will apply. When creating attribute categories, choose Product Attribute. You can also create attribute categories for profiles and contract terms. |
|
Display Sequence |
Enter a value to set the placement of the attribute category on the record detail page. This number must be unique across all attribute categories. We recommend using increments of 10 so you can insert categories into the sequence later. |
Create a Product Attribute and Connect a Picklist
With a new attribute category in place, Devi begins creating its associated product attributes.
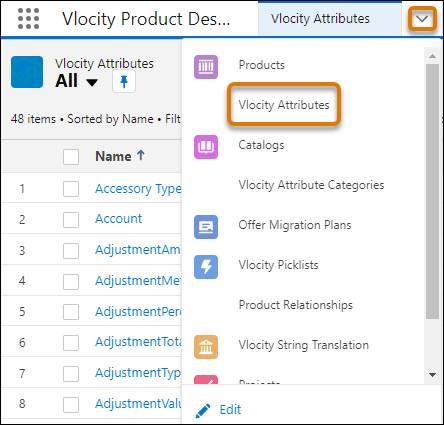
- In the Product Designer navigation menu, select Vlocity Attributes.
2. In the Vlocity Attributes workspace, click New.

3. On the New Vlocity Attribute screen, populate the fields for a Band Type attribute. Set the Value Type to Picklist, and select the Band Type picklist in the Picklist field.

Here’s a detailed explanation of these configuration properties.
| Property | Description |
|---|---|
|
Name |
Enter a short name for the product attribute. This required value is visible at run time in the Cart’s configuration window. |
|
Code |
Enter a unique attribute code. This required value is only visible at design-time. We recommend that you make this code unique and follow this format: ATT_ prefix followed by an alphanumeric value. You can also enter a label to indicate the type of attribute, such as RT for runtime, DT for design-time, or DC for decomposition. |
|
Description |
Describe the attribute's purpose here. This description is only displayed at design-time. |
|
Active |
Select this checkbox to make the attribute available for use across Shared Catalog. |
|
Attribute Category |
Define the associated attribute category. You must assign each attribute you create to an attribute category. Use this lookup field to search for and select the applicable category name. |
|
Encrypted |
Use the Encrypted checkbox to protect personal information and other private data, such as Social Security number. This allows only certain users access to the data. |
|
Value Type |
Enter a data type for the attribute. Options include Currency, Percent, Text, Number, Checkbox, Date, Datetime, Picklist, Multi Picklist, Percent, and Lookup. |
|
Default Value |
Enter either a Text or Number value. This value is not applicable if a picklist is connected to the attribute. |
|
Picklist |
To connect a picklist, select the name of the picklist here. |
|
Display Sequence |
Enter a unique number to indicate the sequence in which the attribute displays within the attribute category on the product details page in the Cart. Use a sequence of 10, 20, or 30 so that it’s easy to insert additional attributes later. For example, you can introduce a new attribute between 10 and 20 by setting the sequence number to 15. |
|
Filterable |
Click this checkbox to let users filter products by attributes in the Cart. |
|
Exclude From Basket Cache |
Select this checkbox only for those attributes that don’t affect pricing or configuration validity. When you enable this checkbox, API requests related to pricing or configuration bypass the attribute and improve performance. |
4. After you configure these properties, select the applicable objects to which the attribute applies.

Make sure to select the Product object so that the attribute displays in lookup fields during object type and product configuration.
Let’s check back in with Devi. He breathes a sigh of relief as he builds out the other smartwatch attributes. In his previous system, he had to manually define attributes each time he built out a new product and their functionality was very limited. What a pain! With Shared Catalog, he creates attributes once and applies them as needed to swiftly build out new products. When the time comes to create a new smartwatch product, he can reuse these attributes and assign unique values to them to customize the offering.
In this module, you’ve learned all about picklists and attributes in Shared Catalog. With these foundational components in place, you’re ready to begin building object types that store this product metadata.
Want to Learn More?
If you’re a Salesforce customer, check out these learning journeys to find out how to skill up on our amazing suite of digital transformation tools and industry applications.
- Communications Cloud Developer
- Communications Cloud Consultant
- Media Cloud Developer
- Media Cloud Consultant
- Energy & Utilities Cloud Developer
- Energy & Utilities Cloud Consultant
If you’re a Salesforce partner, you’ll find the same great learning plus additional partner resources on Partner Learning Camp (login required). #AlwaysBeLearning