Set Up Einstein Relationship Insights
Learning Objectives
After completing this unit, you’ll be able to:
- Create an Einstein Relationship Insights Growth account.
- Set up a connected app.
- Add the Einstein Relationship Insights component to Accounts and Contacts.
Set Up Einstein Relationship Insights
In this module, we assume you’re an admin for Einstein Relationship Insights with the proper permissions to set it up. If you’re not an admin for Einstein Relationship Insights, that’s OK. Read along to learn how your admin would take the steps in a production org. Don’t try to follow these steps in your Trailhead Playground. Einstein Relationship Insights isn’t available in the Trailhead Playground.
Linda decides to set up Einstein Relationship Insights and configure its components for the sales team. First, she assigns the ERI Growth license to sales reps.
- Click
 , and select Setup.
- In the Quick Find box, enter
Permission, and select Permission Sets.
- Select ERI Growth User to assign the Einstein Relationship Insights Growth license.
- Click Manage Assignments.
- On the Assigned Users page, click Add Assignment.
- Select the users you want to assign the license to, and click Next.
- Select an expiration option for assigned users, and click Assign.
Next, she must set up her Einstein Relationship Insights Growth account.
- Click
 , and select Setup.
- In the Quick Find box, enter
Einstein, and select Einstein Relationship Insights.
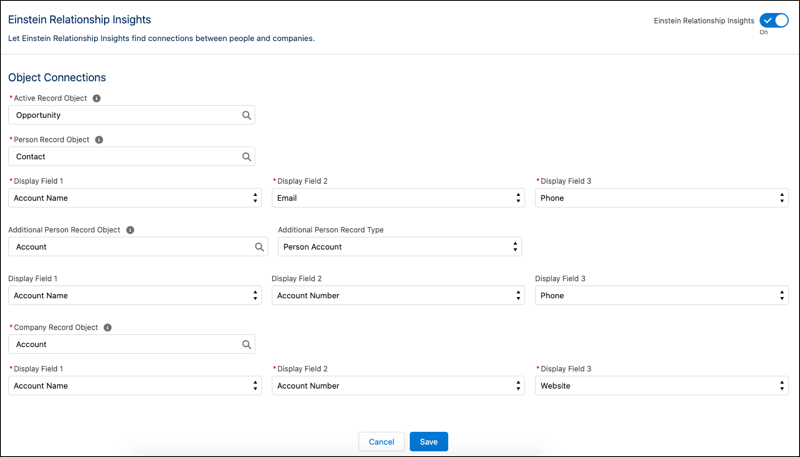
- Select a Person Record Object. Linda selects Contact for this record.
- Select the values for Display Field 1, Display Field 2, and Display Field 3. These display fields help the sales rep select the correct matching record when there are multiple matching records. Linda selects Account Name, Email, and Phone.
- Select Add Person Record Object to add another person record object. Linda selects the custom person type record, Representative. The display fields are filled in by default.
- Select a Company Record Object. Linda selects Account. The display fields are filled in by default.
- Select Add Company Record Object to add another company record object.
- Click Save.

After configuring her account, Linda sets up the Connected Apps framework so that external applications can integrate with Cloud Kicks. She begins by adding the connected app, Einstein Relationship Insights Canvas App, to Einstein Relationship Insights. Here’s how she does it.
- Click
 , and select Setup.
- In the Quick Find box, enter
connected, and then select Manage Connected Apps.
- Edit the Einstein Relationship Insights Canvas App.
- From the Permitted Users dropdown list, ensure the option Admin approved users are pre-authorized is selected.
- Click Save.
Next, she provides herself access to the connected app, Einstein Relationship Insights Canvas App.
- Click
 , and select Setup.
- In the Quick Find box, enter
profiles, and select Profiles.
- On the Profiles page, click System Administrator.
- Click Edit.
- Under Connected App Access, enable Einstein Relationship Insights Canvas App.
- Click Save. Repeat the steps for any profiles that need access.
Add Einstein Relationship Insights to Accounts and Contacts
To make sure that the sales team at Cloud Kicks can access Einstein Relationship Insights, Linda adds the Einstein Relationship Insights component to the page layouts of Accounts and Contacts.
- From the settings menu for the object whose page layout you want to edit, click Edit Page.
- Drag the Einstein Relationship Insights component onto the page.
- Save your work.
With Linda having completed the setup, Jose and their sales team can now begin exploring Einstein Relationship Insights.
