Add Custom Filters and Icons
Learning Objectives
After completing this unit, you’ll be able to:
- Enable filters for the dispatcher console.
- Create and share a custom filter for service appointments.
- Add a custom icon field to the page layout for service appointments.
- Add a custom icon to the Gantt.
Enable Custom Filters
Jacinta starts out her day by looking at her long list of service appointments. She loves the existing filters, like Unscheduled and In Jeopardy, because they show her immediate priorities.
She had some ideas for new filters and wants to create her own. She talks to her admin, Maria, to get started.
Before Jacinta can create any filters, Maria must enable them.
- From the App Launcher
 , find and select Field Service Admin.
 - Click the Field Service Settings tab.
- Click Dispatcher Console UI and select Enable Custom Filters.
Create a Custom Filter
Everything is ready for Jacinta to create as many custom filters as she wants. Maria recommends that she creates fewer than 15 filters so as not to affect performance. Jacinta laughs. She has only one custom filter in mind (so far).
Jacinta wants a filter that displays only appointments that take several hours to complete. She likes to make sure that this kind of appointment is scheduled early in the day because it’s the most complex. She wants her field service workers to get to the complicated appointments while they’re still fresh.
- From the App Launcher
 , find and select Field Service, then click the Field Service tab.
 - To the right of the filter picklist, click
 and select New.
 - Enter the name, description, and dates to select. Jacinta enters the following.
- Name:
Long Jobs - Description:
Show jobs longer than 4 hours - Date Selection: Jacinta enters
3for the number of days before and after the selected horizon date. The filter displays only appointments that fall within that date range.
- Name:
- Set the field criteria. Jacinta sets criteria for two fields.
- Jacinta sets the first field criteria. She chooses Duration as the field, greater or equal as the operator, and 4 as the value. That’s for jobs that take more than 4 hours.
- Jacinta sets the second field criteria. She chooses Status as the field, does not contain as the operator, and Completed as the value. She doesn’t want to see jobs that are already completed, just jobs left to do.

- Choose the fields to display. Jacinta wants to display the default fields in the Service Appointment List Columns field set, so she leaves it blank.
- Decide whether to share the filter with other dispatchers. Jacinta wants to share, so she selects Make this filter available to all users.
- Click Save.
Jacinta’s new filter shows up in her picklist. She scans her long jobs and makes sure they’re assigned when she wants them to be.
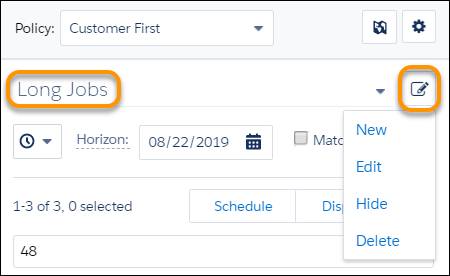
If she decides she doesn’t need her custom filter anymore, she can edit, hide, or delete it.
- Select the custom filter in the filter picklist. Jacinta selects Long Jobs.
- Click
 and choose the desired option.
Jacinta has created and shared her filter, and she knows how to hide or delete it later.
Add a Custom Icon to the Gantt
Custom icons on service appointments let dispatchers visually identify information about the appointment. For example, add a VIP icon to indicate a customer with a high-level service agreement. Jacinta wants to show her appreciation for workers who go above and beyond by putting a sunny icon on challenging completed service appointments. Workers love those little rays of sunshine. But how can she add a custom icon to a service appointment on the Gantt?
First, Maria must add the Gantt icon field to the page layout for service appointments so Jacinta can see it on the Gantt.
- Click
 then select Setup.
 - Click Object Manager.
- Click Service Appointment, then click Field Sets.
- Click Service Lightbox.
- Drag the Gantt Icon field to the In the Field Set section.

- Click Save.
Maria checks to make sure that the new field displays properly. If you try these steps in your org and can't see the Gantt icon field, make sure that you've assigned the page layout you changed to the correct user profiles.
Jacinta is ready to add her icon to a deserving service appointment.
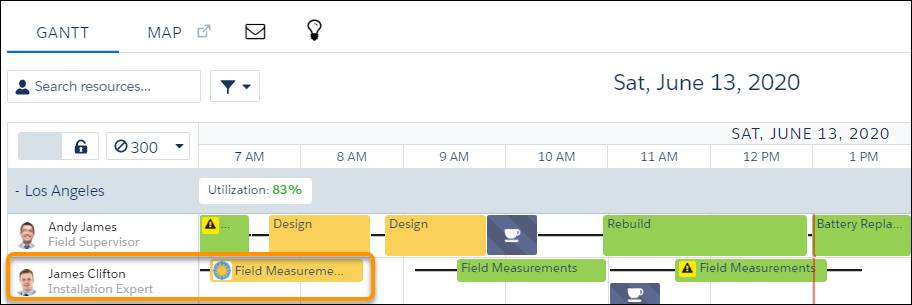
- In the Gantt, right-click the service appointment and choose Details. Jacinta right-clicks James Clifton's first appointment.
- In the Details tab, click Edit.
- Enter the icon URL in Gantt icon. Jacinta enters
https://www.salesforce.com/news/wp-content/uploads/sites/3/2021/05/Salesforce-logo.jpg?resize=1536,864. - Click Save Changes and close the tabs.
- Refresh the Gantt to view the icon. (Your screen may not look exactly like this screenshot.)

In this unit, Maria and Jacinta worked together to customize the dispatcher console. First, Maria enabled custom filters for Jacinta, then Jacinta created a custom filter for Long Jobs. After that, Maria set up the service appointment page layout for Jacinta, and Jacinta added her first sunshine icon to a worthy service appointment. That’s teamwork.