Add a Custom Action
Learning Objectives
After completing this unit, you’ll be able to:
- Define the functionality and location of a custom action.
- Create an Apex class using sample code.
- Set permissions for the Apex class.
- Add a custom action to the dispatcher console.
Display Custom Actions Where Users Need Them
Jacinta comes to Maria with another request. Sometimes, mobile workers contact her to tell her that they’re ill or an appointment is running over. These schedule changes jeopardize their next appointments, putting them at risk of not being completed today. Jacinta wants to set those appointments’ status to In Jeopardy right from the Gantt. Can Maria help?
You bet she can. Maria can create a custom action and add it to Jacinta’s Gantt to set appointment status. Custom actions can either call an Apex class or open a Visualforce page. They can be run on records in several areas of the dispatcher console. Maria decides that this action is best accomplished using an Apex class.
Maria asks Jacinta where she’d like to see the custom action. Maria lists the places where an admin can add custom actions to the dispatcher console.
- The service appointment list on individual or multiple appointments
- The Gantt on individual or multiple appointments
- The Gantt on individual mobile workers or resource absences
- Polygons on the map (the action runs on the appointments within a polygon)
Jacinta requests that Maria add the custom action to individual service appointments on the Gantt. Maria is ready for the next steps.
- Write the Apex class.
- Assign permissions to the class.
- Add the custom action to the dispatcher console.
Write an Apex Class
Maria checks to see if the code for Jacinta’s request already exists. She’s thrilled to find an Apex class code sample that does just what she needs in the Field Service Developer Guide. She uses the toggleServiceAppointmentJeopardy class provided there to get the job done.
- Click
 and select Developer Console.
 - From the File menu, select New | Apex Class.
- For the class name, enter
toggleServiceAppointmentJeopardyand then click OK. - Select all the code in the developer console and delete it.
- Enter the new code. Maria pastes in the code sample.
global class toggleServiceAppointmentJeopardy implements FSL.CustomGanttServiceAppointmentAction { global String action(List<Id> serviceAppointmentsIds, Datetime ganttStartDate, Datetime ganttEndDate, Map<String, Object> additionalParameters) { List<ServiceAppointment> saList = [SELECT FSL__InJeopardy__c, AppointmentNumber FROM ServiceAppointment WHERE Id in: serviceAppointmentsIds]; String reply = ''; List<String> saNames = new List<String>(); for (ServiceAppointment s : saList) { s.FSL__InJeopardy__c = !s.FSL__InJeopardy__c; saNames.add(s.AppointmentNumber); } upsert saList; reply = String.join(saNames, ', '); return 'Service Appointments successfully processed: ' + Reply; } } - Select File | Save.
Maria’s new class is saved in the list of Apex classes.
Assign Permissions
Although Maria has created the class, she can’t add it to the dispatcher console until she sets up the proper permissions.
First, she sets up custom permissions for her new Gantt custom action.
- Click
 and select Setup.
 - In the Quick Find box, enter
permission. - Select Custom Permissions.
- Click New.
- Enter the label, name, and description. Maria enters the following.
- Label:
toggle Service Jeopardy - Name:
toggle_Service_Jeopardy - Description:
Grant permission to view and use the toggleServiceJeopardy class on the Gantt.
- Label:
- Click Save.
Then she creates a custom permission set for her lead dispatchers and adds her newly created permission.
- Click
 and select Setup.
 - In the Quick Find box, enter
permissionand click Permission Sets. - Click New.
- For Label, enter
Lead Dispatcherand click Save. - In that tab, scroll down and click Custom Permissions.
- Click Edit.
- Select toggle Service Jeopardy and click Add.

- Click Save.
- Click Manage Assignments.
- Click Add Assignments.
- Check the box next to your name and click Assign.
Maria has the correct permissions to add the action to the dispatcher console. One more step and she’s done.
Add the Action to the Dispatcher Console
Maria is ready to add that new action to the dispatcher console so Jacinta can see it.
- From the App Launcher
 , open Field Service Admin.
 - Click the Field Service Settings tab.
- Open Dispatcher Console UI and click Custom Actions.
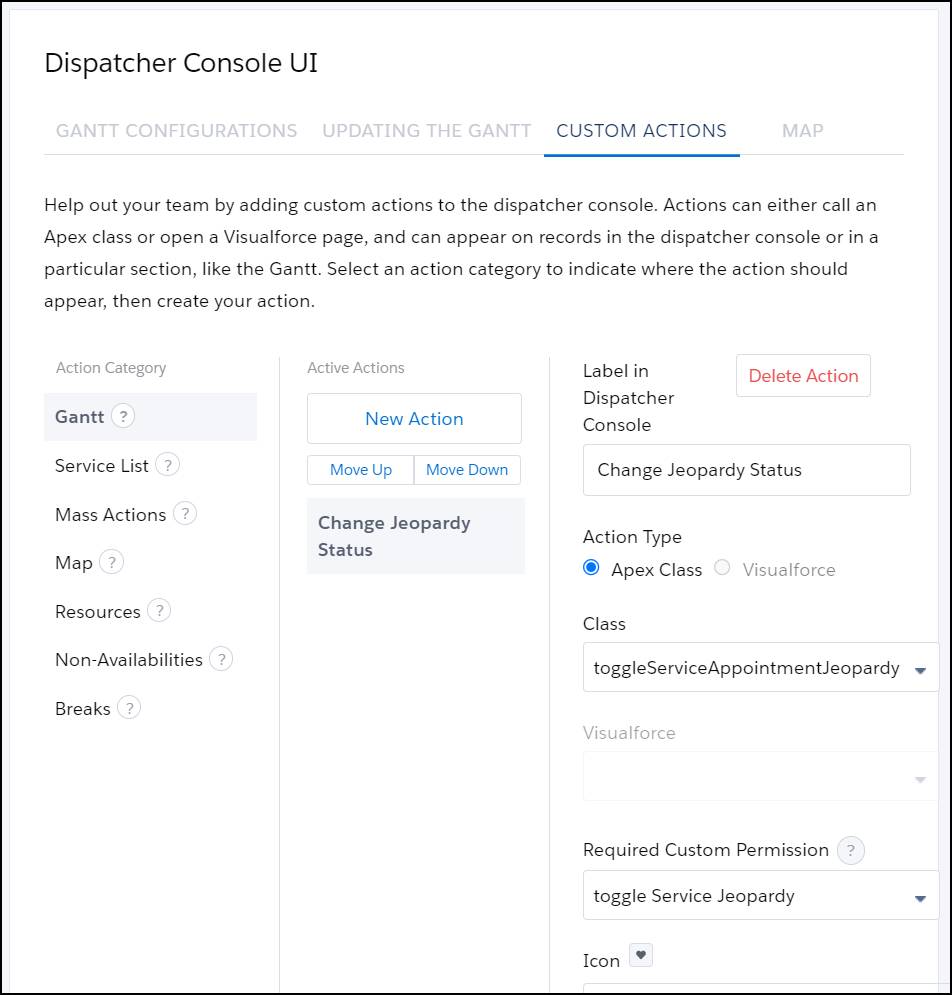
- In the left-hand column, select an action category to define the location and scope of the action. Maria selects Gantt.
- Click New Action and enter the details. Maria enters the following.
- Label in Dispatcher Console:
Change Jeopardy Status - Action Type: Apex Class
- Apex Class: toggleServiceAppointmentJeopardy
- Required Custom Permission: toggle Service Jeopardy
- Icon: Select an icon to display next to the action label.

- Label in Dispatcher Console:
- Click Save.
Maria tells Jacinta that her new action is ready to go. When Jacinta right-clicks an existing service appointment on the Gantt, she sees an option to change its jeopardy status. To select multiple service appointments, she holds down the Ctrl key and selects them.

Maria added an action to the Gantt. She defined the action, decided where to put it, found a code sample that did what she needed, and set the permissions. Then she added it to the Dispatcher Console UI setting. Now Jacinta can change service appointment jeopardy statuses as needed.
Maria and Jacinta have customized the dispatcher console to meet the team’s needs. Remember when we asked you to think about ways to customize your own dispatcher console? We bet you now have some great ideas.