Manually Upload Currency Rates
Learning Objectives
After completing this unit, you’ll be able to:
- Describe how to prepare the currency conversion file using the Spiff template.
- Explain how to upload currency conversion rates into Spiff.
Introduction
Markets can fluctuate rapidly, sometimes even within hours. For a business that employs commission-based sellers and works with clients around the globe, it’s crucial to have a commission management system such as Salesforce Spiff equipped with the appropriate rules, processes, and data.
Imagine your seller closing a deal with a Japanese client and earning their commission in Yen. If you haven’t set up your Spiff instance to handle seamless currency conversion to your company’s currency, things can quickly get complicated. Quotas can be miscalculated, forecasts can show errors, and timely payments to your sellers can be at risk.
The simplest solution? Automate currency rate updates by integrating with Salesforce. If syncing currency rates isn’t an option, upload the rates manually using Spiff’s currency template. This provides Spiff with the data it needs to ensure the formulas you’ve set up work like a charm and currency conversions happen without a hitch. So, keep reading to learn how to set up this process.
Prepare the Currency File
If you choose to manually upload currency rates to Spiff, the first step is to prepare your currency file. Here’s what a completed currency file typically looks like.
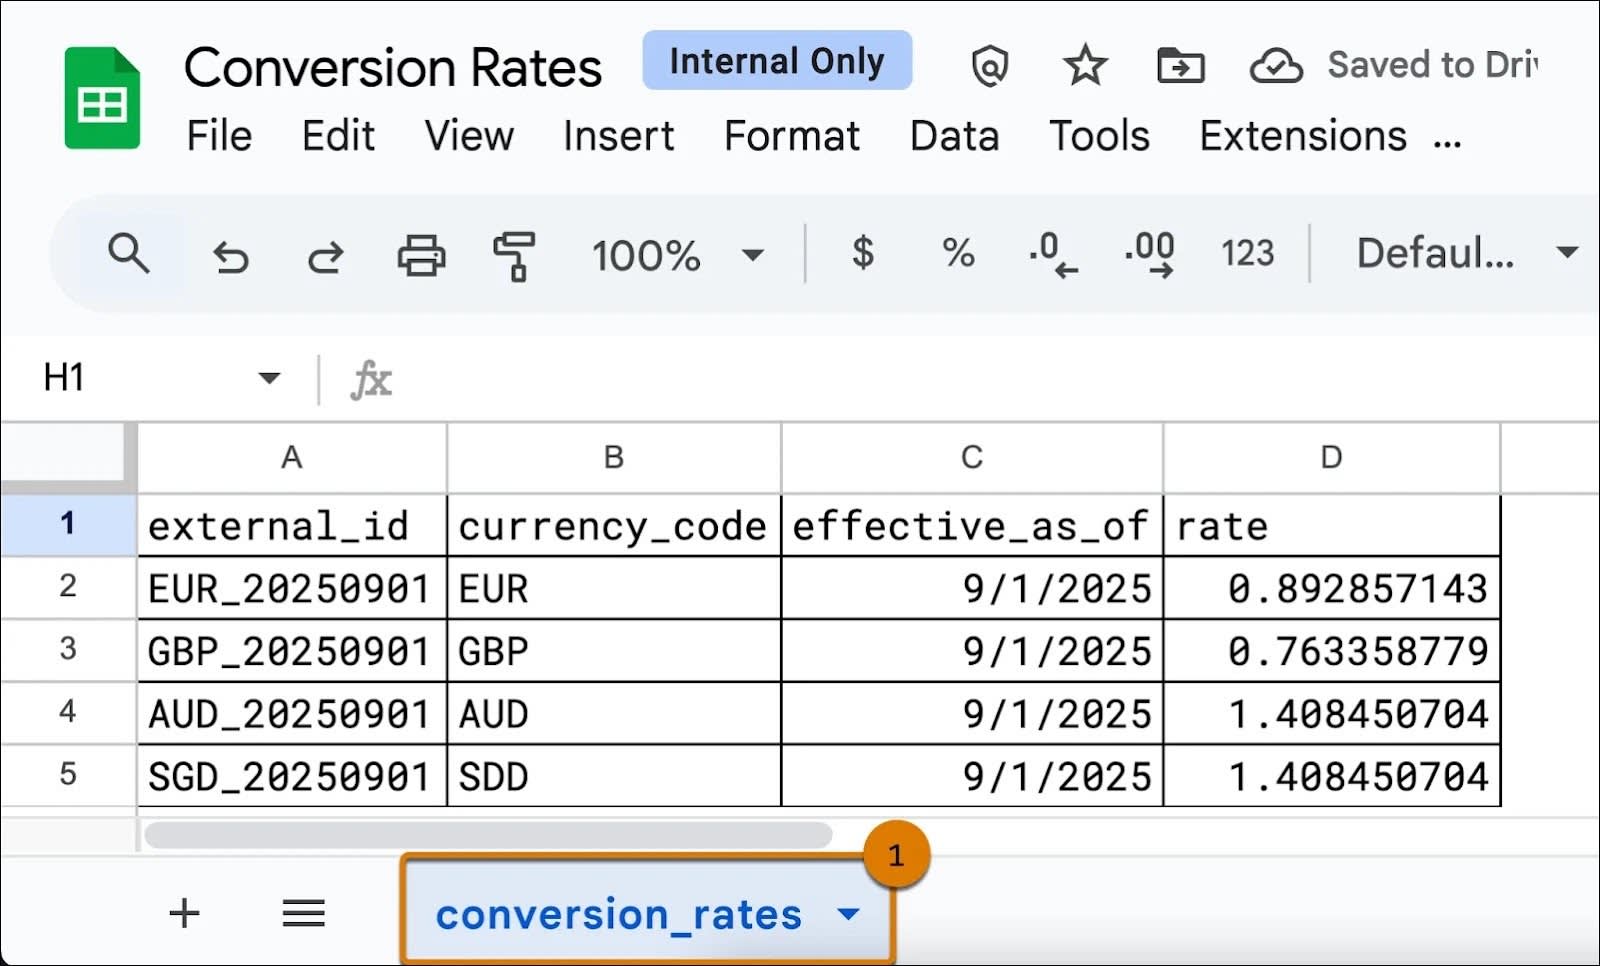
The process is simple—just download the template, fill in the columns for each field, and you’re good to go. Need help? Check out this table for a detailed explanation of what each field represents and how to fill it out.
Field Name |
Description |
|---|---|
external_id |
This is a record’s unique identifier. Instead of overwriting an existing record when updating a rate, it’s best practice to upload a new record with its own unique external ID. This ID corresponds to the record’s effective date and rate. A common approach is to concatenate the effective date with the currency code to create this unique identifier. |
currency_code |
This is the three-character ISO code for the currency. For supported currencies, see Currency in Salesforce Spiff in Salesforce Help. |
effective_as_of |
This is the date when you apply the conversion rate. |
rate |
This is the rate for converting from corporate currency to the currency specified in the currency_code field. All conversions are based on the corporate currency defined in Settings under Admin. |
Make sure to name the sheet conversion_rates. This is important to make sure that the data is mapped to the currency table in Spiff.

Now that you've downloaded the template and filled in the necessary details, you're one step closer to streamlining your currency management process. The next step is to upload the completed file to Spiff and make sure everything works smoothly.
Upload the Currency File
Spiff provides two options for uploading currency rates. Choose the process that best fits your workflow.
Upload via Data Sources
Here’s how to upload currency rates using the Data Sources tab.
- Navigate to Data Sources and locate the Data Imports section.
- Click
 . This opens up a window to import your currency rates file.
- Click Browse your computer and upload the file you prepared in the previous section. On your first upload, Spiff creates a new conversion_rates object. Select this object for future uploads.
- Click Next. In the Identify Primary Key tab, make sure that external_id is set as the primary key.
- Click Next.
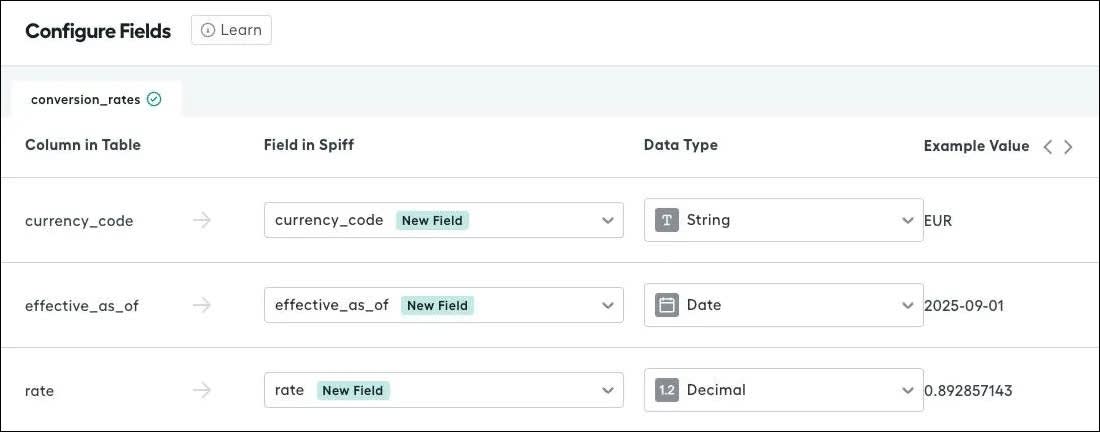
- Set the data type for each field. Set currency_code as String, effective_as_of as Date, and rate as Decimal.
- Click Next.
- Handle duplicate records. If there are duplicate records in your file, choose Override Existing Fields to replace the old entries with the new data. If the file contains only new records, select Skip duplicate records to avoid changing existing entries.

- Click Finish.
After Spiff processes your import, go to the Conversion Rates object in Data Sources. For each record, view details such as the creation date, updates, currency code, effective date, and rate.

Upload via Admin Tab
Use these steps to upload currency rates through the Admin tab.
- Click the Admin tab and select Users from the list.
- Click Currency Rates.
- Click Edit.
- Click
 . This opens up a window to upload your currencies.
- Click Browse your computer and select the currency file you prepared earlier. Your records are successfully added to the table.
Uploading currency rates in Spiff is a straightforward process that ensures your data is accurately imported and up-to-date. By carefully selecting your upload method, handling duplicates appropriately, and verifying the imported records, you can simplify your workflow and maintain reliable conversion rate data. In this next unit, learn all about managing your currency conversions.