Create Campaign Members and Monitor Their Engagement
Learning Objectives
After completing this unit, you’ll be able to:
- Describe who can be added to campaigns.
- Customize campaign member status options.
- Use Clone with Related Records to save time on campaign configuration.
Get Ready to Engage Your Stakeholders
Michael, the Communications Specialist at No More Homelessness (NMH), has set up campaign records in Nonprofit Success Pack (NPSP) for his first advocacy training workshop, but what’s a workshop without people?
It’s time for Michael to create custom statuses to collect responses, set up his other events, create a list of people to invite, send the invitations, and track responses. He’ll do all that using the campaign he created in the last unit.
Campaigns Need Campaign Members
In Salesforce, the people you add to a campaign need to first have either a contact or a lead record. When you connect either record to a campaign Salesforce creates a campaign member record, which allows you to track responses. That’s key data for organizing and understanding how well your campaigns perform.
Most data on a campaign member record pulls directly from the related lead or contact record, but you can use an additional field to track someone’s status in the campaign. For example, after you add campaign member records to a campaign, and send an invitation to an event, the status could be Sent. If they never respond, this status doesn’t change, but if they register for the event, you can change the status to a value like RSVP Yes.

Exciting, right? So before Michael starts adding campaign members to his advocacy training workshop, he must decide what statuses he wants to use to track invitations.

Create Custom Campaign Member Statuses
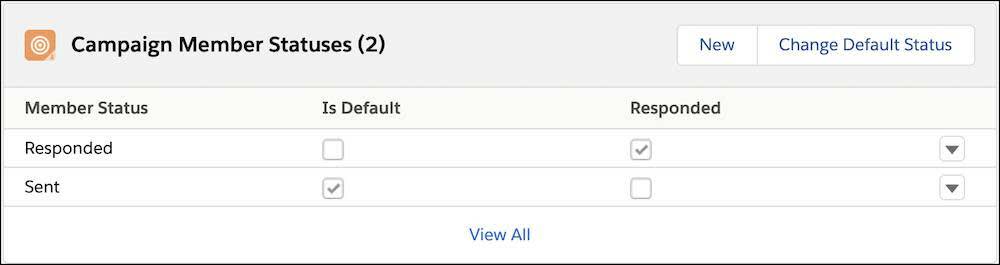
Two statuses are automatically set up for every campaign: Sent and Responded. Depending on how you use campaigns, that might be enough. Things aren’t always binary, though, and they definitely aren’t for Michael and NMH.
For each individual campaign, you can add your own statuses and apply them as needed to each campaign member. Because custom campaign member statuses are set for each campaign, you should work out a set of common statuses for all your different campaign types to make reporting clear and easy.
At NMH, the team decides to keep the standard status Sent for events and add RSVP Yes, RSVP No, Cancelled, Attended, and No Show for events. Let’s see how Michael adds these new campaign member statuses to an upcoming advocacy training workshop campaign.
- Find the campaign record you’re working with. Michael’s working with Event: June 2021 - Advocacy Training Day and finds it through global search.
- Click Related.
- In the Campaign Member Statuses section, click New.
- Enter the new Member Status. Michael enters
RSVP Yes.
- Optionally, you can check the Responded box. This indicates that the campaign member has replied in some way and allows this status to be included in the responded campaign summary roll ups. Michael checks the box to make sure RSVP Yes is included.

- Click Save.
Michael repeats the process for each of the other campaign member statuses the NMH team wants to add (which are RSVP No, Cancelled, Attended, and No Show) and removes Responded, because it's redundant now. When he’s done, Michael verifies that the default status is applied to each campaign member. Sent is the current default status. That’s what the team wants, but if they change their minds Michael could use the Change Default Status button and select a different option.
With all of the campaign member statuses set up, this is the full list.

Clone Campaigns with Related Records
With the campaign member statuses set, Michael now has everything he needs to make a copy of this campaign record to create his other advocacy training workshop events as campaigns. The campaign he created can serve as a template from which similar campaigns can be cloned.
Here’s how he does this:
- At the top of the record, click the Clone with Related button.

- In the interface, check the box for the related records you would like to clone with the campaign. Michael checks the box next to Campaign Member Status.
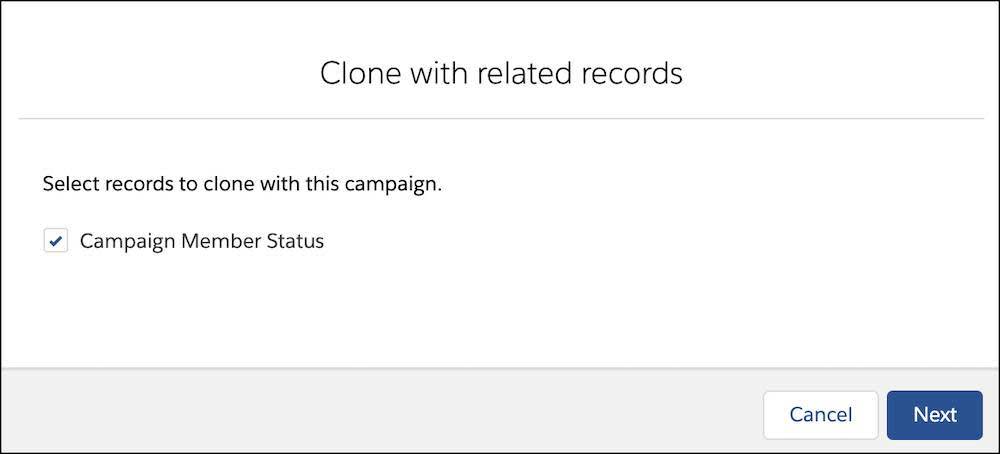
- Click Next.
- Change the relevant details on the next screen to make a new campaign record. Michael updates the Campaign Name, Start Date, and End Date to create the July event.

- Click Save.
This creates a new campaign with the same details and custom campaign member statuses. Michael has decided to clone the record now because he knows that cloning with related records only includes statuses, not campaign members, too.
Speaking of members, it’s time to add those to the June event.
Add Campaign Members to a Campaign
Michael can add a select group of leads and contacts as campaign members so that he can invite them and track responses.
There are a few ways to do this:
- Add individual campaign members from contact or lead record detail pages. This is a good option if you just need to add a few specific people to a campaign.
- Add contacts or leads using the Manage Campaign Members option in the dropdown on the Campaign Members related list. If you can segment your list based on a single field value, this option might be right for you.
- Add up to 200 contacts or leads from a list view. This is helpful if you want to add dozens of contacts or leads with some simple segmentation.
- Add up to 50,000 members from lead or contact report results. This is a great option for segmenting a list by multiple criteria or adding a large number of campaign members to a campaign.
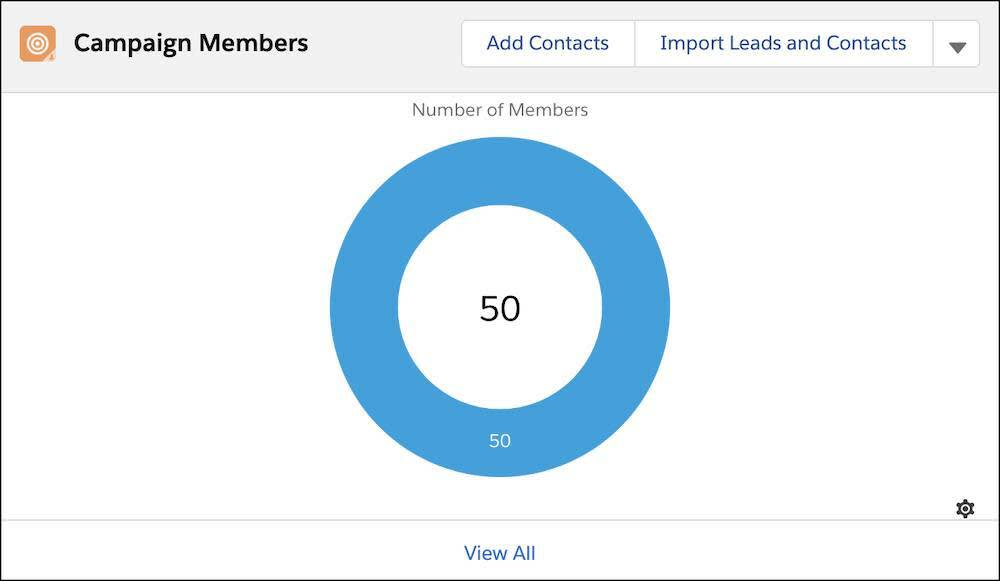
Michael decides to use a list view because he’s not planning to send more than 200 invitations. NMH already has a list view for contacts that have volunteered and made a donation last year, and Michael’s team feels that this segment of supporters will be most interested in becoming advocates. (And, this is important: Even though Michael is focusing on contacts at the moment, he could follow the exact same steps from the lead object to add leads as campaign members.)
Let’s see how Michael adds members from his list view:
- Go to the Contacts or Leads tab. Michael clicks on Contacts.
- Click the List View name to select the list you would like to use. Michael clicks Volunteers and Donors (Last Year), which the NMH team has set up for itself.
- Click the checkbox at the top of the column to select all records in the list. You could also select just a few contacts or leads by clicking individual checkboxes.
- Click Add to Campaign.

- In the Campaign field, find and select the campaign for these contacts. This is where your easy-to-remember, transparent naming convention comes in handy. Michael selects his campaign, Event: June 2021 - Advocacy Training Day.
- Select the Member Status. You should see custom statuses if you set them up. Michael chooses Sent as the status, which is his default.
- Select either Keep existing Member Status or Update to the selected Member Status for any existing campaign members, which will affect existing members of the campaign. Michael doesn’t have any members on this campaign yet, so he leaves it as Keep existing Member Status.

- Click Submit.
Now that Michael has added this list of contacts to the campaign, they each have a campaign member record that he can access and manage from the related list on the campaign record.
Just remember that adding contacts to a campaign, regardless of how, only connects records in Salesforce. You still need to reach out to your campaign members, be it by email, phone calls, a letter, or singing telegram.
If you use a tool like Marketing Cloud Engagement you can sync the lists and emails you are building with those tools and vice versa (check out the Get Started with Marketing Automation for Nonprofits Trailmix in Resources for more on these options). Review the resources below to explore other options that might best meet your specific needs.
Then we continue on to talk about how to start tracking responses in the next unit.
Resources
-
Salesforce Help: Customize Campaign Member Statuses
-
Salesforce Help: Add Members to Campaigns
-
Trailhead: Lightning Experience Productivity
-
Trailhead: Lightning Experience Customization
-
Trailhead Trailmix: Get Started with Marketing Automation for Nonprofits
-
Salesforce Help: Track Accounts as Campaign Members (Beta)