Set Up an Approval Process
Learning Objectives
After completing this unit, you’ll be able to:
- Create an approval process for shifts.
- Request for shift approval.
- Respond to shift approval requests.
Create an Approval Process
Matt has completed the prerequisites for the final step of his plan and now he’s ready to carry out the step. It’s time to set up the approval process that Cumulus retail bankers use to submit shift approval requests. Cumulus branch managers and partner branch managers use the approval process to approve or reject requests. Retail bankers can also recall their shift approval requests.
To set up the approval process, Matt must complete these tasks.
- Create a process that sends requests to all the approvers in the queue when Cumulus retail bankers submit shift records for approval.
- Add an approval step to specify which records can advance to the next step.
- Add the actions that must be performed when a shift is approved, rejected, or recalled.
Create Shift Approval Process
Matt uses the Standard Setup Wizard to create the approval process. Among other things, the wizard allows him to specify which records are eligible for approval process, specify which notification templates to use, and specify who can submit approval requests.
Here’s how Matt uses the Standard Setup Wizard to create an approval process.
- Click
 , and then click Setup.
 - In the Quick Find box, enter
Approval Processes, and click Approval Processes. - From the Manage Approval Processes For dropdown list, select Shift.
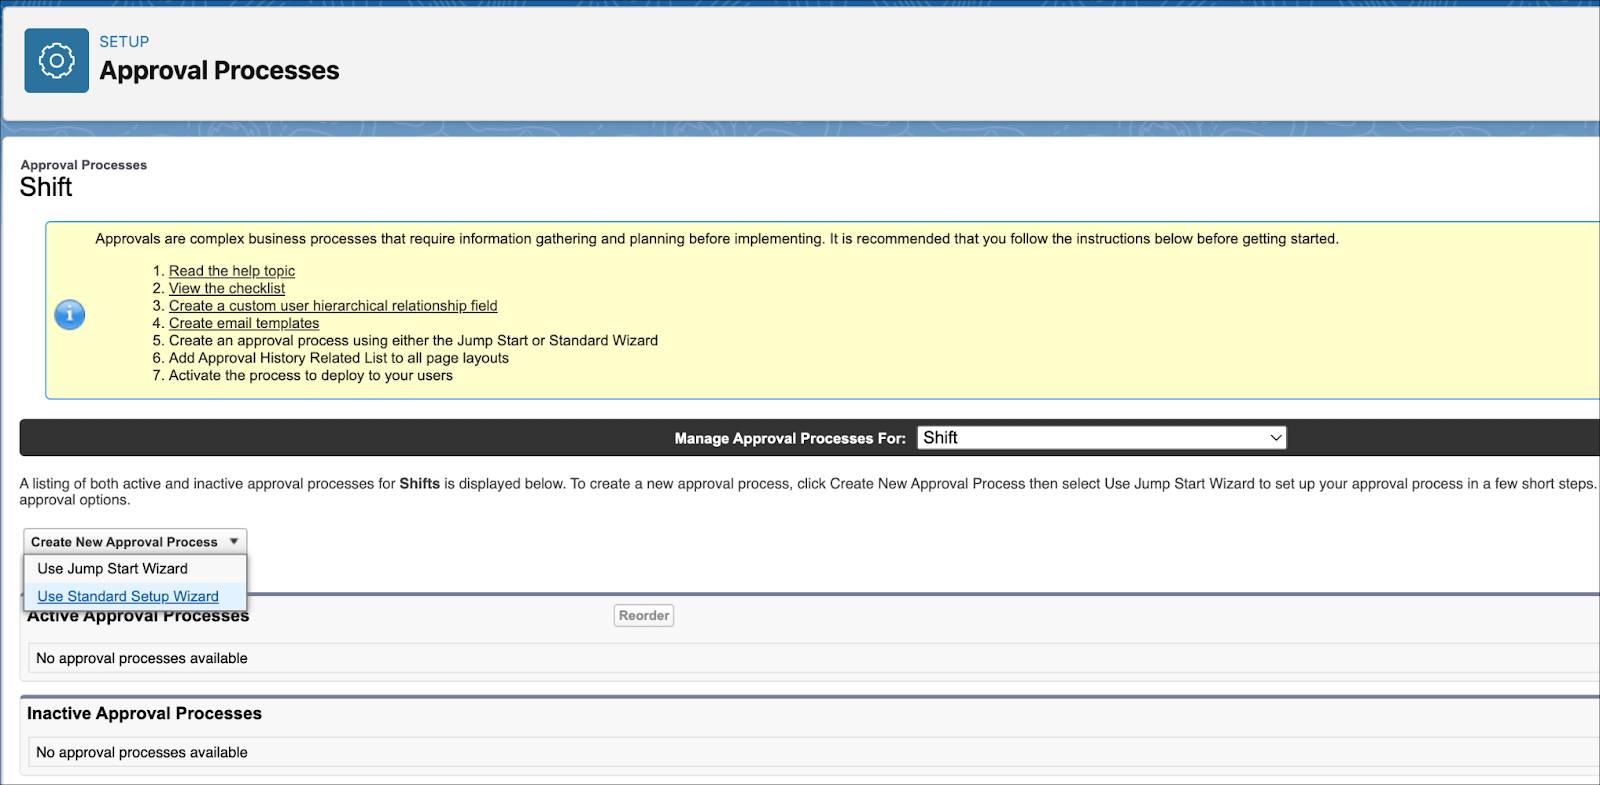
- From the Create New Approval Process dropdown list, select Use Standard Setup Wizard.
- In the Enter Name and Description step:
- Enter
Shift Approval Process_Retail Bankersas the name, and then press Tab to auto-populate the unique name. - Click Next.
- Enter
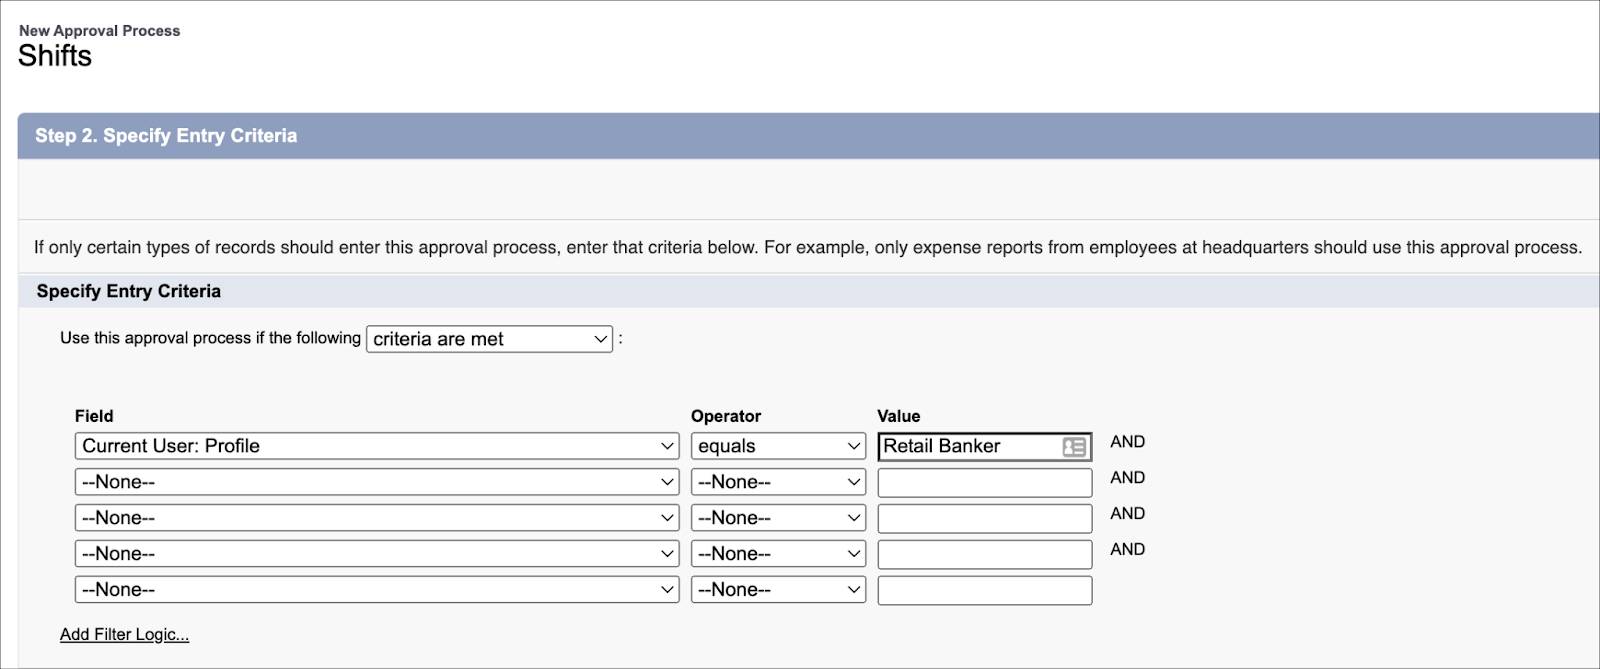
- In the Specify Entry Criteria step:
- From the Use this approval process if the following dropdown list, select criteria are met.
- Select Current User: Profile as the field, equals as the operator, and enter
Retail Bankeras the value.
If you add multiple criteria, then add the filter logic as necessary. - Click Next.
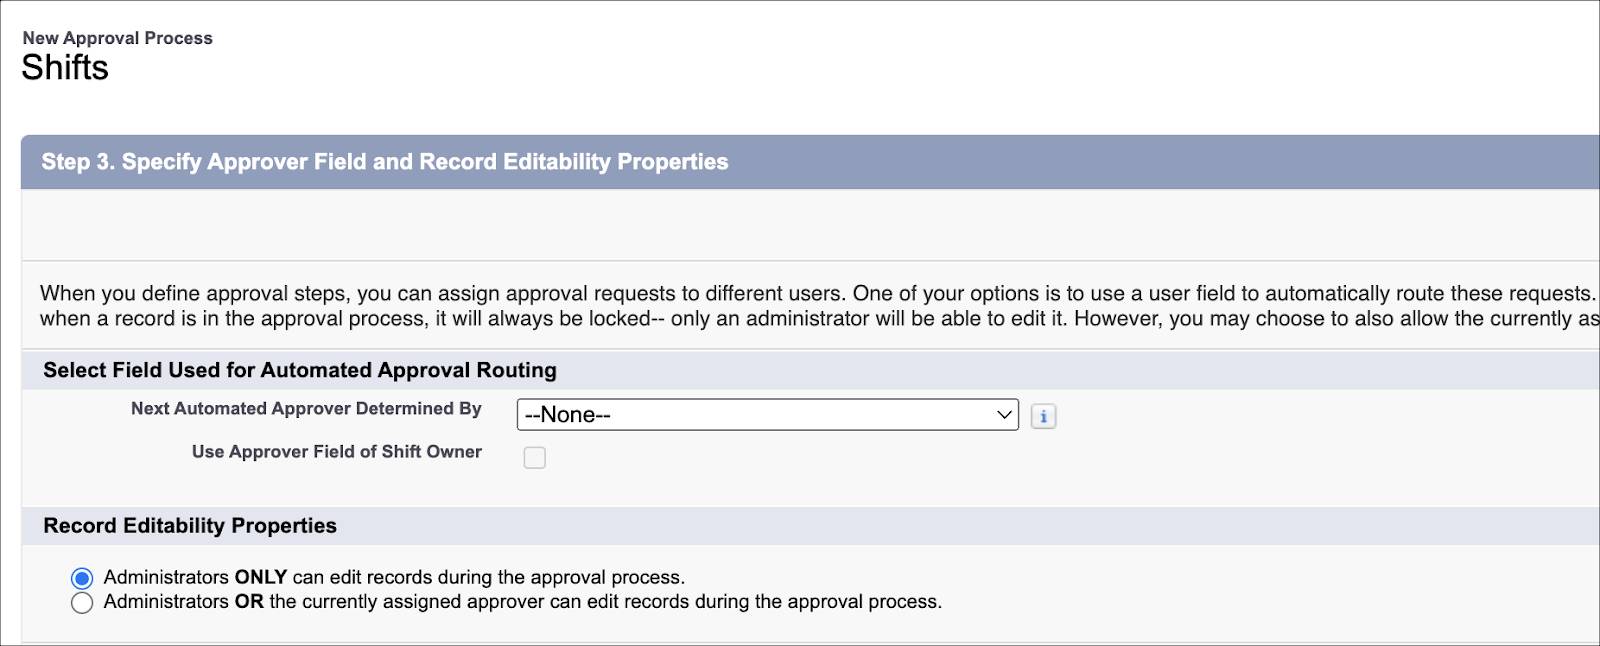
- In the Specify Approver Field and Record Editability Properties step:
- Ensure that the value of Next Automated Approver Determined By is set to None.
- Select Administrators ONLY can edit records during the approval process.
- Click Next.
- In the Select Notification Templates step, select the Shift Created email template, and then click Next.

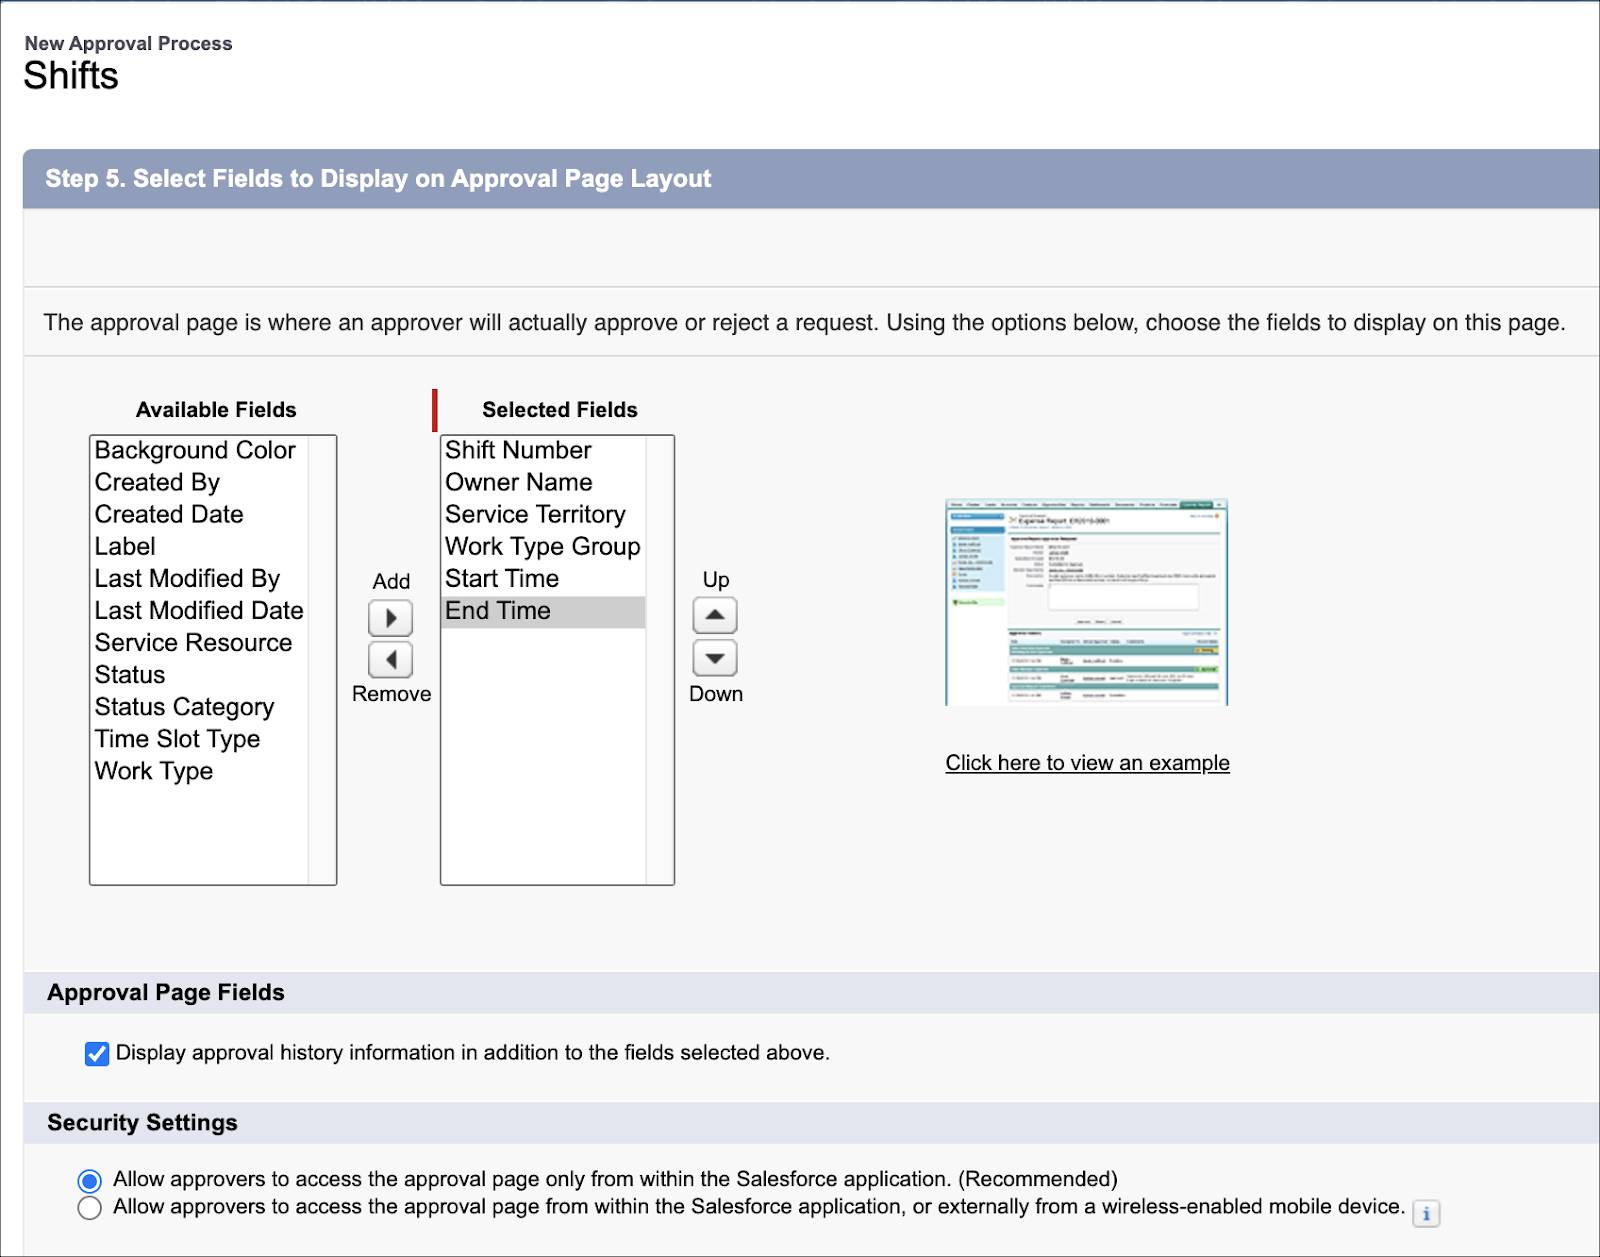
- In the Select Fields to Display on Approval Page Layout step:
- Move Shift Number, Owner Name, Service Territory, Work Type Group, Start Time, and End Time to the list of Selected Fields.
- Select Display approval history information in addition to the fields selected above.
- Click Next.
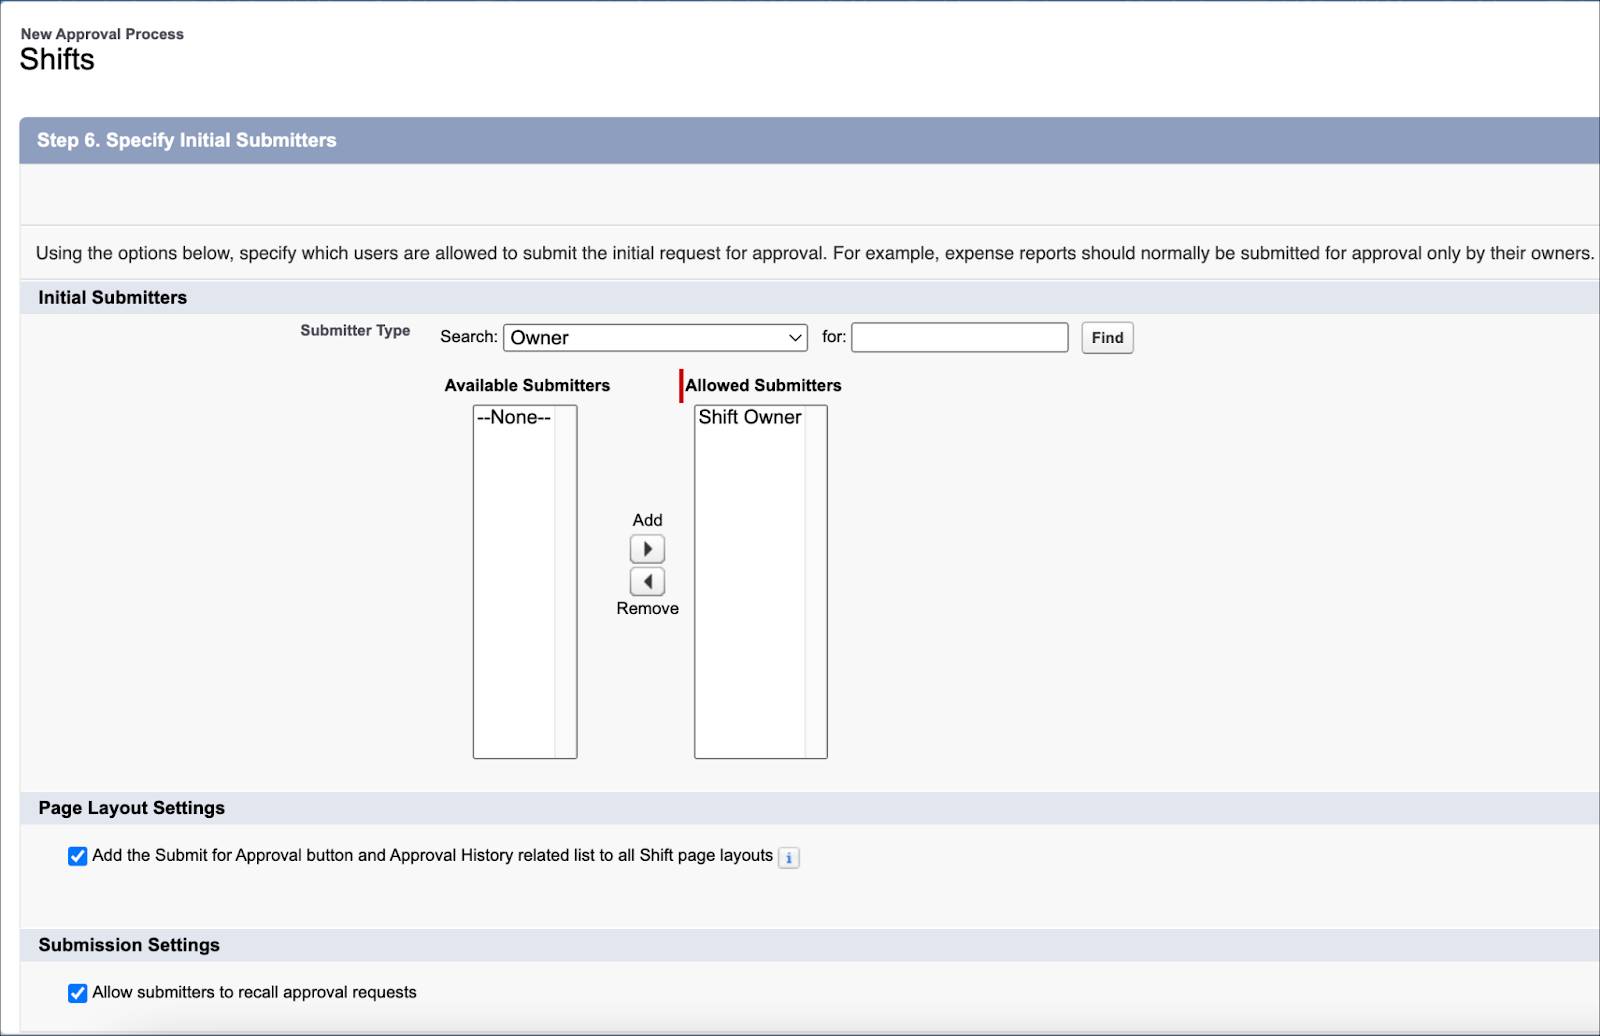
- In the Specify Initial Submitters step:
- Ensure that Shift Owner is in the Allowed Submitters list. If Shift Owner isn’t selected by default, follow these steps:
- For Submitter Type, select Owner from the Search dropdown list.
- Select Shift Owner from the list of Available Submitters, and then click Add.
- Select Add the Submit for Approval button and Approval History related list to all Shift page layouts.
- Select Allow submitters to recall approval requests.
- Ensure that Shift Owner is in the Allowed Submitters list. If Shift Owner isn’t selected by default, follow these steps:
- Click Save.
Add an Approval Step
Matt adds an approval step to specify which approval requests can advance to that step.
- If you’re on the What Would You Like To Do Now? page, select Yes, I'd like to create an approval step now., and then click Next. If you’re not on the page, then:
- Click
 , and then click Setup.
 - In the Quick Find box, enter
Approval Processes, and click Approval Processes. - Click Shift Approval Process_Retail Bankers.
- Click New Approval Step.
- Click
- In the Enter Name and Description step:
- Enter
Shift Approval Stepas the name. - Press Tab to auto-populate the unique name.
- Click Next.
- Enter
- In the Specify Step Criteria section, select All records should enter this step., and then click Next.

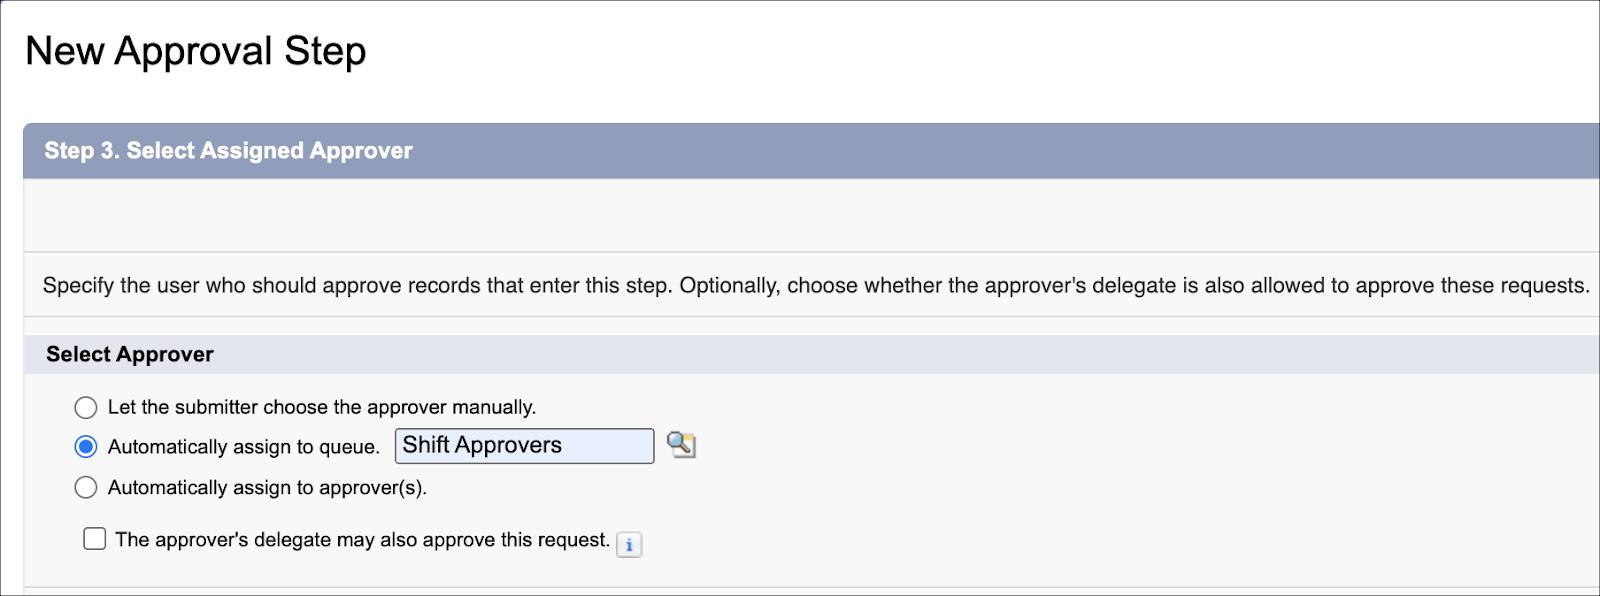
- In the Select Assigned Approver step, select Automatically assign to queue., select Shift Approvers as the queue, and then click Save.
Add Approval, Rejection, and Recall Actions
To automate status change and notifications, Matt must add approval, rejection, and recall actions. Here’s how Matt adds an approval action to update the status field to Confirmed when a shift is approved.
- Click
 , and then click Setup.
 - In the Quick Find box, enter
Approval Processes, and click Approval Processes. - Click Shift Approval Process_Retail Bankers.
- In the Final Approval Actions section, click the Add New dropdown list, and then select Field Update.
- On the New Field Update page:
- Enter
Update Status to Confirmedas the name. - Press Tab to auto-populate the unique name.
- From the Field to Update dropdown list, select Status.
- Select A specific value, and then select Confirmed from the dropdown list.
- Click Save.
- Enter
Next, Matt adds another approval action to send emails to retail bankers when their shift requests are approved.
- Click
 , and then click Setup.
 - In the Quick Find box, enter
Approval Processes, and click Approval Processes. - Click Shift Approval Process_Retail Bankers.
- In the Final Approval Actions section, click the Add New dropdown list, and then select Email Alert.
- On the New Email Alert page:
- For the description, enter
Send an approval email to retail bankers. - For the name, enter
Shift Approval Email. - For Email Template, select Shift Approved.
- For Recipient Type, from the Search dropdown list, select Owner.
- Select Shift Owner from the list of Available Recipients, and then click Add.
- In the From Email Address dropdown list, select Current User’s email address.
- Click Save.
- For the description, enter
Matt repeats similar steps and uses the Shift Rejected and Shift Recalled templates to add final rejection actions and recall actions.
Activate the Approval Process
Here’s how Matt activates the approval process.
- Click
 , and then click Setup.
 - In the Quick Find box, enter
Approval Processes, and click Approval Processes. - Click Shift Approval Process_Retail Bankers.
- Click Activate.
Create a Shift and Request for Approval
Matt informs Fola that they’re all set to use the approval process. Fola is excited and can’t wait to see the process in action. Fola asks Arun to create a shift record and send it for approval. Arun dives right in!
- Click
 to open the App Launcher.
 - Select Shifts.
- Click New.
- Provide the following details.
- Start Time: Select a date and time
- End Time: Select a date and time
- Status: Published
- Work Type Group: Wealth Management
- Service Territory: Headquarters
- Service Resource: Arun
- Time Slot Type: Normal
- Click Save. The shift record page appears.
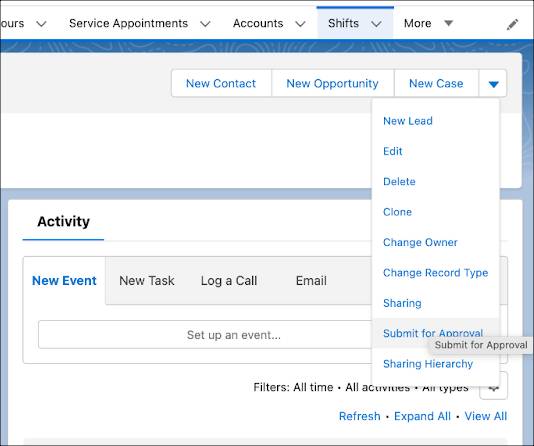
- On the shift record page, click
 , and then click the Submit for Approval quick action.
- In the Submit for Approval popup, enter
Hey Fola, here’s the first approval request., and then click Submit.
After Arun submits the shift for approval, Fola receives a shift approval request via email.
Respond to an Approval Request
Fola logs in to Salesforce. She’s pleasantly surprised to see an approval notification request there as well. She proceeds to approve the request.
- Click
 to open the App Launcher.
 - Select Shifts.
- Click the shift record with the approval request.
- Click Approve.
- In the Comments window that appears, enter
Your shift is approved., and then click Approve.
Arun receives an email notifying that his shift request is approved. He then checks the shift record in Salesforce and sees that the status is confirmed. Arun and Fola decide to explore the approval process a bit more. They repeat the approval request process to test the reject action and the recall action.
The Approval Process Is Approved!
Matt and Fola meet the larger group to demonstrate the changes they’ve made as a part of the preparation for the upcoming quarter. They showcase how shift records are shared only with relevant users, how users can access only relevant shifts statuses, and how the new approval process works. When they’re asked for feedback, everyone gives the thumbs up.
Fola thanks Matt for saving time by eliminating the need to monitor shifts with incorrect statuses, and by streamlining the approval process. She wraps up by joking that they can now discuss weather and sports in their meetings instead of negotiating shifts.