Learn About Daily Rate Limits
Learning Objectives
After completing this unit, you’ll be able to:
- Explain why Salesforce has daily rate limits.
- Identify processes that approach daily rate limits.
- Implement techniques to avoid daily rate limits.
Why Daily Rate Limits?
In the multitenant Salesforce architecture, orgs share a set of pooled resources. To assure consistent performance for everyone, we allocate a certain amount of usage for certain types of actions per 24-hour period. We want to keep the flow of traffic moving and avoid bottlenecks.

We aggregate this load across each instance in a few different ways.
Allocations Based on Licenses
The more licenses you purchase, the higher your allocations of certain features or functions. Maximum daily SOAP and REST API calls and platform event delivery allocations are examples of this.
Average Allocations Based on Org
Within a particular edition or configuration, each org gets the same size slice of the pie, so to speak, for some allocations. But sometimes we can increase certain limits, such as the bulk API daily batch limit or the streaming API daily delivery limit. Generally, limits like these are based on what extreme (also called “high-water”) use can look like per org. So in the normal use case, you never hit these limits, but occasionally you can during peak demand. For the times you do, Salesforce may be able to raise your limits for a short time period if the load on the service allows.
Maximum Allocations Based on Org
Each org gets the same slice of the pie, but we cannot increase the limit. Generally this is set as the top limit that we can support in the system. Examples include the maximum number of API logins allowed per user per hour and the maximum SOQL query length allowed.
How We Calculate Rate Limits
To understand what happens as you approach a 24-hour limit, let’s look at an example.
Platform event limits apply to a 24-hour cycle. Before delivering new events, such as a change in order status, to subscribed clients, Salesforce checks your allocation and how many events have been used in your Salesforce org in the last 24 hours. If the number of events used is lower than the 24-hour allocation, Salesforce delivers events to subscribers. If you did hit your allocation for events in the previous 24 hours, Salesforce doesn’t deliver new events. But, they’re queued within a brief time window until event allocation is available.
As you trigger each new event, Salesforce checks your allocation against the number of events in the previous 24 hours. This period “rolls” with each new event—it doesn’t reset at a specific time. It’s always 24 hours from the new event trigger. And again, if you haven’t used your allocation in the previous 24 hours, the event is delivered to subscribers.
How You Can Monitor Rate Limits and Your Allocation
Don’t wait for the system to tell you that you have run out of allocations. Be proactive. Look at your usage and determine if you should continue to trigger events or make API calls or requests.
You can do this either declaratively or programmatically. If you monitor your rate limits declaratively, you need to stop any integrations manually, which is not the most ideal scenario. If you do it programmatically, your apps might be able to self-monitor to avoid the limits.
Declarative Monitoring Options
Use the following to monitor events and API usage declaratively.
Basic Usage on the Company Information Page
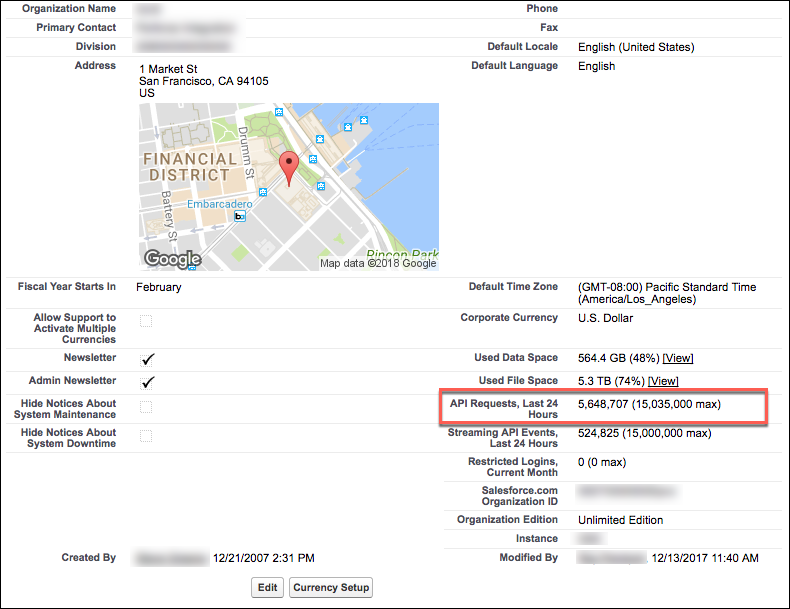
You can view how many API requests have been issued in the last 24 hours on the Company Information page. (You can also view other limits, such as the Streaming API events allocation, which applies to PushTopic events only.) To access this page, from Setup, enter Company Information in the Quick Find box, then select Company Information.
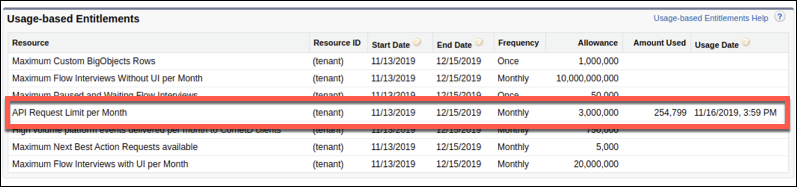
And at the bottom of that page, the API Request Limit per Month usage-based entitlement shows you the API requests aggregated over 30 days.
API Usage (Salesforce Classic)
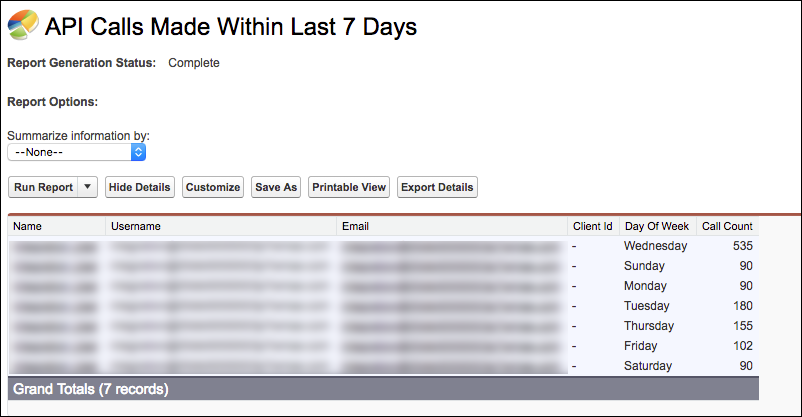
In Salesforce Classic, the Salesforce API Usage Report shows which users and apps have made calls to your orgs for the last 7 days. Navigate to the Reports tab, select the folder Administrative Reports, and click the API Usage Last 7 days report.
Also, API Usage Notification sends emails when you use a defined percentage of your allocation.
API Usage Monitoring Add-Ons
Salesforce Event Monitoring is an add-on that tracks the number of API calls made to your org, which user made the calls, and which connected app made the calls.
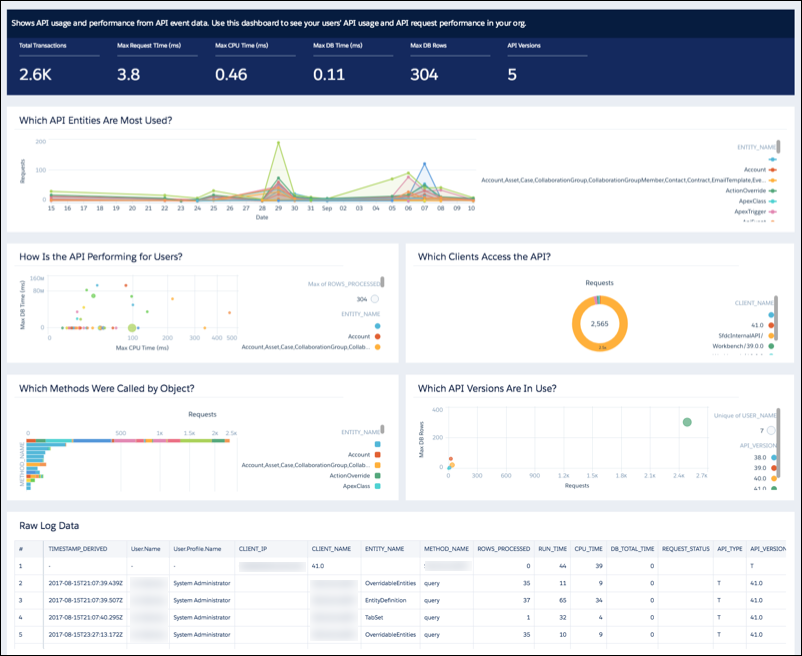
And, the Salesforce Shield add-on includes more detailed event monitoring, including your historical usage rates.
Programmatic Monitoring Options
Use the following to monitor both events and API usage programmatically.
Limit Info Headers
The limit info headers in API calls give you current usage. When you make an API call through REST API or SOAP API, Salesforce returns the current daily usage.
The limit info response tells you the number of SOAP and REST API calls you have made in the last 24 hours and also your daily allocation. Subtract the number of calls made from the number available to get the number remaining.
Here is an example of the Limit Info response using REST API. The third line shows the number of calls and your limit in the api-usage value.
Here is an example of the limit info response using SOAP API. Your number of calls is the current value.
REST API limits Resource
The REST API limits resource provides a list of all your available tracked allocations and how much you have currently used. Many of them are daily allocations.
Here is an example of the response from the limits resource (shortened to save space).
Recalculate Your Route
You’re monitoring and paying attention to your usage. That’s great. What do you do when you see those numbers approaching your allocation? It’s time to be a gatekeeper. You have several options.
- You can program your app to call the REST limits resource periodically, to see where you are against the limit, and then decide whether to make the subsequent call.
- You can manage the API-enabled profiles, disabling access to the Salesforce API for those user profiles that absolutely do not need access to it. You can do this with a single user perm: API Enabled.
- You can set objects as Light vs. Enterprise. For those objects that should have only limited API interaction, you can set objects as Light, so that you cannot use the Streaming or Bulk API against them. For more information, see Store Information That’s Unique to Your Organization.
- Restrict API access only to approved apps. For those times when you only want certain apps to use the API, you can use the API client to allowlist the feature to restrict which apps actually can use the API. You also can restrict usage of the approved apps to only approved users using OAuth policies, further restricting access. See Manage API Access.
Evaluate your needs. Remember, these are allocations. It can be time to right-size your org and upgrade your edition or add-ons.
Example: Lockdown Access
Let’s walk through an example of locking down access to the API and connected apps.
In Setup, you’re looking at your system overview and notice a lot of API usage in the last 24 hours. You see API requests are piling up from people using Data Loader, API platforms like Postman, and apps downloaded from AppExchange. You don’t want all of these users using all of these features at the same time. You need to coordinate who can use what, and when. To do this, you can create two profiles for your data entry users, who don’t all need to use Data Loader all the time.
- From Setup, enter Profiles in the Quick Find box and select Profiles.
- Clone the Standard User profile with the following settings: Use existing profile: Standard User Profile Name: No API Access
- Click Save.
- Click Edit on the No API Access page.
- Under Administrative Permissions, deselect API Enabled. Don’t see Administrative Permissions on the profile page? Dont worry. Salesforce displays profile permissions based on your org settings. If you’re using the Enhanced Profile User Interface, search for API Enabled on the No API Access profile page, or find API Enabled under System Permissions. Then, deselect it.
- Click Save. Now you can assign the Standard User profile to users who need apps that use the API, such as Data Loader, and assign the No API Access profile to data entry users who don’t need API access.
For finer control, you can limit usage to a particular connected app with a permission set. In this case, you have a connected app assigned to all Standard User profiles. Let’s create a permission set that you can assign to select users who need to use a connected app
First, create the connected app. We can keep this very simple. The app doesn’t need to handle authorization. It just points to a URL.
- In Lightning Experience, you use the App Manager to create connected apps. From Setup, enter App in the Quick Find box, then select App Manager. Click New Connected App. In Salesforce Classic, from Setup, enter Apps in the Quick Find box, then select Apps (under Build | Create). Under Connected Apps, click New.
- Enter the following:
- Connected App Name: Limits Trail Connected App
- API Name: Accept the default
- Contact Email: Use your email address
- Start URL (under Web App Settings): https://trailhead.salesforce.com
- Click Save.
Next, create the permission set.
- In Setup, enter Permission Sets in the Quick Find box and select Permission Sets.
- Click New.
- Label the permission set App Access, and accept the default API Name.
- For the License, select None, so you can assign it to different profiles.
- Click Save.
- On the Apps Access page, click Assigned Connected Apps.
- Click Edit.
- Select Limits Trail Connected App and click Add, so it shows in the Enabled Connected Apps list.
- Click Save. Now, when you want users to use the connected app, go to the Users page in Setup and assign them this permission set. This way, you restrict the permissions to the users who really need them and avoid hitting your limit.
You’re learning to problem solve. This optimization pattern, and others, will become familiar soon enough.