Aktivieren und Einrichten von Agentforce-Vertriebs-Coach
Lernziele
Nachdem Sie diese Lektion abgeschlossen haben, sind Sie in der Lage, die folgenden Aufgaben auszuführen:
- Aktivieren und Erstellen eines Benutzers für Agentforce-Vertriebs-Coach.
- Erteilen des Zugriffs auf, Konfigurieren und Aktivieren von Agentforce-Vertriebs-Coach.

Aktivieren von Vertriebs-Coach in Agentforce
Damit Sie den Vertriebs-Coach in Betrieb nehmen können, müssen Sie zuerst einige unterstützende Dienste aktivieren. Der Agentforce-Vertriebs-Coach-Setup-Assistent erleichtert die Aktivierung aller erforderlichen Unterstützungsfunktionen und zeigt eine Liste der benötigten Funktionen sowie der bereits aktivierten Funktionen an.
Aktivieren von unterstützenden Funktionen
- Klicken Sie auf der Startseite auf das Zahnradsymbol
 und dann auf Salesforce Go. Dies öffnet die Salesforce Go-Startseite in Setup. Falls Sie bereits in Setup sind, verwenden Sie alternativ das Feld "Quick Find" (Schnellsuche), um nach Salesforce Go zu suchen und diesen Eintrag dann auszuwählen.
- Blättern Sie nach unten zum Abschnitt "Get Started with Agentforce" (Erste Schritte mit Agentforce) und klicken Sie auf der Karte "Agentforce for Sales" (Agentforce für den Vertrieb) auf Set Up (Einrichten).
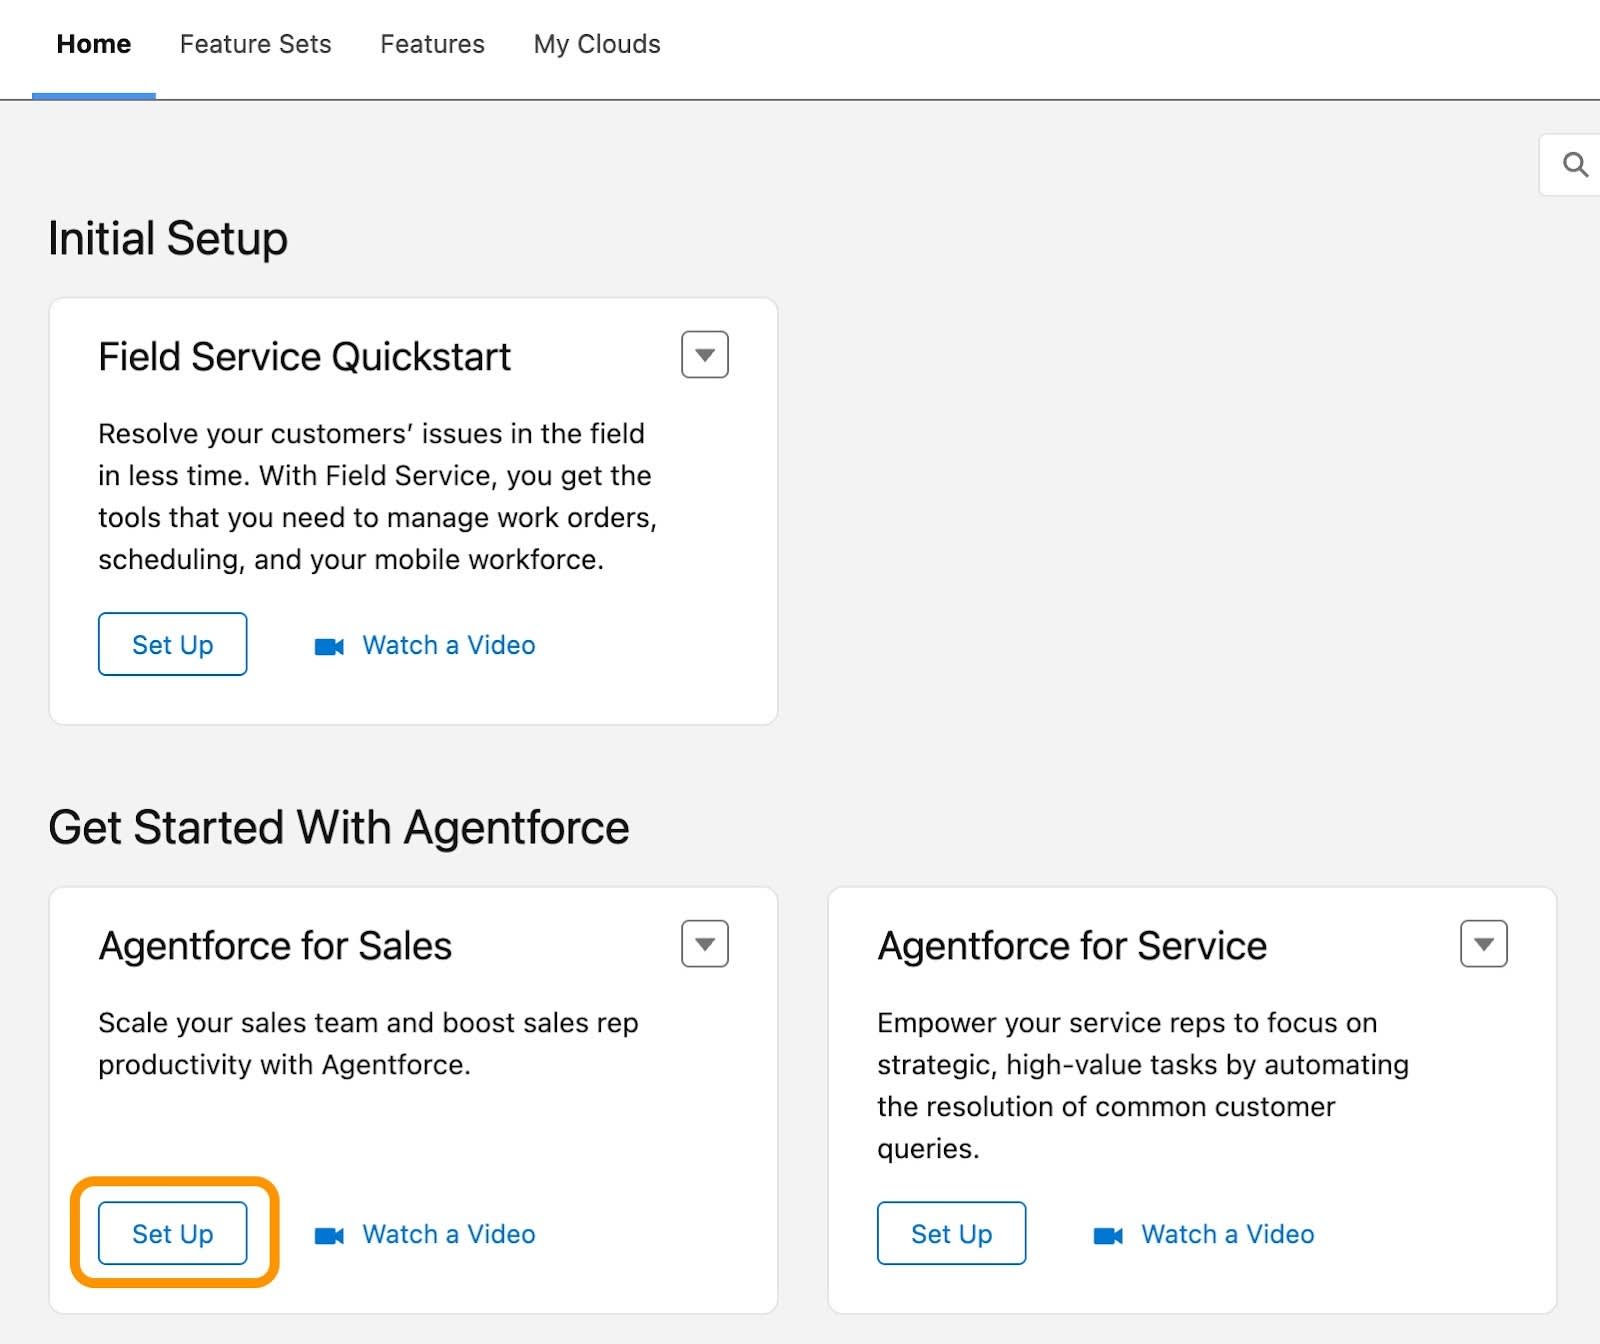
- Klicken Sie auf Turn On (Aktivieren), um Agentforce in Ihrer Organisation zu aktivieren.

- Klicken Sie auf Confirm (Bestätigen). Die Aktivierung von Agentforce kann ein paar Minuten dauern. Nach der Aktivierung stellt Agentforce automatisch vertriebsorientierte Agenten zum Einrichten zur Verfügung. Agentforce for Sales (Agentforce für den Vertrieb) beinhaltet beispielsweise zwei Agenten: "Sales Coach" (Vertriebs-Coach) und "SDR Agent" (SDR-Agent). Nach der Aktivierung können Sie auf dieser Seite auf diese Agenten zugreifen. Hier können Sie den gewünschten Agenten aktivieren, für diese Lektion also Vertriebs-Coach.
- Aktivieren Sie Agentforce Sales Coach (Agentforce-Vertriebs-Coach).

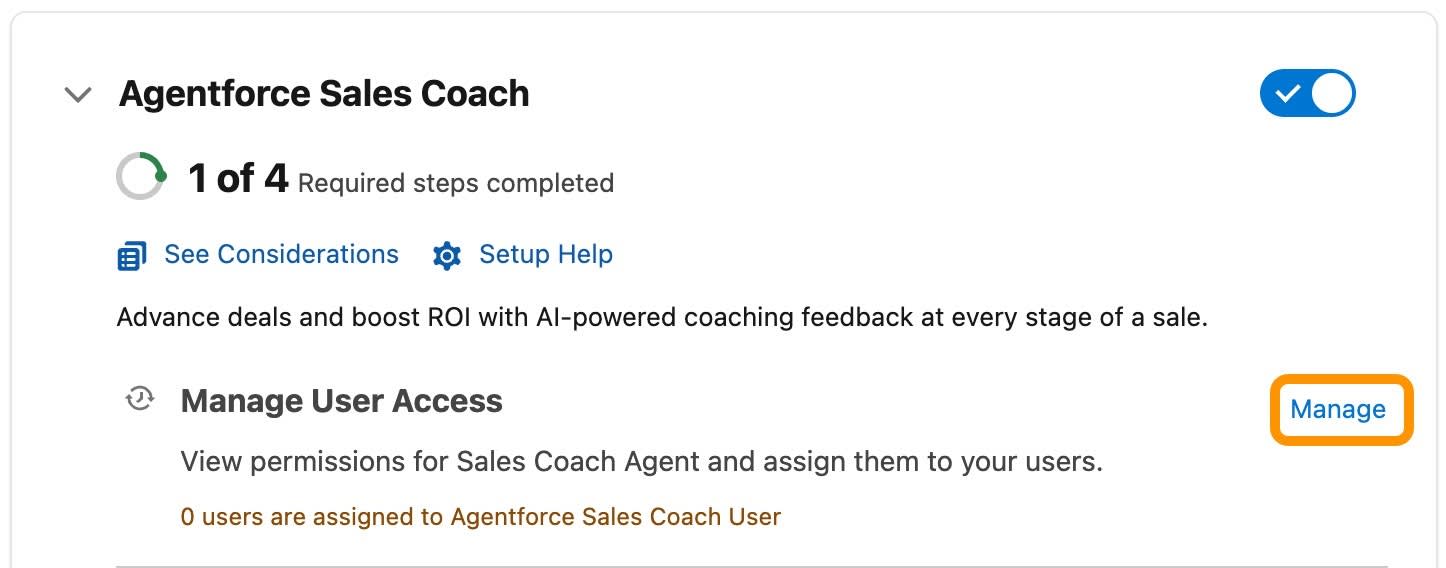
- Klicken Sie im Dialogfeld auf Confirm (Bestätigen). Die Aktivierung des Agenten kann ein paar Minuten dauern. Nach der Aktivierung werden die Setup-Schritte, die Sie durchführen müssen, verfügbar. Wie Sie sehen, ist einer der vier notwendigen Schritte – das Aktivieren des Agenten – jetzt abgeschlossen. Ihr Agent ist jetzt aktiviert und kann eingerichtet werden.
Berechtigen von Benutzern zum Zugriff auf Vertriebs-Coaching
Für dieses Projekt müssen Sie sich selbst den nötigen Zugriff erteilten, um den Agenten für Vertriebs-Coaching konfigurieren und betreiben zu dürfen.
- Klicken Sie im Setup-Bereich Agentforce Sales Coach (Agentforce-Vertriebs-Coach) im Abschnitt "Manage User Access" (Benutzerzugriff verwalten) auf Manage (Verwalten).
- Klicken Sie unter der Registerkarte Manage Agentforce Sales Coach (Agentforce-Vertriebs-Coach verwalten) auf das Dropdown-Menü "Recently Viewed" (Zuletzt angezeigt) und wechseln Sie zu All Users (Alle Benutzer).
- Suchen Sie Ihren Namen und aktivieren Sie das Kontrollkästchen neben YOUR NAME (IHR NAME).

- Klicken Sie auf Assign (Zuweisen). Sie haben sich jetzt erfolgreich zur Verwaltung des Agentforce-Vertriebs-Coach berechtigt.
- Klicken Sie auf die Registerkarte Use Agentforce Sales Coach (Agentforce-Vertriebs-Coach verwenden) und ändern Sie das Dropdown-Menü "Recently Viewed" (Zuletzt angezeigt) in All Users (Alle Benutzer).
- Aktivieren Sie das Kontrollkästchen neben YOUR NAME (IHR NAME). Klicken Sie auf Assign (Zuweisen) und dann auf Done (Fertig).

- Sie sollten im Schritt Manage User Access (Benutzerzugriff verwalten) jetzt ein aktiviertes Kontrollkästchen sehen, das diesen Schritt als abgeschlossen kennzeichnet. Sie haben die erforderlichen Berechtigungen für den Vertriebs-Coach-Agenten erfolgreich erteilt.
Agentforce-Vertriebs-Coach zu Opportunity-Seiten hinzufügen
Da Sie nun die richtigen Berechtigungen haben, fügen wir "Agentforce Sales Coach" (Agentforce-Vertriebs-Coach) nun zur Opportunity-Seite hinzu. Dies ist die primäre Schnittstelle, über die Sie mit Ihrem Vertriebs-Coach interagieren, sobald er aktiv und konfiguriert ist. Dieser Schritt ist die dritte Anforderung im Setup-Prozess des Agentforce Sales Coach (Agentforce-Vertriebs-Coach).
- Navigieren Sie zurück zum Setup von Agentforce Sales Coach (Agentforce-Vertriebs-Coach), indem Sie erst vom Setup-Symbol aus auf Salesforce Go klicken und dann auf den nach unten zeigenden Pfeil neben Agentforce Sales Coach (Agentforce-Vertriebs-Coach) klicken, um diesen Abschnitt einzublenden.
- Klicken Sie im Abschnitt Add Components, Fields, and Actions to Lightning Record Page (Komponenten, Felder und Aktionen zur Lightning-Datensatzseite hinzufügen) auf Manage (Verwalten).
- Klicken Sie neben der Option Opportunity Grouped View Default (Standard für gruppierte Opportunity-Ansicht) auf Open in App Builder (Im Anwendungsgenerator öffnen). Eventuell müssen Sie nach rechts blättern, um die Schaltfläche zu sehen. Der Lightning App Builder (Lightning-Anwendungsgenerator) wird in einer neuen Registerkarte geöffnet. Dort bearbeiten Sie das Seitenlayout "Opportunity Record" (Opportunity-Datensatz).
- Klicken Sie im Bereich "Components" (Komponenten) auf Agentforce Sales Coach (Agentforce-Vertriebs-Coach) und ziehen Sie diesen Eintrag an die Position direkt über dem Abschnitt "Related Lists" (Themenlisten).

- Klicken Sie auf Save (Speichern) und dann auf Activate (Aktivieren).
- Klicken Sie auf Assign as Org Default (Als Organisationsstandard zuweisen).
- Behalten Sie "Desktop" als Standardansicht bei und klicken Sie auf Next (Weiter).
- Klicken Sie auf Speichern. Sie sind mit dieser Registerkarte fertig und können die Registerkarte "Lightning App Builder" (Lightning-Anwendungsgenerator) daher schließen.
- Zurück auf der Setup-Seite klicken Sie auf Done (Fertig). Aktualisieren Sie die Seite.
- Setzen Sie manuell ein Häkchen in das Kontrollkästchen, um diesen Schritt als abgeschlossen zu kennzeichnen.
Erstellen eines Vertriebs-Coach-Benutzers
Ihr Agentforce-Vertriebs-Coach wird in Salesforce als Benutzer ausgeführt. Als solcher benötigt er Berichterstellungs-, Dokumentations- und Verwaltungsberechtigungen, genau wie andere Benutzer in Ihrer Organisation. Erstellen Sie als Nächstes einen bestimmten Benutzertyp für Ihren autonomen Vertriebsagenten und weisen Sie ihm die entsprechenden Berechtigungen zu.
- Suchen Sie im Feld "Quick Find" (Schnellsuche) nach Users (Benutzer) und wählen Sie diesen Eintrag dann aus.
- Klicken Sie auf Neuer Benutzer.

- Es wird eine neue Registerkarte geöffnet, in der Sie einen neuen Benutzer erstellen können. Füllen Sie die Felder unter "New User" (Neuer Benutzer) wie folgt aus:
- First Name (Vorname):
Sales Coach(Vertriebs-Coach) - Last Name (Nachname):
Agent - Alias: wird automatisch ausgefüllt
- Email (E-Mail): Ihre E-Mail-Adresse
- Benutzername: Der Benutzername muss eindeutig sein.
- Nickname: wird automatisch ausgefüllt
- Unternehmen:
Acme - User License (Benutzerlizenz): Einstein Agent (Einstein-Agent)
- Profile (Profil): Einstein Agent User (Einstein-Agentenbenutzer)
- First Name (Vorname):
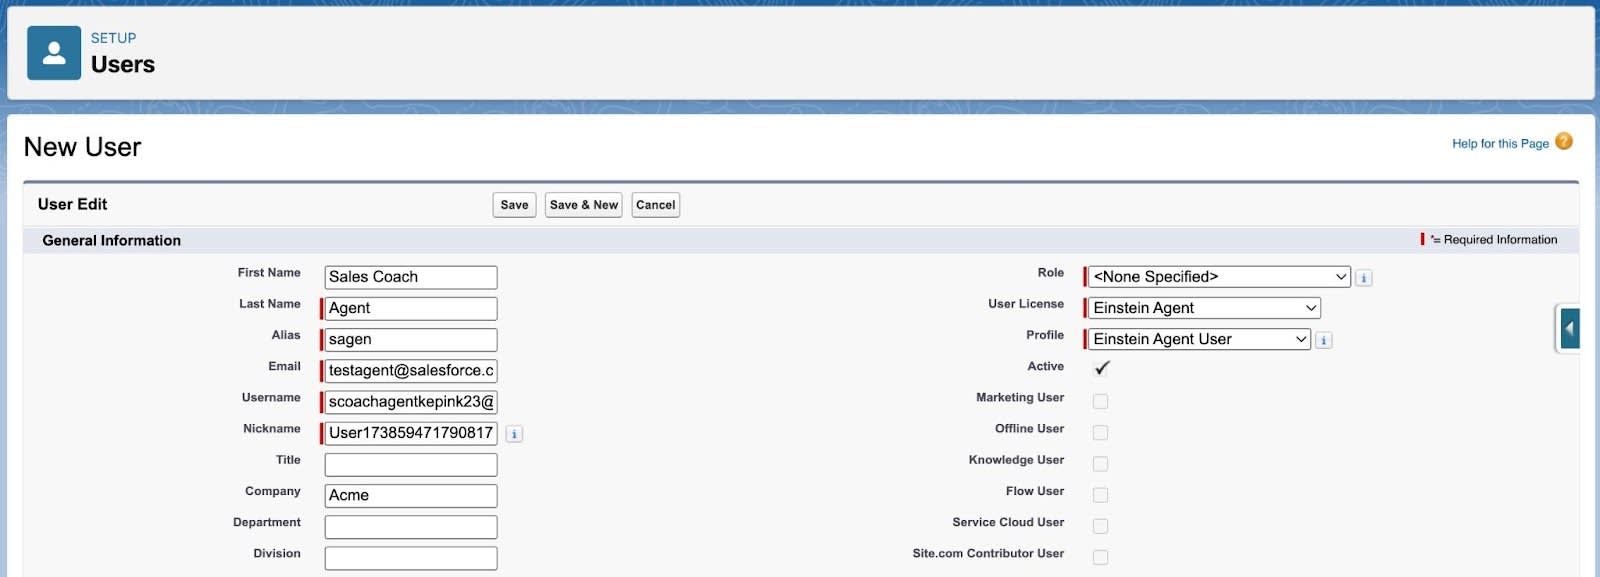
- Klicken Sie auf Speichern. Der Benutzerdatensatz für Ihren Agentforce-Vertriebs-Coach wurde erstellt.
- Blättern Sie nach unten zum Abschnitt "Permission Set Assignments" (Berechtigungssatzzuweisungen) und klicken Sie auf Edit Assignments (Zuweisungen bearbeiten).
- Verschieben Sie Agentforce Sales Coach (Agentforce-Vertriebs-Coach) aus dem Abschnitt "Available Permission Sets" (Verfügbare Berechtigungssätze) in den Abschnitt "Enabled Permission Sets" (Aktivierte Berechtigungssätze).
- Klicken Sie auf Speichern.
Sie sind fast fertig mit der Einrichtung des Agenten. Sobald Sie Agentforce-Vertriebs-Coach konfiguriert und aktiviert haben, können Sie mit der Anpassung beginnen.
Konfigurieren und Aktivieren von Agentforce-Vertriebs-Coach
Jetzt, da die Vorarbeiten erledigt sind, sind Sie bereit, den Vertriebs-Coach zu konfigurieren und zu aktivieren.
- Wenn Sie sich noch nicht auf der Salesforce Go-Seite befinden, klicken Sie auf
 und wählen Salesforce Go aus. Dies öffnet die Salesforce Go-Startseite in Setup. Falls Sie bereits in Setup sind, verwenden Sie alternativ das Feld "Quick Find" (Schnellsuche), um nach Salesforce Go zu suchen und diesen Eintrag dann auszuwählen.
- Blättern Sie nach unten zum Abschnitt Get Started with Agentforce (Erste Schritte mit Agentforce) und klicken Sie auf Keep Going (Weiter so).
- Klicken Sie auf der Karte "Agentforce Sales Coach" (Agentforce-Vertriebs-Coach) auf
 , um die Setup-Schritte einzublenden. An diesem Punkt sollten drei der vier erforderlichen Schritte abgeschlossen sein.
- Klicken Sie auf Go (Los). Agentforce Builder (Agentforce-Generator) wird dann in einem neuen Register geöffnet, und der Vertriebs-Coach ist bereits ausgewählt.

- Es wird eine neue Registerkarte geöffnet, in der Sie den Agenten auswählen können, den Sie erstellen möchten. Der Agententyp "Agentforce Sales Coach" (Agentforce-Vertriebs-Coach) ist bereits ausgewählt.
- Stellen Sie im Schritt Select Your Agent’s Subagents (Unteragenten Ihres Agenten auswählen) sicher, dass alle verfügbaren Unteragenten hinzugefügt wurden. Klicken Sie auf Weiter.
- Füllen Sie die Felder im Schritt Customize your agent (Ihren Agenten anpassen) wie folgt aus:
- Name:
Agentforce Sales Coach(Agentforce-Vertriebscoach) - API-Name:
Agentforce_Sales_Coach - Beschreibung: automatisch aufgefüllt
- Rolle: gemäß den Angaben Ihres Unternehmens anpassen.
- Unternehmen: gemäß den Angaben Ihres Unternehmens anpassen.
- Agent User (Agentenbenutzer): Wählen Sie Sales Coach Agent (Coach-Agent für den Vertrieb) aus der Liste aus.
- Aktivieren Sie das Kontrollkästchen Keep a record of conversations with Enhanced Event Logs to review agent behavior (Gesprächsaufzeichnung mit erweiterten Ereignisprotokollen behalten, um Agentenverhalten zu prüfen).
- Name:
- Klicken Sie auf Weiter.
- Behalten Sie im Schritt Select Language and Tone (Sprache und Ausdrucksweise auswählen) die Standardeinstellungen bei und klicken Sie auf Next (Weiter).
- Falls Sie RAG verwenden möchten, können Sie optional im Abschnitt "Select Data" (Daten auswählen) unter "Select a Library" (Bibliothek auswählen) auf New Library (Neue Bibliothek) klicken. Dadurch wird die Agentforce-Vertriebs-Coach-Bibliothek automatisch erstellt. Die Bibliothek unterstützt aktuell nur Knowledge oder hochgeladene Dateien. Beachten Sie, dass Data 360 aktiviert sein muss, damit diese Option angezeigt wird.
- Laden Sie Ihre Ressourcen hoch bzw. stellen Sie eine Verbindung zu ihnen her und klicken Sie auf Save (Speichern).
- Klicken Sie auf Create (Erstellen). Halten Sie diese Registerkarte geöffnet – Sie benötigen sie in der nächsten Lektion.
Sobald Sie Ihren Agenten erstellt haben, können Sie jederzeit weitere Ressourcen hochladen, indem Sie auf das Buchsymbol in der Menüleiste auf der linken Seite klicken.
Jetzt wissen Sie, wie Sie den Vertriebs-Coach aktivieren, einen Vertriebs-Coach-Benutzer erstellen, Benutzern Zugriff auf Vertriebs-Coach erteilen und Ihren Agentforce-Vertriebs-Coach konfigurieren und aktivieren können. Als Nächstes lernen Sie, wie Sie ihn anpassen können.