Create a Search Index, Retriever, and Prompt Template
Learning Objectives
After completing this unit, you’ll be able to:
- Create a search index.
- Build a retriever.
- Create a prompt template that uses your retriever.
In this unit, you create a search index to make your unstructured Case fields searchable. Then you create a retriever for the search index and add it to a prompt template. Your agent will use that prompt template to retrieve relevant information from past customer cases and generate responses to questions.
Create a Search Index
A search index makes your text searchable so that your RAG solution can find and retrieve chunks of text that are relevant to the user’s input. For example, if the customer asks about causes for toast burning, your RAG solution will be able to search past customer cases and find text related to burning. Data 360 supports two types of search indexes: vector search and hybrid search. In this example, you create a hybrid search index to find relevant content based on both semantic similarity and keywords.
- From the App Launcher, launch Data Cloud.
- Select the Search Indexes tab. You might need to expand the More dropdown to see it.
- Click New.
- Select Advanced Setup and click Next.
- Select Hybrid Search as the Search Type.
- Leave default as the Data Space.
- Select Case as the Source Object, then click Next.
- Click Manage Fields and select Description and Subject, then click Save.

- Click Next repeatedly to accept the remaining default values.
- Leave the default name Case.
- Click Save to create your search index.
- Wait 20 minutes, then refresh the page. Confirm that the Search Index Last Run Status is Ready before proceeding.
- Click the Data Model tab to see the created search index files:
- text chunks (
Case_chunk_dlm)
- a hybrid index (
Case_index_dlm)
- text chunks (

It’s helpful to know how to inspect text chunks for debugging purposes or feature optimization. For example, chunks might reveal why a large language model (LLM) is responding in unexpected ways. You can inspect chunks in Data Explorer.
- In Data Cloud, click the Data Explorer tab.
- For Object, select Data Model Object and Case chunk.
Build a Retriever
A retriever is a wrapper for Einstein Search operations. You create a custom retriever in AI Models to refine the search so that the retrieved content is more relevant to your use case. An individual retriever can fetch data from only one search index. A search index can index only one DMO. If your feature needs to ground on data from multiple data sources, use an ensemble retriever. You only need to retrieve information from the Case search index which indexes the Case DMO, so you’ll use an individual retriever. Learn more in Retrievers.
- In Data Cloud, select the AI Models tab.
- Click the Retrievers tab, then click New Retriever.
- Select Individual Retriever and click Next.
- Select Data Cloud and leave the default data space.
- Select the Case DMO and the Case search index configuration, then click Next.
- For filters, leave All Documents and click Next.
- Leave 20 for the number of results to return.
- Under Fields to Return, add three fields.
- For the Field Label, enter
Subject. For the Field Name, select DirectAttributes > Case > Subject. Click Add Field.
- Enter
Description, then select DirectAttributes > Case > Description. Click Add Field.
- Enter
Chunk, then select RelatedAttributes > Case chunk > Chunk.
- For the Field Label, enter

- Click Next, then click Save.
- Make sure the name is
Case Retrieverand click Save.
- Note down the retriever’s API name. You’ll need it later.
- Click Activate, then Activate again.
Create a Prompt Template and Add Your Retriever
A prompt template defines the structure of the prompt that is sent to the LLM. You can add text instructions and resources, such as retrievers, Flows, customer input, or other resources. A prompt template inherits characteristics from a prompt template type, which contains hidden pre- and post-processing instructions that affect how the resolved prompt is used at runtime. In this example, you create a new prompt template based on the Answer Questions with Knowledge prompt template.
The prompt template describes how to understand the input, find relevant Case information using the retriever, and generate a response using that information. The prompt also instructs on how to respond if you can’t find relevant information. That edge case is important because it prevents the LLM from generating a hallucination when it’s not sure how to respond.
- From Setup, in the Quick Find box, search for and select Prompt Builder.
- Click New Prompt Template.
- For Prompt Template Type, select Knowledge Answers.
- Name your prompt template
Answer Questions with Case Data. Make sure the API Name isAnswer_Questions_with_Case_Data.
- Click Next.
- Copy and paste the following text in the workspace.
            ### INSTRUCTIONS
            1. Analyze the query: Carefully read and understand the user's question or issue from the QUESTION section.
            2. Search CASE: Review the provided company CASE to find relevant information.
            3. Evaluate information: Determine if the available information in the CASE section is sufficient to answer the QUESTION.
            4. Formulate response: To generate a reply <generated_response> to the user, you must follow these rules
            a. Find the article-chunk(s) that is most relevant to answer the user query and VERBATIM extract the ID of the article to set <source_id> field in the response JSON. If you are unable to find the relevant article, set <source_id> to NONE.
            b. Use the relevant article-chunk to generate the response that exactly answers the user's question and set the <generated response> field.
            c. If the user request cannot be answered by the case information provided, set the <source_id> to NONE and <generated_response> to "Sorry, I can't find an answer based on the available articles."
            5. Refine and deliver: Ensure your response is polite, professional, and concise.
            6. Review response: Make sure that you have followed all of the above instructions, respond in the desired output format and you only strictly stick to the provided CASE only to formulate your answer.
            ###
            CASE:
            [Insert Retriever Here]
            ###
            QUESTION:
            {!$Input:Query}
            ###
Response:- Delete [Insert Retriever Here] and leave your cursor at that spot.
- Click Insert Resource. Under Actions, click Retrievers.
- Click Configure Retrievers.
- In the left Resources tab under Template Settings, click Case Retriever.
- Follow these steps under Search Parameters. You may need to expand the Inputs section.
- For Search Text, select Query.
- For Output Fields, select Chunk.
- For Number of Results, enter
5.
- For Search Text, select Query.
- Click Apply and Insert.
- Click Save, then click Activate.
Test Your Prompt Template
It’s a good idea to test the prompt template you just created.
- Click Preview.
- In Preview Settings, expand Inputs if needed.
- Enter a question into the Query, such as
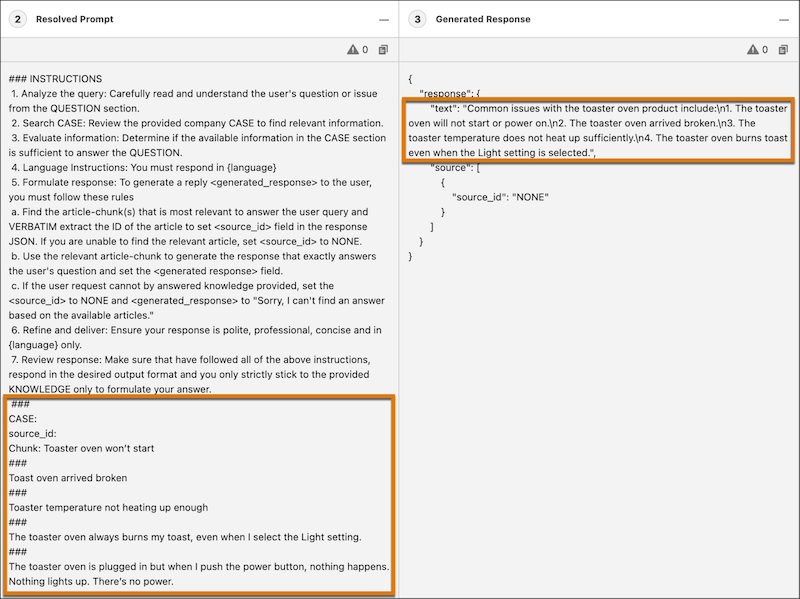
What are some common issues with the toaster oven product? - For Retriever ID, enter your retriever ID.
- If you didn’t take note of it before, you can get your retriever ID by navigating to the retriever details page in AI Models. Copy your retrievers’s API name then paste it in the Retriever ID field in Prompt Builder.
- If you didn’t take note of it before, you can get your retriever ID by navigating to the retriever details page in AI Models. Copy your retrievers’s API name then paste it in the Retriever ID field in Prompt Builder.
- Click Preview again and view the response in the Generated Response tab.
-
Resolved Prompt shows the resolved prompt that was sent to the LLM. The resolved prompt contains the chunks of data that your retriever fetched. That’s RAG in action!
-
Generated Response shows the prompt template’s output that you can surface to customers.
-
Resolved Prompt shows the resolved prompt that was sent to the LLM. The resolved prompt contains the chunks of data that your retriever fetched. That’s RAG in action!
Great work! Now you have a prompt template that uses your retriever to find relevant Case information and responds to customer questions. Click Check Challenge for 500 points to complete this unit. Next, you build a service agent that uses the prompt template.