Work with Schema Builder
Learning Objectives
- Describe the advantages of using Schema Builder for data modeling.
- Use Schema Builder to create a schema for a given object model.
- Use Schema Builder to add a custom object to your schema.
- Use Schema Builder to add a custom field to your schema.

See Your Data Model in Action
By now, you and D’Angelo have created a handful of custom objects, fields, and relationships. Your app’s data model is starting to get a little more complicated.
Schema Builder is a tool that lets you visualize and edit your data model. It’s useful for designing and understanding complex data models like the one D’Angelo is building. Take a look at how it’s done.
- From Setup, search for and click Schema Builder in the Quick Find box.

- In the left panel, click Clear All.
- Check Contact, Favorite, Offer, and Property. You should have the Favorite object from the previous unit, and the Offer and Property objects from the previous challenges.
- Click Auto-Layout.
You'll see something like this:
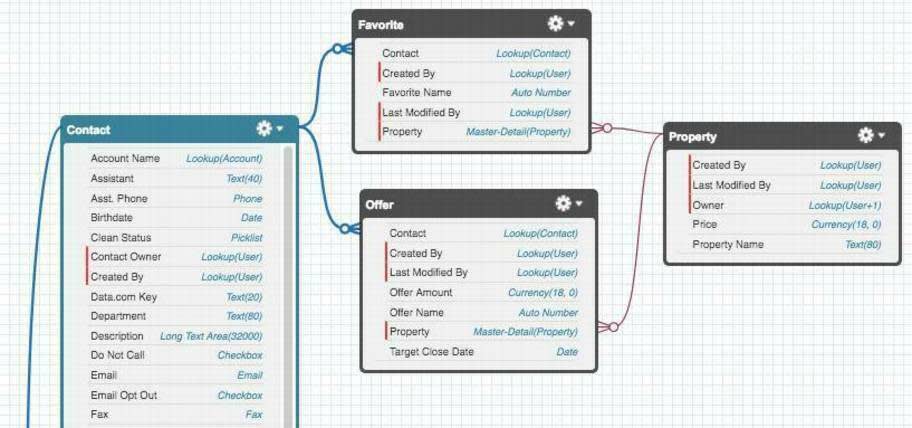
Notice that you can drag these objects around the canvas. This doesn’t change your objects or relationships, but it can help you visualize your data model in a useful way. Schema Builder is a handy tool for introducing your Salesforce customizations to a co-worker or explaining the way data flows throughout your system.

Create an Object with Schema Builder
You can also create objects using Schema Builder. If you prefer, you can create objects in this visual interface if you’re designing your system and want to be able to revise all your customizations on the spot. Here’s how it’s done.
- In the left sidebar, click the Elements tab.
- Click Object and drag it onto the canvas.
- Enter information about your object. You can make it whatever you want!
- Click Save.
Your new object appears in the Schema Builder. That was quick! Next, add some fields.
Create Fields with Schema Builder
Creating fields with Schema Builder is just like creating objects.
- From the Elements tab, choose a field type and drag it onto the object you just created. Notice that you can create relationship fields, formula fields, and normal fields in Schema Builder.
- Fill out the details about your new field.
- Click Save.
Cool! If you go back through Object Manager, you’ll see your new object shows up the same way your Property, Offer, and Favorite objects do.

Sum It Up
We’ve learned a lot in this module. First, you learned about the data model and the database including objects, fields, and records and created some of each for our DreamHouse app. Then you learned about relationships between objects and how you can visualize your data model using Schema Builder.
As you start to dive into more advanced content, you’ll see custom objects and fields everywhere. Before you know it, you’ll be a data modeling pro. Happy building!
Resources
- Salesforce Help: Design Your Own Data Model With Schema Builder
- Salesforce Help: Schema Builder Custom Object Definition