Create a Flow Using External Services Actions
Let’s begin by building a flow that can create new bank accounts, or update existing bank accounts at your fictional bank.
Add the Screen Canvas
A screen canvas allows you to collect input from the user that corresponds to input parameters in your API specification.
- Click the App Launcher (
 ).
).
- In the Search apps and items box, enter
autoand then select Automation.
- In the Flows panel, click New.
- Under Frequently Used, select Screen Flow.
- In the button bar, change the Auto-Layout setting to Free-Form.
- From the toolbox, with the Elements tab selected, drag the Screen element onto the canvas.
- Label:
Bank Account Record - API Name:
Bank_Account_Record
- From the list of Input components, drag two Text components into the Flow Label screen canvas.
- Click to highlight the first Text component
- Label:
Last Name on Account - API Name:
Last_Name_on_Account
- Click the second Text component
- Label:
Bank Account Type - API Name:
Bank_Account_Type
- Click Done.
- Click Save to save the flow and set the flow’s properties.
- Flow Label:
Bank Account Records - Flow API Name:
Bank_Account_Records
- Click Save and ignore any warnings. To return to the toolbox from the Errors and Warnings, deselect

So far, we simply added a screen element to our flow that enables two text inputs. Now it’s time for action.
Add an Action
Action elements, by definition, present and perform invocable actions outside of the flow that were created by External Services when you registered your API spec. Calling one of the actions registered by your external bank service is an example of invoking an action outside of the flow.
You’re interested in the ability to add an account at our fictional bank from within Salesforce. “Wait, don’t I have to be a developer to do that?” Not at all! External Services has done all the heavy-lifting for you. And now, you simply use a tool like Flow Builder or Einstein Bots to hook up the connections.
To continue, add the addAccount action, originally an operation from our API spec, as an action element in your flow. If an existing bank account doesn’t exist, you use the addAccount action to create a new bank account at the bank service. This action takes the two user inputs, calls the bank service via your BankService Named Credential, and looks for an existing bank account with both a matching name and account type.
There are two output values from the addAccount operation in our API spec that you define here as variables.
-
201: A name match was not found. There is presently no bank account. Therefore, a new bank account is created via addAccount.
-
409: An exception that means a name match was found—the bank account already exists—so we don’t create a new one. In this case, a message is returned within the flow along with existing account details. The details are returned so that we know exactly which account triggered the 409 exception.
You define these output values here to make other downstream elements in our flow smarter. OK. Let’s be clear: Italics won’t give you Salesforce superpowers... but completing the rest of this unit and the hands-on challenge will.
- From the toolbox, with the Elements tab selected, drag the Action element onto the canvas.
- Change Filter By to Type, select External Service, and click in the search box.
- Select Add Account.
- Label:
Add Bank Account - API Name:
Add_Bank_Account
- Click in the Account Name field, select Bank Account Record, then select Last_Name_on_Account.
- Click in the Account Type field, select Bank Account Record, then select Bank_Account_Type.
- Select Manually assign variables (advanced).
- Under Store Output Values, click in the 201 field, and select New Resource.
- Resource Type: Variable
- API Name:
account - Data Type: Apex-Defined
- Apex Class: ExternalService__BankService_accountDetails
- Availability Outside the Flow: Select Available for input and Available for output
- Click Done.
- Under Store Output Values, click in the 409 Exception field, and select New Resource.
- Resource Type: Variable
- API Name:
existingAccount - Data Type: Apex-Defined
- Apex Class: ExternalService__BankService_accountDetails
- Availability Outside the Flow: Select Available for input and Available for output
- Click Done and Done.
With so many bank reps signing up new customers, who knows for sure whether an account for Maria Thompson already exists? So, let's add logic for evaluating whether the account already exists or not.
Add a Decision
When the flow executes, if the account doesn’t exist, then our flow is routed through a “create account” path and proceeds to update the new user account via addAccount. If the account already exists (default outcome), it is routed through an “update” path, and we simply update the Salesforce user record with the information from the bank service. This type of evaluation and branching logic is perfect for Flow Builder’s Decision element.
- From the Elements tab in the toolbox, drag Decision onto the canvas.
- At the top of the New Decision window, enter these values.
- Label:
Bank Account Updated? - API Name:
Bank_Account_Updated(Remove the ? at the end of the string for the API_Name)
- In the Outcomes section, notice the two listed outcomes on the left: New Outcome and Default Outcome.
- Make sure that New Outcome is selected, and enter these values into the Outcome Details section.
- Label:
Bank Account Created - API Name:
Bank_Account_Created - For Condition Requirements to Execute Outcome, select All Conditions Are Met (AND).
- For Resource, enter these conditions.
- Resource: existingAccount, and then select Entire Resource.
- Operator: Is Null
- Value: True
- Select Default Outcome and enter:
- Label:
Bank Account Found
- Click Done.
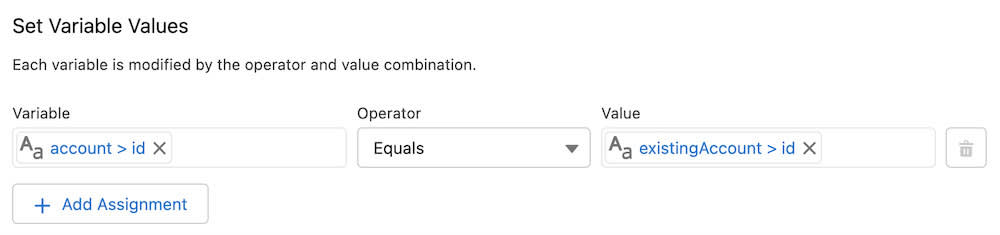
Add an Assignment
In the case where a bank account already exists, let’s tell Flow to update the Salesforce User Account ID field with the Bank account ID. To do this, you need to assign the value to a variable (account.id).
- From the toolbox, drag Assignment onto the canvas.
- In the New Assignment window, enter these values.
- Label:
Assign Existing Bank Account ID - API Name:
Assign_Existing_Bank_Account_ID
- For Set Variable Values, enter these values.
- Variable: Select account then select id
- Operator: Equals
- Value: Select existingAccount then select id
- Click Done and ignore any warnings.
Add the Update Records Element
Let's use the values stored in variables to update our Salesforce user record with the bank account type and the bank account ID.
- From the toolbox, drag the Update Records element onto the canvas.
- In the New Update Records window, enter these values:
- Label:
Update Salesforce User Record - API name:
Update_Salesforce_User_Record
- Select Specify conditions to identify records, and set fields individually
- Under Update Records of This Object Type:
- Object: User
- Under Filter User Records:
- Condition Requirements for record to update: All Conditions Are Met (AND)
- Field: Last Name
- Operator: Equals
- Value: Select Bank Account Record then select Last Name on Account
- Under Set Field Values for the User Records:
- Field: Account ID
- Value: Select account (under Apex-Defined Variables) then select id
- Click + Add Field.
- Field: Account Type
- Value: Bank_Account_Type (under Screen Components)
- Click Done.
Connect the Elements
Almost there! You just need to hook up your flow. Let’s start connecting the elements in the right order by dragging the connector node to the target element so our business process flows successfully at run time. Don’t forget to save it.
- Connect Start to Screen Bank Account Record.
- Connect the Screen Bank Account Record to Action Add Bank Account.
- Connect Action Add Bank Account to Decision Bank Account Updated?
- Align the Decision element on the canvas so you have space for one outgoing connector on each side.
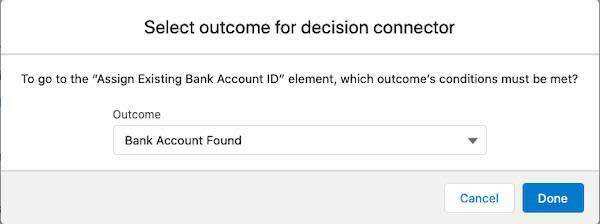
- Connect Decision Bank Account Updated? outcome to Assignment Assign Existing Bank Account ID.
- When prompted, select Bank Account Found for the decision outcome to assign to the path and click Done.
- Connect Assignment Assign Existing Bank Account ID to Update Records Update Salesforce User Record.
- Connect Decision Bank Account Updated? to Update Records Update Salesforce User Record.
- Click Save.
Debug Your Flow
You’re almost done. But before you wrap things up, let’s use debug mode to check your flow.
- Click Debug.
- Select Run the latest version of each flow called by subflow elements.
- Click Run.
- For Last Name on Account, type
Thompsonand for Bank Account Type, enterChecking.
- Click Next.
The flow executes with our inputs.
Under Debug Details, follow the entire flow that you just built.
First, there's your text inputs. Next, under BANKSERVICE.ADDACCOUNT, we can see that the text inputs have been properly assigned and that the the outputs report either an existing account:
{!existingAccount} = 409excand
{!account} = 201 (null)…or that no account was found, and a new one was created:
{!existingAccount} = 409exc (null)and
{!account} = 201The Decision phase confirms the outcome of the decision. The variables were assigned.
And now, under Update Records, the Account Type and Account ID fields in Salesforce have been populated with the new values from the bank web service.
Drum roll, please… Now look at Maria Thompson’s User record in Salesforce.
As the bank representative, you entered the name and account type in Salesforce and our Flow app automatically updated an existing bank account (or created a new one) at the bank service and returned the account ID and the new account type to the Salesforce User record.
You now have a way to track sales activity on bank accounts all from within Salesforce. “No code,” did you say? Yes. All done without writing a single line of code.
Know Your App’s Limits
You also need to know that you can receive an error. For example, if you use “Maria Thompson” for Last Name on Account, you’ll receive an error, because a space is illegal in this field. Likewise, an error can be displayed if you enter a name that is less than six characters, (say, Jones), since this is another limit of our simple application. Here are some of the codes you might see.
Code |
Description for Acme Bank Service |
|---|---|
200 |
System finds an account with a given name |
201 |
Response when the account does not exist and we can create one |
204 |
Response when system finds an account with given name |
400 |
Error response if the account name is less than minimum of six characters or has spaces |
404 |
Error response if the account is not supported by service or not found |
409 |
Response when the account exists and we cannot create one |
Let’s Review
Whew! Nice job! Let’s review how you created a flow using External Services and take a look at the steps you took along the way. Notice that while you had to deal with an OpenAPI-compliant schema definition within your API spec, most of the work is declarative (low to no coding). Nice, eh?

And now the moment you’ve been waiting for… let’s check your work.